In this article we will look at how to build a bath from foam blocks with your own hands. This is the best material of all that can be found on the market today. Various structures are constructed from foam blocks (but not more than 1-2 floors high). In addition, a high level of humidity does not affect the quality of the material. If you correctly apply in practice all the positive qualities of foam blocks, then you will build a reliable and durable bathhouse that will serve you for more than a dozen years.
A little about the features of foam blocks
Let's determine what positive and negative qualities this material has. There are almost no disadvantages, as you know, when building a bath from foam blocks with your own hands. But there are many advantages:
- High strength material. The foam block is very resistant to compression with a force of up to 3.5-5 MPa. Some brands of materials are allowed to be used even in the construction of multi-storey buildings and baths.
- Low density - about 400-1600 kg / cu. m. This indicator directly depends on the brand of material. This is the lowest figure among all building materials that generally exist in nature. This parameter has a minimal effect on strength and wear resistance. Due to their low density, foam blocks are much easier to transport and store. In addition, the speed of construction increases, since a special tool is not required for this. And one person is quite able to cope with lifting the foam block to any height.
- Low thermal conductivity, almost the same as wood. And the figure is three times better than clay brick. When building a bath from foam blocks with your own hands, you will get many advantages, the main one of them - the structure holds heat well.
- A high degree of sound insulation - through the walls made of foam blocks, extraneous sounds are almost not transmitted. The material has a lot of pores that muffle all possible sounds.
- High degree of moisture resistance - this indicator is extremely important in the construction of baths. Subject to GOST during the manufacture of the blocks, so tight pores are obtained that the material can lie in the water for more than a week without changes.
- Frost resistance is also one of the positive parameters of the material. The foam block does not change its properties over a wide range of temperatures.
- From the point of view of fire safety, the fire resistance of the material is quite high. Blocks do not ignite even after prolonged exposure to fire. Able to withstand the effects of fire for a long period of time - about 8 hours.
- The structure of the foam blocks is homogeneous, despite the fact that it has a large number of pores. All of these air-filled bubbles are nearly the same size. Therefore, at work, it is allowed to use any methods of processing materials - shredding, sawing, chopping.
Knowing the main features and advantages of the blocks, you can begin construction. You can not rush to purchase material, since first you will have to do a lot of preparatory work.
Equipping the foundation
Well, are we building a bathhouse with our own hands from foam blocks? If so, where without reliable support? During the construction of foam block baths, any type of foundation is allowed. The construction can be located on any ground. The only thing that needs to be done in advance is to level the site for construction. This is done in this way:
- Measure the slope of the surface of the plot. To do this, install rods (wooden or metal) along the edges of the finished trench, a step of about 1 m.
- Pull the rope between the rods and check its horizontal position. That is how we build a bathhouse with our own hands from foam blocks.
- If necessary, then change the level, digging a trench more in the place where the slope is stronger.
If the difference is not very big, then you can do nothing. This will allow water to drain faster. But it is also impossible for the slope to be too large.
Pay attention to the quality of the soil. If it is possible to choose a site, it is recommended to build a bathhouse where the soil is more dense. First, all debris is removed from the surface and turf is removed (fertile layer of land with plant roots). Remove all organic impurities. In the event that the soil is stony, you will have to remove all the large protruding components. Next, we will give a more detailed description of the phased construction of a bath from foam blocks with their own hands.
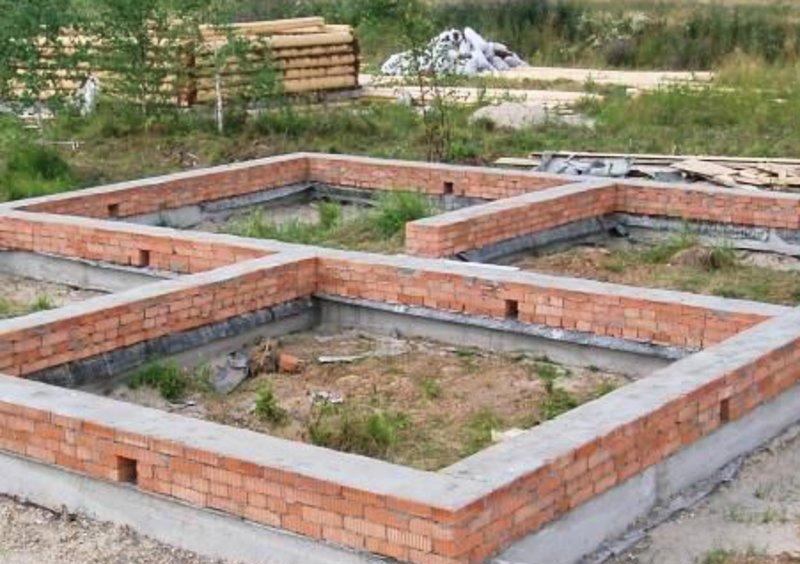
If you removed too much soil, you can compensate for the height by filling up the cleared earth. The complete elimination of all extraneous elements must be done so that organic decay does not occur near the foundation. Most often, they build a strip foundation for foam block baths. This is a simple and cheap design that can be implemented in just one day. The most optimal option is a shallow foundation, it is able to withstand relatively moderate loads of light construction. Particular attention should be paid to building the foundation, how long the bathhouse will serve you faithfully for its quality and evenness.
Make a trench
The strength of the foam blocks is quite high, but still the structure is more reliable, the better the support (foundation). The presence of distortions or cracking is unacceptable, because because of this the walls will change shape, their integrity will be violated. It is necessary to dig a trench so that the depth of the foundation is sufficient to support the mass of the entire structure. Next, we will consider the phased construction of the bath from foam blocks with our own hands.
Separately, it is necessary to consider the height of the sand cushion and the insulating layer. As a rule, during the construction of baths, it is necessary to dig a trench with a depth of 0.5-1 m. As for the width, 30 cm is enough. But it is recommended to pay attention to the size of the foam blocks - the width of the trench depends on them (it should be slightly larger). Observing this condition, you will be able to freely lay all the necessary waterproofing layers.
To solve the question of how deep the foundation should lie, you need to focus on the following indicators:
- Dimensions and mass of the structure.
- Soil quality.
You were just lucky if you had once done exploration. Then you will definitely know what soil is on your site. If the soil is weak (for example, clayey), then the depth should be as large as possible. In the event that the soil is dense and reliable, it is allowed to make a small foundation. It should also take into account the degree of heaving of soils, the proximity of groundwater. All this is taken into account when preparing the design of the foam block bath. With your own hands, you can make it from scratch or you can take it ready.
You can find out the degree of soil heaving in construction organizations or conduct geological surveys. Inspect neighboring buildings, find out what type of foundation they used in the construction. If cracks are visible on the buildings of the neighbors, it is better to give preference to heavily buried foundations.
Arrangement of sewage in the bath
Let's look at the easiest way to prepare a sewer in a bathhouse. In advance, you need to equip the pit and make a drain. You can connect the sewer to both the central system and your septic tank. Pipes are installed inside the building under a slight slope. It turns out that all communications will be in the underground space. The pit should be located as far as possible from the building - this is the only thing that will need to be taken into account when manufacturing the sewer system.
Foundation Step-by-Step Guide
In advance, you need to prepare a draft of the bath from foam blocks. With your own hands you can make a drawing, designate all sizes. And build according to the drawing. Now let's look at how to make your own foundation. You already know the basics, now you need to describe all the steps in more detail:
- At the bottom of the dug trench, gravel or sand is poured. The layer thickness should be no more than 30 cm. The material must be rammed, watered. Some builders recommend using pre-moistened sand.
- Fix the formwork at the edges, its thickness should not be more than 20 cm. It is best if it is less than 10 cm. It will help protect the concrete mortar from spreading. As a formwork it is allowed to use wood, sheet metal. Even fixed formwork can be installed. The removable formwork is attached to the supporting posts and connected with self-tapping screws (sometimes with ordinary nails).
- Now you need to make reinforcement. This is done using a special grid. At the bottom of the trench are placed "high chairs" for reinforcement. It can even be pieces of brick, the main thing is to place the grid at an equal distance from the bottom. Then the vertical rods are installed, horizontal ones are attached to them. Installation is best done not by welding, but using a special wire.
- Make a mixture for pouring. When building a bath from foam blocks with your own hands, it is important to observe all proportions. It includes components such as crushed stone, sand, cement. Proportion 5: 3: 1. As soon as you bring the concrete to a liquid state, immediately pour it into the trench. If you delay a little, the solution will harden and you will not make anything out of it. Be sure to get rid of air bubbles - pierce it with a shovel, a rod or use a deep vibrator.
The last step is to wait. The base must harden, and this requires at least 3 weeks. In rainy and windy weather, it is necessary to wrap the entire foundation with waterproofing. If you suddenly threaten to hit frosts, then insulation will not hurt. After final hardening, it is necessary to lay 2-3 layers of waterproofing (roofing material) on top of the foundation. It will protect the walls from moisture.
What you need for laying walls
When carrying out the construction of buildings from a material such as foam blocks, you will spend a fairly small amount of time and effort. In fact, if you don’t rush anywhere, then only one person can do all the work. Blocks are placed on the wall in the same way as bricks. One difference - the foam block has large dimensions, so the work goes much faster. When building a bath from foam blocks with your own hands, you need the presence of such tools:
- Hammer, pickaxe.
- Trowel.
- The rule.
- Cord mooring.
- Construction level.
- Shovel for mortar.
- Plumb lines.
- Stitching.
All work, of course, is much more convenient to carry out with a concrete mixer. Therefore, if there is an opportunity to buy cheaply or ask friends for it, do not miss the chance.
Walkthrough: building a bath
And now let's talk in more detail about how to build a sauna on your own.
We considered the stage of manufacturing the foundation, now you can begin the construction of walls and other elements:
- Prepare the foundation for a foam block bath. It is quite simple to do it with our own hands, we examined it a little higher. You check the horizontal and vertical surfaces with a building level. If they are curves, there are slopes, then all errors must be leveled with a special solution. Of course, immediately after applying a layer of mortar, construction can not begin, you need to wait a few days. Look at the photo of the foam block bath, with your own hands such structures are erected in just a couple of days.
- It is necessary to pay attention to the first row of blocks. It must be isolated from the foundation. Earlier we mentioned that it is necessary to lay 2-3 layers of roofing material. Such material as bikrost also shows itself well. Protrusions and gaps are not allowed. It is recommended to use only such material that will protrude beyond the edges of the foundation.
- Next, a solution of cement and sand is applied to the waterproofing layer, which, in fact, is the fastening of the blocks. Only sand-cement mix should be used. No other compounds are suitable for laying the first row on the foundation under a foam block bath. Do it yourself with your own hands, make sure that the walls are horizontal and vertical. First, the corners are laid. Make sure that the blocks are installed evenly. Check for symmetry, as this is an important parameter when laying walls. From the corners you need to gradually move towards the center. Before applying the solution, a small amount of water is sprayed onto the blocks - this will significantly improve the adhesion to waterproofing. If you need to lay the trimmed block, then its two sides are wetted with water, then a solution is applied to them. And the installation is made in the gap between the blocks.
Moving on: what is needed during construction?
We continue our leadership. The foundation is prepared, and now you only need to build walls. Always consider all the little things when building a house or a bath from foam blocks with your own hands. Step-by-step instructions include such manipulations:
- During the construction of the steam room, it is recommended to use the foam block brand M-25. They need to be placed on the edge. Try to reduce the thickness of the seams, dock as tight as possible. But you can not save on solution. Wash all smudges on time. Irregularities and blemishes are best removed immediately. Otherwise, you will have to constantly adjust the position of subsequent rows. If you find a block with marriage during construction, put it aside. It is possible that one or several good pieces will be cut out of it, which will come in handy when laying the next rows. As you can see, making a bath from a foam block with your own hands is not so difficult.
- When laying the second row, a small shift is made - usually up to 50% of the length of the block. It is recommended to coordinate the width so that they can fit into the overall structure of the structure. A solution of sand and cement should be used only when laying the first row, then you can use glue. It is allowed to use glue not only for foam blocks, but also for any porous materials (of course, if there are no restrictions, so read the instructions carefully). The layer thickness should be about 5 mm. It is not necessary to wait for the glue to dry. The main thing - do not subject the walls to heavy loads when laying subsequent rows.
- As for the laying of openings, here, too, several features should be highlighted. If you have a gap left empty, then cut some block with a defect and put a piece. It is recommended, of course, to ensure that the size of an incomplete element is half that of a full one.
- Be sure to check the horizontality using the level after laying the first and other rows. If you notice slight irregularities, then use a mallet - tap with its help on the parts that protrude. The smoother the walls, the more reliable the entire structure will be.
The final stage of masonry
So you almost erected the walls. Let's see how to complete their construction and put a full stop:
- The second and next rows should be laid on a solution or glue. Both are allowed. When using glue, it is necessary to make a row, then dressing (maximum 12 cm). The dressing should capture at least half the height of the block. The thickness of the adhesive layer is not more than 3 mm. First, it must be applied to the vertical joint, then to the horizontal seam. Glue is applied using a spatula with teeth. Be sure to monitor the level of filling the joints. To ensure good quality, you need to remove all bumps in a timely manner. If it is necessary to significantly reduce the heat loss of a building, the masonry should be done in two rows. In this case, all vertical seams overlap. But this will significantly increase the cost of the foam block bath. With your own hands, if you decide to build it, then you probably do not want to throw extra money out. Therefore, it is better to make insulation after construction.
- To simplify the masonry process, you can do the ordering. As a material for this, you can use anything, but it is better to use wooden slats. It should have a cross section of 50x50 mm, a length of about 2 m. It is also allowed to use a corner made of metal measuring 60x60x5 mm.
- In order to avoid the appearance of cracks, in the future it is necessary to make reinforcement. To do this, grooves are made in the body of the unit, which must be filled with a solution (this will prevent corrosion). Elements of metal need to be pressed.
When all the walls are ready, leave them for a week to dry the glue and mortar. , . , .
: ?
. . , , ? – , . , -. , :
- . .
- .
- , .
, 50-60 . 0,5 . . .
To make the connection of the rafters, brackets are used. The bars are 1-1.2 m apart. Good performance is guaranteed if high-quality material is used to make the system. But there should be no errors during installation. It is recommended to use wood of durable and hard breeds. And be sure to thoroughly process with various protective equipment. Pay attention to the quality of the timber - it should not have a lot of defects, knots, cavities with resin.
Once you complete the installation of the roof frame, you can proceed to the crate. They make it, as a rule, from a thin board. Therefore, keep an eye on the uniformity, integrity and quality of the material. Make sure all boards are smooth. If there are notches, knots, then clean. When using ondulin or ruberoid, make a continuous crate. The thickness of the boards should be at least 20 mm. Be sure to install the heat insulator and waterproofing layer. Often use mineral wool, which is covered with plastic wrap. To increase reliability, it is necessary to lay a heat insulator clearly at the joints.
Wall insulation
Be sure to make insulation before finishing. In this case, the materials are laid on the walls and ceiling. The floors of the bath will be examined later. If you use mineral wool, then be sure to do waterproofing. The easiest way is to lay aluminum foil in front and behind the insulation.
In addition, the bath is also insulated from the outside. If you plan to sheathe a bath with plastic panels, it is best to use mineral wool. If there is a desire to cover with a layer of decorative plaster, then it is best to use plate versions of insulation - polystyrene or more expensive polystyrene.
A little about the floor of the bath
Before you start decorating the bath from foam blocks with your own hands, you need to prepare the floors. The floor covering for the bath is ceramic tile or polished board. This is the best option. To keep the hot air inside the steam room, you need to raise the floor by 10-20 cm. If you decide to use a wooden board, then first do the installation of the lag. Only then can a finishing coat be applied. When installing the tiles, it is recommended to make a concrete screed. Only then can tile be laid on it. Prepare the tile mix and grout in advance.
The option of finishing the steam bath
When decorating a steam room, only species of deciduous trees should be used - conifers cannot be used, since they have a large number of resins. First you need to make a frame from a beam of 50x50 mm, a step of 0.5 m. The wood panels are fixed directly to the frame. Mounting of blocks is allowed both horizontally and vertically. In some cases, it is allowed to use diagonal inserts. This is done for the most part in order to make an attractive pattern. Thus, it is possible to do the finishing of the bath from foam blocks inside with your own hands.
To fix the elements of wood, it is allowed to use only bronze or copper nails. Iron can not be used, since they rust quite quickly. But you can go for a trick, dip iron nails for several hours in a solution of ferric chloride. Together with the nails you need to put a piece of copper in the solution. As a result, the nails will be covered with a layer of copper, which will protect the iron from moisture.
In this article, you examined the step-by-step construction of a bath from foam blocks with your own hands. You can get to work, but remember that construction will take a lot of money - materials are quite expensive today.