Any construction takes a lot of time and effort. Especially if the construction is done by yourself. You need to know a lot: to understand the principles of building an object, the properties of materials, methods of connecting structures. Not only knowledge, but also experience is needed. Experienced builders work quickly and efficiently, can distinguish quality material from cheap fakes, have all the necessary skills for joining and connecting structures. Beginners in the construction are deprived of all this. All that remains for them is to collect information and learn from their own mistakes. This article will talk about what are cranial bars, as the people call the support beam, what they serve for and how to mount them on the beam.
Appointment of support bars
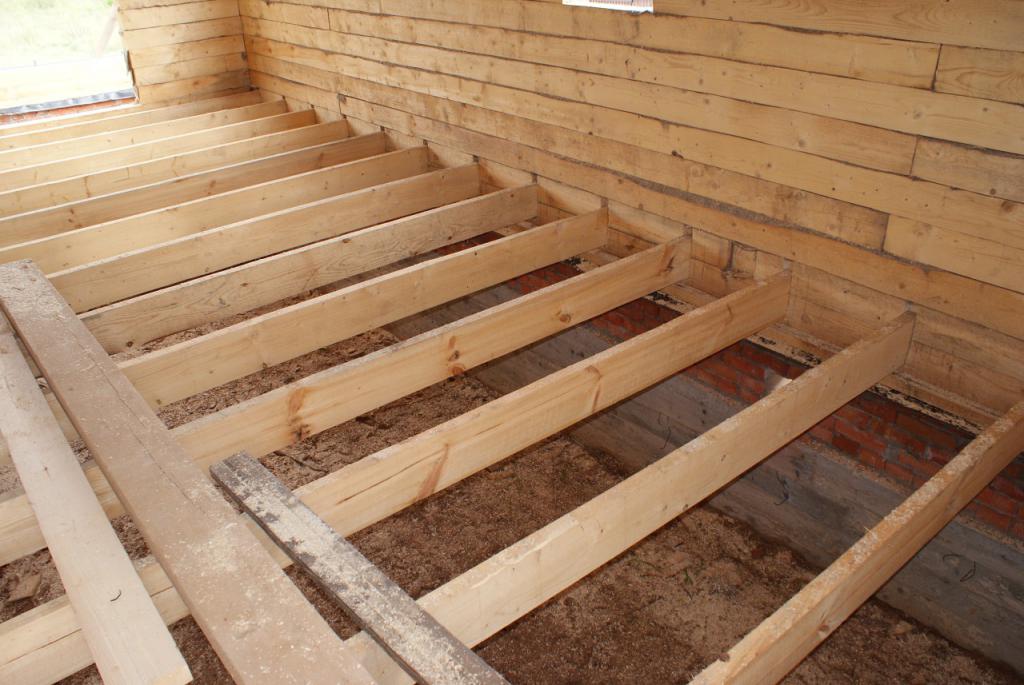
The supporting bars are used for attaching floor boards, ceilings or rafters. In the old days, when not a beam was used for beams, but a whole log, the skull was chosen by the master with the help of an ax and tesla. Now some builders also use logs for logs to save money, but they cut the skull with a chainsaw, and then choose an ax or a chisel. Recently, a beam has been used for the log of the floor or ceiling, and cranial bars are stuffed onto it to fix the ceiling. This is due to the fact that ordinary log houses are now a rarity, and the round timber is almost no longer sold, and at construction bases timber of different sections is always available.
Installation methods for the subfloor
Beams with skull bars are mainly used for flooring subfloors. It, in turn, serves to warm the ceiling. As a subfloor , OSB boards or sheets can be used. They are laid on the bars, and a heater lays on top. All beams, bars and boards must be treated with an antiseptic from a bug and mold. Sometimes a cranial block is used for additional fastening of the beams themselves. In this case, they are stuffed around the perimeter of the lower harness, and the beams lie on them. Bars for the rough floor can be fixed across the beams by nailing them from the bottom.
Installation methods of rafter systems
For the installation of the rafter system , a cranial bar is also used. What is it for? It simplifies the installation of rafters, especially complex ones - hip or yand roofs, where cross-joints and different rafter lengths are required. To evenly distribute the load on the main supporting rafters, the bars are used as additional supports.
Installation is carried out as follows. Raised rafters are installed on the hip ridge. To them fasteners fasten with long self-tapping screws or nails. But for good strength, it is necessary to nail the cranial bar between the spouts on both sides, so that with its ends it will spread the sprigs along the entire length of the rafters. This will help to evenly distribute the load across all rafters and increase the strength of the entire structure. The bar must be sawed at an appropriate angle with a hacksaw or a miter saw. In the same way, rafter racks can be strengthened.
Skull block for ceiling mounting
To fix the ceiling, the bars can be used in two ways, as is the case with the floor. The first is to nail the bars along with the butt of the beam. In this case, the draft floor of the second floor or the attic is laid on top of the bars, and the ceiling lathing is attached from below across the beams, and the final version of the ceiling is already mounted on the lathing. In the second version, the bars are sewn from below across the beams, and the crate is attached directly to them. In either case, you can use ready-made beams with two cranial bars. Subsequently, vapor barrier and a layer of insulation are laid between the beams of the second floor.
How to fix a bar to a beam: expert advice
You can fasten the bars to the beam with nails or self-tapping screws. Their length is selected depending on the thickness of the bar. The thicker it is, the longer the nail. Mounting is allowed from two sides: from the side of the bar or from the side of the beam. You can nail by alternating both methods. It is important to maintain an even plane so that the ends of the bar are on a par with the beam.
You need to fasten the bar through the same segments, visually dividing the distance between its ends. If you use nails, pay attention to the hammer. To avoid injury, the tool is chosen with a non-slip handle and a flat, flat striker. If the hammer is beaten, then the hammer can slide off the nail head, thereby injuring the hand. Cranial beams choose straight, with a planed surface. It is necessary to hammer a nail up to the hat itself, making two or three control strokes for a more dense mating of surfaces.
For fastening the bar with screws, a screwdriver with a bat is used. Self-tapping screws are used with a wide thread pitch and a protective coating. Upon contact with an aggressive environment, oxidized self-tapping screws rust quickly, therefore, in order to fix rough floors, the cranial block must be screwed onto yellow or white self-tapping screws. When twisting, it is important to pay attention to the state of the bit. Its faces should be intact, if the faces are erased, then the bit will slip through the head of the self-tapping screw, not ensuring tight contact between the surfaces. On the ratchet of a screwdriver, it is necessary to select a value at which the most dense contact of the surfaces is ensured.
Sizes of support bars
The most important drawback when using support bars is a decrease in the usable volume for the insulation. The larger the bar, the less insulation can be put.
The standard dimensions of the cranial bar are 50 x 50 mm. Some masters, in order to increase the volume for the insulation, use dimensions of 40 x 50 mm or even 20 x 40 mm. But such savings can come sideways. Smaller timber thickness has a reduced coefficient of reliability of such fastening. In order to use the narrow bars, you need to reduce the distance between the beams. So, in the calculations you will have to add one or two beams. This is not very economical, since the cranial beam is much cheaper than a thick beam. It is best to adhere to standard sizes designed for heavy loads.
Finally
Building a house is always a crucial test for the owner. Knowing what cranial bars are and how to install them is just one of the things that a craftsman needs to remember. In fact, there are many stages of construction, from the correct filling of the foundation to the fastening of the ridge. But if you have already managed to build a house under the roof, this does not mean that you can immediately move there to live.
Interior decoration can be more expensive than the frame itself. The house needs to be insulated, sheathed or plastered the walls, made heating, equip the sewer, to conduct water supply, gas. After the construction of the house is completed, a thousand more unfinished business will remain: garbage collection, land improvement, construction of a bathhouse, utility rooms. But even when everything is completed, a quiet life is not guaranteed. There will always be things in your home that will require further intervention.