Believe or not believe in God, each person must decide for himself. However, no matter what the answer is, baptizing children at the present time is a fairly popular and even fashionable procedure. Moreover, not all parents understand the meaning of this sacrament. But they strive to do everything so that it passes on the highest level. Many even prepare their own baptismal shirt for the boy. Therefore, the material presented below describes in detail how to sew this important thing with your own hands.
The stage preceding the work
In order for nothing to interfere with the creative process, it is important to carry out competent preparation. In this case, you need to assemble the following set of tools:
- special pins to secure the material and prevent pattern distortion;
- convenient scissors for cutting;
- chalk for drawing patterns;
- a centimeter tape to measure the parameters of the baby;
- pattern and a long ruler - transfer the taken measurements to the fabric;
- sewing needle with threads - make a shirt;
- sewing machine - stitch the product.
The tools needed to complete the baptismal shirt for the boy should be placed at hand. So that at any time they can be used.
Material selection
Experienced craftsmen recommend paying special attention to the choice of fabric, which we will use to build patterns, patterns and tailoring of the studied product. Most novice craftsmen prefer linen, some even work with silk or satin. Although both professional seamstresses and church ministers agree that cotton is the most suitable material for sewing a baptismal shirt for a boy, as well as a baptismal dress for a girl. The most common white cotton. However, this does not mean at all that the finished product will turn out to be too simple and ordinary. With a creative approach, it will be possible to transform it into a true masterpiece. More about this later.
Features of taking measurements
Experienced needlewomen are convinced that even novice craftsmen can build a pattern for a boy’s baptismal shirt with their own hands. But in order not to make a mistake with the size of the product, it is important to correctly measure the baby. For this we need a centimeter tape. You should also prepare a pencil and notebook for recording all the parameters. To facilitate the work and not get confused in the measurements taken, it is better to draw (at least schematically) the desired product. In this case, a baptismal shirt. And then directly indicate all the parameters on it. Then to build a pattern will be much easier and faster.
So, to translate ideas into reality, you need to measure:
- The estimated length of the baptismal shirt for the boy is traditionally from the shoulder to the base of the lower leg. In rare cases, they sew a shirt that reaches just to the knees.
- Chest girth - approximately at the level of the armpits.
- Girth of the neck - at the base through the seventh vertebra.
- The length of the sleeves is most often from the shoulder to the elbow. But also there are variants of the studied products - both with sleeves to the wrist, and to the middle of the forearm.
Duration of work
It is difficult for novice masters to understand how to build a pattern for a baptismal shirt for a boy. Therefore, most of them suffer for a very long time on the implementation of their ideas. But experienced needlewomen are convinced that with a competent approach, work will take no more than one day. At the same time, a large part of it will be taken by the design of the conceived product with various details - ruffles, lace, bows, embroidery, appliques and other decor. It will be possible to carry out cutting very quickly if you prepare the material. The essence of this procedure is described below.
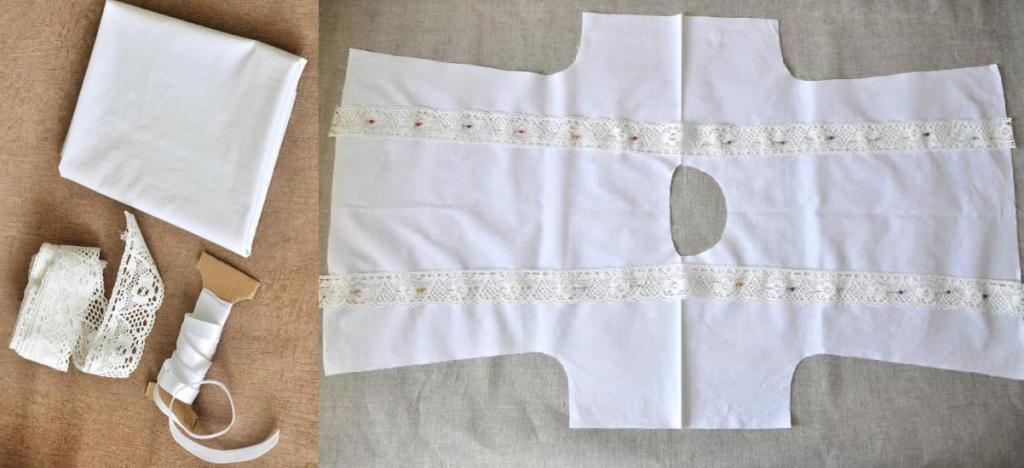
Preparatory stage
In order not to make a mistake with the size of the fabric when buying, it is important to take measurements with the baby in advance. We need a rectangle, the length of which is two shirt lengths, and the width is equal to the sum of the following parameters: two sleeve lengths + half chest circumference. Masters advise working with a well-steamed and ironed piece of fabric. Therefore, after the purchase, we first perform the indicated actions. After we spread the material on a flat table or smooth floor - parquet, laminate, linoleum. Not on a carpet or a palace, it’s very inconvenient to work on them! Fold a large rectangle in half so that the fold line is at the top. Then we pass through it with a hot iron to fix it. Fold in half a smaller rectangle and also iron it well. After we fasten it with pins on all four sides. This is necessary so that the material does not move when building the pattern of the baptismal shirt for the boy with his own hands.
Modeling a baptismal shirt
At the next stage, you need to take chalk, a pattern, a long ruler and a sheet with the parameters of the baby. Then we proceed to the construction of the pattern. Since the length and width of the prepared section are already equal to the required product, we need to add only two lines. From the bend line we set aside half of the neck girth + 2 cm. Using the curve or by hand, we outline the goal line. On the other hand, we lower by 15 cm. And draw a straight line equal to the length of the sleeve, thereby outlining this detail.
A little lower from the fold line, we lay aside half the chest circumference + an additional 7-10 cm to make the shirt loose. With a rounded line we connect the sleeve and the notch, which determines the width of the shirt in the chest area. Now at the bottom edge we make another notch. Its distance from the fold line is adjustable independently. However, experienced craftsmen do not recommend placing it too far, because we sew a shirt for a boy, not a dress for a girl.
Traditionally, the edge coincides with the point at the base of the sleeve. Having determined the important nuance of the pattern, we connect the armhole line with the marked notch. Then we cut out the finished product. If desired, lower the goal line a little lower in front, or leave it that way. That’s the whole peculiarity of building a pattern for a baptismal shirt for a boy. We offer a photo of the pattern and the finished result below.
Decoration of the shirt with decorative elements
Professional seamstresses advise novice craftsmen to sew on lace, appliqués and so on first, and only then proceed to assemble the product. So now we need to deploy a cut shirt. And attach to it with pins various decorative elements. The studied wardrobe item shown in the photo below is decorated with lace. Which must be attached with pins from the lower edge of the back to the shoulder bend, and from it to the lower edge of the front. And to do the same manipulations, but if necessary, arrange the lace mirrored, on the other hand. Then check how symmetrical everything turned out. So that a possible error can be corrected. If all is well, sew the lace in a zigzag seam. Each tape on both sides. Then we turn the product inside out and carefully cut the insert between the seams with nail scissors. At the same time, we try to place the scissors as close to the seam as possible, but not to damage it. Having completed the described manipulations, we carefully iron the shirt.
Sew the product at the side seams
We are used to the fact that most products must be turned inside out and stitched. However, experienced needlewomen, talking about how to sew a baptismal shirt for a boy, note that in this case the actions will be slightly different. Let's try to find out what the difference is. To begin with, the shirt must be fastened with pins at the side seams. Then stitch on a typewriter, but move the seam one and a half to two centimeters from the edge. Turn the shirt over with the front part down and with the help of nail scissors carefully cut off part of the seam allowances. But only from the back! Then we wrap wide allowances, smooth, and then bait, hiding the slice inward. After that, we sew the edge on the typewriter, placing the needle as close to the bend as possible. After this, we carefully iron the seams from the wrong side.
Gate design
Now we find the center of the gate and make a vertical incision 10 cm long. And from it 5 mm notches in both directions. We take a satin ribbon or a slanting inlay located along the edge, carefully bait and flash it on a typewriter.
We take the second ribbon, equal to the circumference of the neck + 20-30 cm. Sew along the goal line, hiding the ends of the bottom. Then we knit on a bow. In conclusion, we complement the lower edge of the finished shirt with lace. Then once again, carefully boil the entire product. And finish the job.
That's the whole point of the job. As you can see, anyone can build a pattern, cut and sew a baptismal shirt for a boy with his own hands. The main thing is not to be afraid to try and follow the tips suggested in the article.