Even at a very young age, girls are given jewelry. Yes, they are made of plastic and decorated with colored pebbles. But for girls, they are of great value. Growing up, girls continue to collect all sorts of trinkets, but now jewelry. All this heap of multi-colored beads and various rings needs to be stored somewhere. You can make a jewelry box with your own hands . Look for ideas and tips below.
Cloth Decor
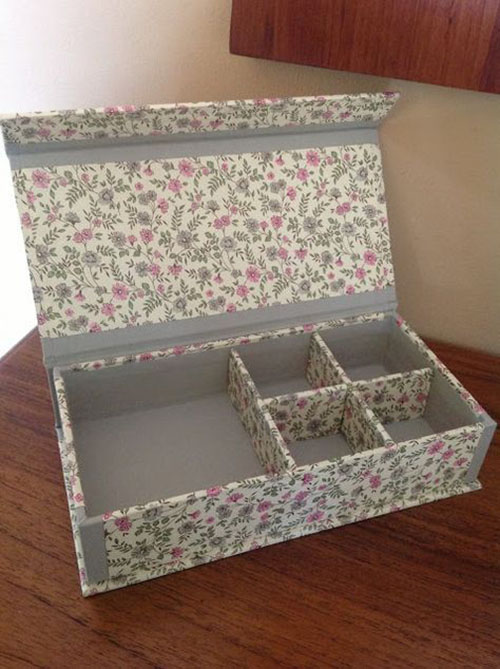
Jewelry box should look presentable. No one in their right mind will store gold items in a shoe box. After all, opening a small box, which is neatly divided into sections, is much more pleasant than rummaging through a cardboard falling apart. How to make a jewelry box with your own hands? To make it, you will need a cardboard box. The one that was given to you complete with shoes is quite suitable. Find a beautiful piece of fabric in a small flower or polka dots. It is advisable to take a thick cloth so that the box does not shine from under it. To decorate the inside of the box, you need to take something less easily soiled, for example gray material. It is advisable not to use smooth fabrics. They will quickly lose their presentable appearance, as clues will appear on them. Wrap the box on the outside with a floral fabric and make a gray coating on the inside. The corners of the box, as well as the stiffeners, also need to be upholstered with gray material. Make partitions from cardboard. Make 4 small compartments. Cover the partitions with a floral fabric. You made your own jewelry box. Its cover can be decorated with flowers made of fabric or metal fittings.
Lace decor
Do-it-yourself jewelry box can be decorated not only with fabric. As a decor, you can use lace and large beads. Such a product will turn out to be incredibly gentle and feminine, which means it will definitely take pride of place on the dressing table. To make the box you will need a small cardboard box. She will become the basis. Take a spray can with silver and white paint. The lid must be painted metallic, and the base should be given a white tint. Wait for the paint to dry. In the meantime, you can search for hardware. Find a cut of wide lace and large white pearl beads. The guipure strip should be glued along the center line of the cover. But the edges of the lid should be decorated with beads. Select the central part of the box and decorate the side of the base with a satin ribbon. You can tie a bow or put a ribbon around the perimeter of the box.
Casket house
Such a craft will appeal to both the girl and the little girl. DIY jewelry box will be made of cardboard. You need to draw and then cut out three square walls. Now glue them together and build a floor. The floor detail will need to be duplicated twice. One of the blanks will become partitions between the drawers of the box, and the second - the ceiling. Fix this cardboard in the middle of the resulting cube. Cut two triangles - pediments and strengthen them in the appropriate places. It remains to make a roof. Cut a rectangle and bend it in half. On the pediments you need to attach a wooden rail. Glue the roof to this rail along the center line of the fold. We make boxes and set them in the space left for them. We cover the house with cloth or paint it with paints. As handles on the boxes you need to glue large beads.
Applique
How to make a jewelry box with your own hands? You can take a small cardboard box and decorate it. If your workpiece is perfectly white, fine, but if not, then you need to paint it from a spray can. After that, you can begin to manufacture the casket. Print a stencil of a simple ornament for yourself and make a slot according to the drawing. Now attach the blank to the side of the base of the future box and paint over the slots with acrylic. Similarly, you need to decorate all the walls of the box. The box cover will need to be painted. You can draw something like a boudoir there: a tiled floor, mirrors on the wall, a hanger and the top of the dress. But frills will need to be made of fabric. Cut a strip and collect it in ruffles. Glue the resulting frills, and decorate the junction with rhinestones or beads. A strip of fabric glued to the side of the box will help maintain the application. You can decorate it with an air bow.
Painting
Do you draw well? Then you should not have a question how to make a jewelry box with your own hands. Paint the wood blank. You do not have to make the foundation yourself. It can be purchased at any needlework store. The lower part of the wooden box for jewelry with your own hands will need to be decorated. Glue two strips of printed fabric around the perimeter. The joint between the materials will be easy to hide with a lace cut. The product cover will need to be painted. Prime the surface. On paper, you first need to draw a sketch. Now transfer the pattern to the cover. You will need to colorize the image in layers. Start applying the lightest shades first, and then apply dark colors. Be sure to dry each coat of paint well. The finished image must be varnished. You can use beads as a decoration for the rib rib.
Embossed cover
Interestingly, you can decorate a simple cardboard box with your own hands. A jewelry box from such a base will turn out unusual if you use non-standard decor techniques. To work, you need to purchase a modular paste. Apply it in a thick layer on the box lid. Now use the spatula to unevenly distribute the coating on the lid. If the desired effect is not obtained, you can use a plastic bag to create a more pronounced relief. Apply the paste in a thick layer, and then blot each part of the workpiece with a crumpled bag. Similarly, you need to decorate only one of the parts of the box, such as a lid. The lower part must be painted in a contrasting color. The product will look advantageous due to the difference in smooth and embossed texture.
Casket with a bas-relief
Such a product will be manufactured in the same manner as described above. But the difference will still be. In the previous version, an abstract relief had to be made on the cardboard box for jewelry from do-it-yourselfers. This time you should create an ornament. Before you start, you need to make a stencil. Print the image and cut out the holes in it according to the picture. Use adhesive tape to stick the stencil onto a pre-stained and primed box. Apply a thick layer of modular paste to the paper and wait for it to set. Now carefully peel off the stencil so that the convex pattern does not suffer. In the same way you need to decorate all the walls of the box. If you want to paint the bas-relief, you can use acrylic or crushed pastels. The varnish will help to fix the paint.
Decoupage
Have you been presented with tea in a metal box? Do you like the shape of the container, but the pattern on it leaves much to be desired? Based on this box, you can create a jewelry box with your own hands. Before starting work, it will be necessary to degrease the metal. Now prime the container. If necessary, give the product the desired shade. Take beautiful napkins and divide them into layers. From the first layer you will need to cut out the picture. Glue the cut flowers and birds to the base with PVA glue. The same glue will need to cover the napkin on top. You can create a beautiful picture by alternating between different images. For example, in the following sequence: birds, butterflies, flowers. But the lid needs to be decorated with all those images that were used to decorate the sidewalls of the box. The edges of the lid can be painted in a contrasting color product.
Flower decor
What do you keep your jewelry in? Beautiful jewelry deserves only the best. For example, boxes that look like a cake. Such a jewelry box is made of fabric from the hands. As a basis, you can take an existing box or add a container of cardboard yourself. Then you will need to tighten the base fabric. For this purpose, you need to use something embossed, such as velvet or leather. When the preparatory work is completed, you can proceed to the decor. We will decorate the box with flowers. If you have artificial flowers in your stock, use them. If there are no such blanks, then you can independently make them from tapes or from fabric. Small flowers should be located on the edge of the lid, as well as encircling the bottom of the base. Large buds are placed on the lid. You should not use more than three shades, otherwise the product will lose part of its charm, becoming too colorful.
Eggshell decor
You can see the photo of the box decorated with your own hands with the help of the shell above. This unusual way of decoration looks advantageous on any surface. Similarly, you can decorate any metal, plastic and wooden container. To make such a decor, you will need to collect raw egg shells for some time. It must be washed and cleaned from the film. And you need to do this right away so that the egg does not have time to dry. When the material is collected, it should be crushed. But do not make the fragments too small. Degrease the surface of the container, and then glue the eggshell. Lay the elements close together so that there are no large gaps between the parts. When the product dries, it can be painted over. You can make the texture metallic, bright or monochrome. The finished product will need to be varnished.
Button decor
Do you think the box can only be made from a cardboard box? Nothing like this. For the manufacture of a beautiful product, you can even use plastic containers. Take a small can with a well-fitting lid. It is advisable to choose an interesting container in shape. Remove all labels with alcohol and then degrease the surface. Take the buttons of different sizes and in a chaotic manner stick them on the jar. You can successfully combine large round circles with small ones, buttons on the leg and without it. All kinds of unnecessary coins and other trifles are also suitable.
If you still have toys from Kinder Surprise, you can also put them into consumption. But do not mix everything on one product. If you decorate the box with buttons, then the maximum that you can use here is thread. If you have chosen coins, then do not fasten all kinds of flowers. Eclecticism rarely looks beautiful. When the can is completely pasted over, we take a spray can with metal paint and paint over the product. If you want to make something colorful, you can rub finely chopped pastels into the space between the parts or gently paint the gaps with acrylic. When the first coat is dry, apply varnish.