Modular origami is the compilation of volumetric sculptures from small triangular modules. For their manufacture, you can use either ordinary colored or white paper A-4, or special, designed for this type of creativity. It can be purchased at stationery stores in the needlework department, ready-made kits with multi-colored modules and schemes for their assembly are also sold there.
In the article, we will consider how to make modular origami for beginners, how to fold a triangular module with two corners and pockets from a small rectangle, thanks to which various configurations and designs are assembled. It will be interesting to learn how to assemble the simplest origami, how to start work, how to do DIY crafts step by step.
How to assemble a module
A large rectangular sheet of A-4 paper folds in half several times until a small rectangle of suitable size remains. Then, over all folds, the sheet is cut. Now there is painstaking work on folding from each small detail of a modular corner. This is most conveniently done by looking at the photo below, which shows the step-by-step execution of the work.
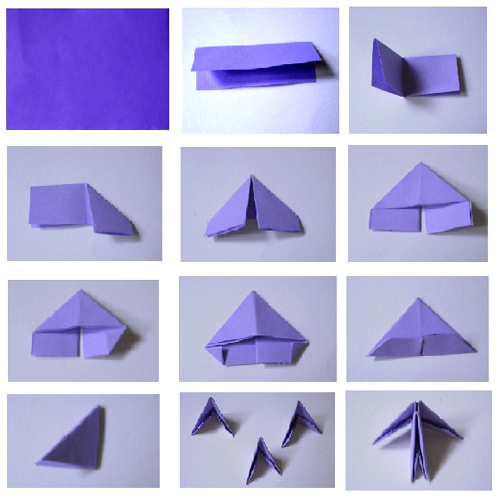
The workpiece is bent in half so that the bend is on top. Then its corners are connected together on the center line. Paper flips to the other side. Below you can see hanging strips of excess paper. Their outer corners are bent inward until they join the flat base of the triangular part. Then bend up the remaining parts of the strips. It remains only to fold the part in half so that the open pockets are outside. This is the basic unit of modular origami. Having made dozens or hundreds of pieces for crafts, you can begin to improve your skills in drawing up figures of animals, birds, vegetables or flowers. First you need to learn how to fasten the modules together, forming long elements, triangles or rings.
How to assemble a triangular part
Connect the modules as follows:
- put two parts with their pockets up, the corners of the third are inserted inside the nearby holes of one and the other module, thereby fastening them together;
- the fourth part is applied to the first two and again fixed by the second row module.
When the required width of the strip is reached, lift it up in rows. To make a triangle, in each subsequent row they make module cuts on the sides. The extreme corners of the parts remain loose.
Such a detail can be used by the master in the manufacture of flower petals or bird wings. Consider how you can create a slice of watermelon, knowing such an elementary technique of assembling modular origami.
Watermelon slice
To work, you need to make modules from green, white, black and red paper. They start making crafts with a green peel, collecting the first four rows of the desired length. From the third row, the reduction in the number of green parts begins. Modules are no longer put on extreme corners.
The fifth row lay out the white elements, fastening them with red details. Do not forget to leave the outer corners uncovered in each row, thereby reducing the number of modules and creating a triangular shape with modular origami.
After the second row of red details, black bones are inserted. The arrangement can be any: both symmetrical and not. The top ends only in red. The work is simple, but bright and original.
Fish
It will be easy enough for beginners to make modular origami triangular fish, as in the example below in the article.
So that the lonely extreme corners do not stick out to the sides, another technique is used to perform the work. We take 1 module and insert its corners into the extreme pockets 2 and 3 of the element. Unused edges remain inside. The third row is made in the same way. First they put on the extreme triangles one module on both sides, then an additional module on the internal elements sticking up. Thus, they act until the required size of the body of the fish is reached. Lateral fins are made by fitting parts one on top of the other, inserting both corners into two pockets of the lower element. It remains to make the tail, acting in a similar pattern. A master class of modular origami and a photo of the finished work will help you easily assemble the craft.
How to make circles
Often, crafts require round supports, and many figures of animals or birds have a similar configuration of parts, so you need to be able to make rings from the modules. You are already familiar with connecting the modules together in a straight line. To form a circle, a long strip is gently bent, and in the second row the details of the outermost modules are combined.
Then continues the circular rise of the figure in height.
Modular Origami "Flowers"
You can fix the passed material on this flower sample, where they use the technique of circular connection of modules and the triangular arrangement of parts. Begin the assembly of green modules, first increasing the width of the triangle, and then decreasing. The result is a rhombus. For a flower, you need 6 such details that are applied with even edges to each other and are connected together by several modules. The base for the modular origami "Flowers" is ready.
A similar work is to be done with pink elements, only the assembled rhombuses are applied nearby and fill the triangular voids from below, creating a continuous canvas. When the lower base has acquired a straight line, the craft is carefully placed on the end part and the sides are connected to each other. The resulting flower fits into the center of the green detail.
The yellow core is assembled from several yellow rows and simply inserted inward between the pink petals. A master class in modular origami proves that making flowers is fun and easy.
Heart of modules
As an original gift for Valentine's Day, you can make a beautiful heart for your loved one. Not only red or pink modules are used, the craft with the addition of a white strip inside will look beautiful.
The modules are assembled according to the described method for triangular parts, however, only 3 to 4 thin rows are left and right. From above, long strips are joined together by a downward bend. A small white-red heart is collected separately and inserted into the craft. Attach it with just a few elements from the top and bottom in the center.
Modular origami "Doggie"
It is very easy to assemble such a small toy from the modules in black and white. How to assemble circular parts from modules, you already know, we will not repeat.
White elements spread the belly and face of the beast, highlighting a slight decrease in the neck and between the eyes from above. On the upper flat area from opposite sides lay the triangles of the ears. It remains to complement the craft with eyes and nose cut out of paper.
On the samples in the article, variants of the simplest modular origami for masters who are just beginning to master this type of creativity are presented. Do work with us and you will surely succeed!