The hat is an integral part of both women's and men's wardrobe. It serves not only as a protection for the head from the harsh Russian winters, but also as a stylish accessory that allows you to create a complete image. You can buy a hat in the store, or you can knit it yourself. Made with her own hands, she will not only make the woman unique, but also allow her to realize her vision of the image.
Yarn
There are many manufacturers of yarn that produce material of different colors and composition, so needlewomen often face the need to choose.
In order to knit a hat with knitting needles or crochet, first you need to decide what the product will be.
For winter hats, yarn with merino wool is ideal. The more its content in the thread, the warmer it will be. Usually, winter hats from such yarn are knitted in 2 threads, while about 150 grams (or 500 meters) are consumed.
Caps for spring-autumn can also be knitted from such yarn, but already in one thread. In this case, 1.5-2 times less yarn is required, depending on the style and thickness of the needles. In addition, such caps can be knitted from acrylic or microfiber. For beginner needlewomen who decided to knit the hat with knitting needles and crochet, it is better to choose children's yarn. It is pleasant to the touch, retains its appearance quite well even after several washings, stretches a little, easily glides along the knitting needle, therefore it is very comfortable to knit from it.
Cotton thread is not as convenient for beginners as acrylic or wool. It stretches less, due to which the finished product holds its shape well, and the lace is clearly visible. Ideal for hats and spring fishnet hats.
Universal step by step instructions
- To get started, you must first select the model of the cap. You can tie a headdress without any preparation, however, planning is the key to successful work.
- The next step will be the calculations. The following parameters are required: head circumference, product depth, pattern height, decrease height.
- It is necessary to sketch a cap where all the parameters can be marked. This will greatly simplify the task. In the same diagram, the color arrangement can be noted if the hat knitted or crocheted is not monophonic.
- It will also be necessary to determine the style of the set of loops. For thin threads, as well as 1/1 elastic, an Italian set with a hollow elastic is well suited. If you knit in two or more threads, then the edge with this set is quite voluminous and looks rough. In such cases, the classic set is more often used.
- Next, you need to calculate the required set of loops. You can use standard parameters (with a head girth of 54 cm, 120 loops are typed). However, this will not be entirely true, since the number of loops depends on several parameters: the thickness of the yarn, the size of the needles and the density of the knitting. Therefore, it is better to tie a small sample, approximately 30 loops * 5 cm in size. It must be remembered that the elastic on the knitting needles does not take its finished, slightly tightened appearance.
- If the cap will include a transition from elastic to any other type of weaving, then it will also need to be knitted in the form of a sample. Often, it requires either an increase or decrease in the initial number of loops.
- When the samples are ready, they must be measured by straightening them on an equal surface. Gum should not be stretched much, otherwise the finished product will leave prints on the skin. Divide the obtained value by the number of loops in the sample and multiply by the girth of the head + 2 hem and 2 or 4 loops per seam (depending on the thickness of the thread)
- You can associate a hat with or without a seam. If the product will be seamless, then knit it quite easily as a crochet, and on 5 knitting needles or on circular. However, with this technique, it is difficult to draw vertical lines, since they will shift in the direction of movement of the thread. Therefore, this type of knitting is suitable for a slightly pronounced pattern such as "rice", or garter stitch. A large pattern with pronounced vertical lines is better to knit in products with a seam.
- Reduce gradually. To do this, calculate how many rows you need to tie. In a classic hat, usually in the last row there are 10-15 loops. Therefore, it is necessary to subtract 10 or 15 from their total number, and divide the remainder by the number of rows. The resulting value indicates how many loops to remove in each row. It is easier to remove the loops in the front row, so often this value is multiplied by 2, and decreases through the row. Another option is to reduce the same number of loops, first every 2 rows, then through a row, and then in each. Thus, the transition is smoother. It is better to distribute the decreases across the entire width of the cap, at regular intervals. To do this, the selected places are marked with a contrasting thread, and decreases are made over it. Thus, the same wedges are obtained. On the finished product, they look very neat.
- Close the edge. If the product is of a classical shape, then through all the loops on the needle, thread the thread through the ring twice, then tighten it, and the back seam of the cap can be sewn with the remaining thread.
- Hide the ends of the threads, decorate the hat with decor.
It is worth remembering that crocheted products do not stretch well, but they hold their shape well, so it’s good to knit hats with this tool. But the cap knitted with needles is more elastic, it takes the shape of the head better and fulfills its intended purpose - it protects from cold and wind. That is why it is impossible to say with certainty that only knitting needles or a hook should be used. The needlewoman decides for herself which tool she will use to create her perfect hat.
Gradient
Colorful caps are in fashion again, however, not only a clear transition from one color to another, but also smooth flowing. To get the gradient effect, it is necessary to use fairly thin threads in several additions. The more there will be, the smoother the transition will be. In addition, it is better to use related colors, which stand next to each other in a gradient. If it is necessary to make a smooth transition between non-related colors, then it is better to use an additional color related to everyone, or neutral gray, white or black.
This technique allows you to knit a new hat for a woman so that the headdress is combined with the color of the outerwear, and at the same time, the color that suits you most remains near the face.
The gradient effect is achieved by replacing a thread of one color with another. Initially, it is necessary to determine what height and how many rows the transition zone will occupy. The number of rows in this zone is divided by the number of threads that will be used in the knitting process. Suppose you will knit a hat in 5 threads, the transition must be done approximately on a strip 7 cm high. In 1 cm 2 loops.
| Row number | The number of threads of color A | The number of threads color B |
| 0 | 5 | 0 |
| 1 | 4 | 1 |
| 2 | 4 | 1 |
| 3 | 4 | 1 |
| 4 | 3 | 2 |
| 5 | 3 | 2 |
| 6 | 3 | 2 |
| 7 | 2 | 3 |
| 8 | 2 | 3 |
| 9 | 2 | 3 |
| 10 | 1 | 4 |
| eleven | 1 | 4 |
| 12 | 1 | 4 |
| thirteen | 0 | 5 |
Thus, if you change the color of one thread every 3 rows, the transition will take 12 rows or 6 cm.
Drawings
Once again, fashioned women's knitted hats with a jacquard pattern. Both classical options with geometric ornaments, snowflakes and deer, and floral motifs are relevant. Such hats are well suited to plain outerwear, introducing a bit of romance and brightness into the image. You can use both bright and contrasting threads, and shades of the same color.
Types of caps
There are a lot of models of hats that you can knit with your own hands. Choose the shape of the future product carefully. The hat should not only be combined with the style of outerwear, but also be suitable for the type of woman's face. Headgear can help hide flaws and emphasize virtues.
Beanie
This hat has a fairly wide range. By and large, beanie is called any model that does not have fasteners and ties, so it is very easy to knit. The latest models of hats for women of this kind are distinguished by an elongated shape, simple viscous and bright colors. Bright and metallic colors are in fashion again, as well as lurex and sequins. This model is well suited for women with an oval type of face. In order to knit such a hat, it is better to choose a discreet pattern, for example, "pearl smooth surface", hosiery, handkerchief knitting or elastic 1/1. Decreases should be made in the upper quarter with pronounced wedges.
Hat with lapel
Such hats ideally hide the flaws of a rectangular face shape. You can associate a hat with both a classic single lapel and a double volumetric one, which visually brings the model closer to the shape of the hat. To clearly fix it on the head, usually from the place of the bend, they make a reverse elastic band, that is, in those columns where there were facial loops, then the wrong ones are knitted, and where there were the wrong ones, respectively, the facial loops. If the yarn is thick enough or in several folds, then at the bend you can knit an additional row of facial smoothness.
Hat with embossed stripes
It is easy enough to knit new models of beanie caps with embossed horizontal and vertical stripes. Thanks to this pattern, the elongated cap-cap assumes the necessary shape without additional styling. The simplest variation of such a knit is the alternation of strips 2 cm wide of the front and back surfaces. Instead of the latter, you can use a garter stitch. The lines of the front loops can be decorated with a simple pattern, vertical columns, as well as the use of color combinations. Such a style suits women with a square type of face. The rows of the wrong side add volume, and an elongated silhouette visually stretches the face, so the jaw line does not look rough and heavy.
Beret
A voluminous headdress has been confidently holding the position of one of the main models for women for several centuries. It is perfect for a triangular face. It takes harder than knitting a hat with knitting needles and crochet. It is necessary to calculate the increase for the volume, it usually makes up 50% of the available loops, then it fits in 30-60 rows, and then gradually decrease in the last 15-20 rows.
Hat with braids
Relief weaving again adorns knitted hats for women. Models on the catwalks demonstrate both simple harnesses and complex arana. Such weaving is relevant for winter hats, as it has a dense structure. At the same time, the product looks very elegant and is not inferior in beauty to openwork hats.
To knit a hat with braids, you need an additional knitting needle. In addition, each weave “eats” the width of the cap, so when you switch from elastic to pattern, you will need to add the required number of loops. To do this, with the help of gum and ornament samples, the number of loops in 1 centimeter of each type of knitting is calculated, the obtained value is multiplied by the girth of the head. The difference between the number of loops is evenly distributed over the entire width of the product. The pattern is tied up to the first row of decreases, after which they continue to knit with a garter or stocking. It is important to remember that in 2 rows of hosiery knitting (1 row with facial loops, 1 - purl) contains 3 rows of scarf (all rows are knitted with facial loops).
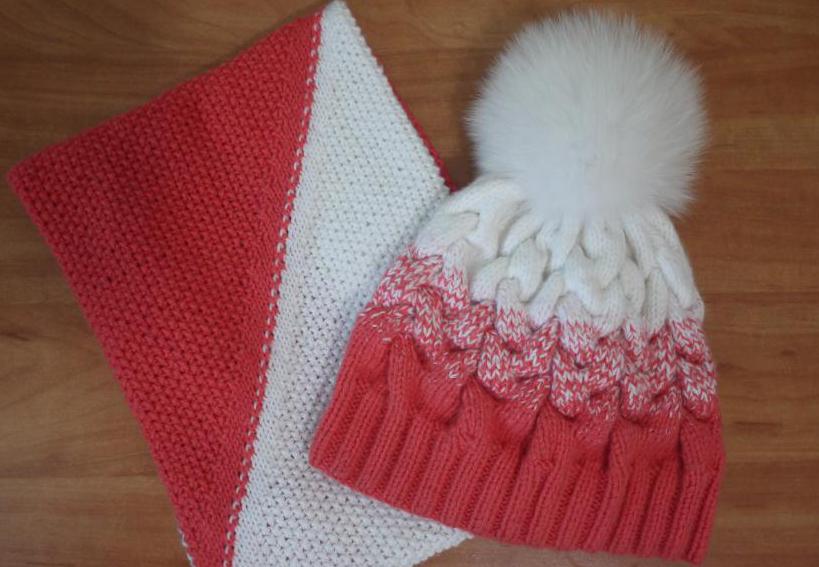
In order to knit a women's hat with knitting needles as in the photo, you will need:
- knitting needles number 2.5 - 2 pcs. long + 1 pc. short (optional);
- yarn of 100 g. each color;
- sewing threads in the color of yarn;
- needle;
- pompom.
1. To grasp the head 56 cm, you need to dial 124 loops in 2 threads. Baby yarn with merino wool 30% was used. The thickness of the thread is about 3 mm.
2. Knit with an elastic band 2/2 - 20 rows.
3. Add 43 more loops to get a total of 167 loops. At this stage, the front surface begins - on the outside of the future hat, knit only the front loops, on the inside - the wrong ones.
4. In the 5th row of the surface, counting the row with the increments, begin to untie the braids. Leave the edge on the working knitting needle, transfer 5 loops to the additional knitting needle, placing it in front of the canvas, then knit 5 loops from the main knitting needle. After that, knit 5 stitches with extra. Return to the main knitting needle and knit another 5 loops from it. There will be 11 such weaves.
5. The next 5 rows again knit face stitch. In the 6th row (it should be front), you need to make the second level of weaves. To do this, knit 5 loops from the main, 5 transfer to the additional knitting needle, placing it behind the canvas, 5 more knit from the main, return to the loops on the additional. Repeat 11 times.
6. The gradient. To make a smoother transition, it is better to use thinner threads, but even thick ones can be dissolved in 2 parts. Sewing threads also help. In this hat, on the 7th row after the elastic, 1 sewing thread of white and coral color was added. Next, the thread was changed every 5 rows according to the following scheme:
| Gradient Rows | Sewing threads | Coral yarn | White yarn |
| 1-5 | 2 | 2 | 0 |
| 6-10 | 2 | 1,5 | 0.5 |
| 11-15 | 2 | 1 | 1 |
| 16-17 | 2 | 0.5 | 1,5 |
| 21-25 | 2 | 0 | 2 |
7. At the 7th level of weaving, begin to make decreases. To do this, for an additional knitting needle from the main knitting needle, knit 2 loops together, 1 loop, 2 loops together. Thus, out of 5 loops, 3 will remain, and from the total number of loops 22 will decrease and 145 will remain.
8. 8 level of interweaving fits a little differently. First, knit 4 loops from the main knitting needle, then remove 5 loops to the additional knit for the fabric, then knit 4 more loops to the main knit, return to the additional and knit 3 from 5 loops. Thus, another 22 loops will be removed, 123 loops remain. On this weave of braids ends.
9. Decreases. In each front row, 22 loops must be removed. Wrong knit without decrease. Tie 10 rows.
10. Tear off the thread, leaving about 40 cm. Through the remaining 13 loops, thread the thread with a double ring, tighten, sew the back seam of the cap to it.
Hide all ponytails of threads. Attach a pompom. On the presented hat is a pompon made of fox fur with a diameter of 18 cm.
A hat for a woman knitted with needles according to this instruction turns out to be very dense, warm, holds its shape well. However, in the place where the sewing threads are added, the fabric is more rigid and does not stretch well. On the one hand, this allows a relatively weak elastic band not to pull out the cap on the eyes, on the other hand, it may at first cause discomfort when worn. Knitting braids is also difficult. Therefore, it is better for beginners to make the initial set 4 loops less, and not to use sewing threads.
Hats with ears
Another new cap model that you can knit with knitting needles is a hat with ears. They can be sharp, like a cat, or rounded, like a mouse. Fashion for such hats came from Japan. They look very cute on young girls, adding to their image of playfulness.
It is very easy to knit such a hat for women. The entire height of the product is knitted evenly, without reduction, and the peculiarity of this model lies in the method of closing the loops.
To get sharp ears that look a little to the sides, it’s enough to stitch the upper edge to get a kind of bag. Turn the product to the front side, divide the upper seam into 3 parts. On the side lines, measure a height equal to 1/3 of the width, connect with the points on the top. You should get isosceles triangles. Sew the base line of these triangles with a simple thread to the color of the yarn.
Another way to create ears is suitable for fine yarn products. For their formation, you must also sew the upper edge, leave the product on the wrong side. Divide the upper seam into 3 parts, connect the resulting points together by sewing with a thread. Turn out the product. At the crown of the cap, 2 folds are formed, and the ears will look a little up.
In order to make the ears rounded, you need to make decreases in each row in two places in the top 1/4 of the cap. The seam should be between them in the center. Further, the ears can be formed by any of the two above methods.
Coarse hats
These hats are ideal diamond-shaped type of face. They allow you to add the necessary volume in the forehead, so that the cheekbones do not become the widest part of the face, and the head takes a more regular shape. Knitting this cap model is very easy. To do this, you need bulk yarn or thread in several (4 or more) additions, as well as thick knitting needles. The larger the tool number, the more voluminous the product will be. The knitting for such hats is usually the simplest - the front surface or gum 1/1, it can be done with or without a lapel. Such a hat does not particularly need decoration, since its main decoration is the very structure of the knitted fabric.
Men's hats
Caps for men are also pleasing with their variety of models. , , , , , ... . , , , "" , .
Fashion is changing, some models come back again and again, and some go away forever, but whatever it is, this is a wonderful occasion for a woman to knit a new hat. The process of creating a headdress with your own hands allows you to get rid of problems, develop attentiveness and fine motor skills. In addition, the needlewoman in the hat of her dreams, and which she knitted herself, looks confident, happy and attractive.