Crocheted rugs are not only the glorious good tradition of our grandmothers, but also the rapidly developing trend of modern room decoration. Do not underestimate round knitted rugs and consider them a relic of the past. Today it is one of the most popular items in a hurry to bring to life many knitters.
What materials are suitable for knitting rugs
Rugs, bedding and rugs can be of various shapes and configurations, but in this article we will talk about how to crochet a round rug for beginners. This activity is simple, although it requires certain investments: time, attention and materials.
What is suitable for the manufacture of such a product:
- Wide ribbon yarn.
- Thick and coarse thread.
- Jute twine and household ropes (small diameter).
- Strips of fabric made by yourself.
Techniques that are used to make rugs
Decide on the technique that will be applied is in advance, as this will significantly affect the choice of materials. It is also necessary to plan the dimensions of the canvas before crocheting a round rug. For beginners, it is better to choose a small product.
You can tie the rug like this:
- Simple circular expanding rows.
- With the laying of a volume cord inside the row.
- Openwork pattern.
Any of these methods opens up wide possibilities for creative natures. Since there are no strict rules, you can safely improvise.
The easiest mat
Using jute twine is the fastest way to make rugs.
Here you can use almost any scheme of a circular fragment: solid or openwork.
The latter always look more attractive. They are a little more difficult to manufacture, but the labor expended pays off.
Semicircular rug
Knowing how to crochet a round rug for beginners can be useful for making rugs in a semicircular shape.
Such specific products are extremely convenient for placement on steps or near a door. Of course, they should not be put under the front door, otherwise they will quickly become worthless, but in a room like a bedroom, they have the right place.
To knit such a rug, you need a thick thread or twine. You can work according to the scheme, which is located above.
Sequencing:
- The beginning is a chain of air loops (VP) in the amount of 7 pieces, plus 3 VP for lifting.
- Then, in each loop, 2 double crochet columns (CCH) are performed, only in the first - 1 CCH, since the lifting loops play the role of the second.
- For the second row, you will also need 3 EPs to climb. Next, in the CCH of the previous row, 1 CCH and 1 VP are knitted, this sequence is repeated until the end of the row.
- 3 VP, a magnificent column of three loops with a crochet (PS) and 1 VP, is repeated to the end of the row, except for the lifting loops.
- 3 VP, in the upper part of the PS perform 1 CCH, the same as in the VP.
To continue knitting, the fourth and fifth rows alternate. The canvas is expanded to the desired size and strapping is performed: 3 CCH with a common base, pico from 3 VP, 3 CCH in the same base loop. It turns out pointed "bushes". If desired, this step may not be performed. Then the mat will turn out with a smooth edge.
The described method is suitable for the manufacture of a round rug: it is enough to double the number of loops and columns, starting from the first row.
Lining knitting
A unique and very interesting technique can be very useful for those who want to know how to crochet a round rug for beginners. This method allows you to create fairly dense rugs. Each row is characterized by increased density due to the fact that a cord or jute twine is laid inside it.
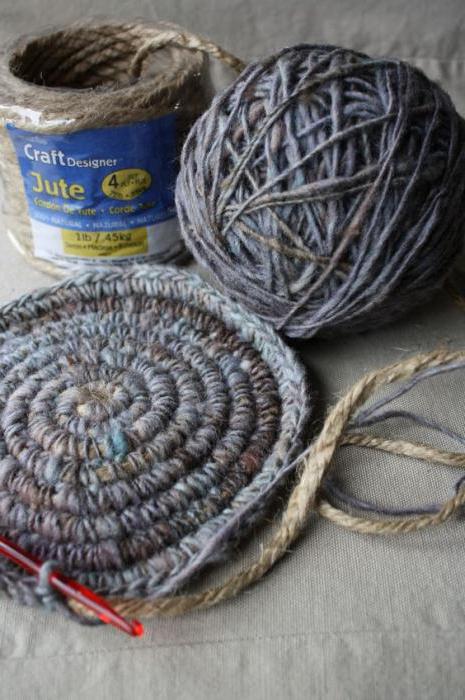
To work in this technique is simpler than simple: from the beginning of the first row you should bring the cord to knitting and start a hook for it before grasping the thread to form a single crochet (RLS). To prevent the lining from shining through, use a thicker thread on the front side of the knitting product. You should think about this before crocheting a round rug. For beginners, the scheme of such a rug may be the simplest: for example, the third motive in the front row in the figure with round schemes. Here rows alternate in which additions (at 12 points) are carried out with rows of even knitting. You can apply the expansion method, in which additions are performed in each row, but at six points.
How to Crochet a Round Rug for Beginners
First of all, you should make sure that such a product does not look old-fashioned and dull. It is better to apply material of one color or several, but similar in tone.
Excessively motley coloring invariably evokes an association with grandmother's knitting from the remnants of different shreds.
Experienced craftswomen recommend using sheets, pillowcases and duvet covers as the material. These are large, straight canvases, so they are easy to cut into long strips.
The secret of crocheting a round rug for beginners from rags is to gently connect their edges. The photo shows that the ends of the textile strip are superimposed on each other and sewn with a blind stitch. You can also just tie the edges and leave the ponytails from the inside, but this method is not very aesthetic.
Knitting rugs perform large hooks. The best are wooden and bamboo. They are lightweight and durable. As a rule, you have to use a tool of at least No. 6, No. 8 or even No. 12.
All these methods are suitable for making a home rug. Using unfamiliar methods and materials may require training and experimentation. For example, testing a lined knitting method before crocheting a round beginner mat. The photo depicts only the simplest linear way, but you can also diversify knitting: some rows are done by tying the cord, others are left flat. If you use a thread of different thicknesses, you can achieve an impressive relief of the canvas.
However, in any case, it should be remembered that the mat is designed to be walked on. So, it should be convenient and completely exclude the possibility of a fall. The leg can catch on volumetric patterns or large holes, so these elements must be used carefully and sparingly.