In kindergartens and schools, children often make paper crafts. These are simple planar applications and voluminous work. For all holidays, preschoolers and schoolchildren create greeting cards for parents, loved ones, teachers and teachers of the kindergarten. Most of these crafts depict various flowers. Even babies know how to make flowers out of paper. However, with age, manufacturing becomes more complicated, because there are a lot of ways to do the work. There are simple options, but there are complex ones, including preparatory work and many elements, small details.
From an early age, the teacher prepares for the lesson on the application on his own, on plastic plates the children receive ready-made parts. Their task is to correctly place them on a sheet of cardboard according to the model and oral explanation of the educator and stick them on. In the middle preschool age, children are already beginning to learn how to use scissors and are mastering ways to cut identical parts by folding paper.
Large flowers made of paper contain many small details, so preparation for the lesson can be lengthy. Usually her teacher with children spends in advance, for example, on the evening of the previous day. How to cut a flower out of paper, children already well understand at the senior preschool age, use templates and stencils. But still, every year interesting original samples of colors made from colored or corrugated paper appear on the Internet. So, how to make flowers from paper can be learned only by constantly expanding your knowledge on this issue.
Seven-flower flower from circles
Everyone remembers the popular fairy tale for children by Valentin Kataev "Flower-seven-color". This is a magic flower given by a kind sorceress to a little girl. After reading such a fairy tale for educational purposes, you can plan an application lesson where you will be asked to assemble a paper flower quickly and easily. For work, children are given a circle template teacher. The children independently draw simple pencils on the contours on colored double-sided paper and cut out seven petals, as in a fairy tale.
It is most convenient to cut such simple flowers from paper by folding several blanks together. They should be of different colors, since all the petals are multi-colored. Then, before gluing, each element of the craft must be folded in half. Only one part is smeared with glue, and the second is free. The application is voluminous. The stalk can be simply drawn with markers, or you can cut a thin strip of green paper and make a leaf separately.
Although these are simple flowers made of paper, the craft looks very impressive because of the color scheme. The main thing is to use bright paper in saturated colors. It must be bilateral.
Postcard with daisies: master class
Paper flowers can be offered to children from thin long strips of the same size. Since the petals of daisies are white, the background of the craft should be contrasting, bright. In the photograph, a purple leaf emphasizes the whiteness of flowers. Such work can be offered to children of the younger group of kindergarten. The teacher only cuts out many stripes for the petals and yellow centers.
Older children can also collect a camomile flower, but they will have to carry out preparatory work on their own. It is more convenient to use the method of folding paper in several layers. Then cutting will take less time, and the strips will be the same size. The middle is performed by the outline of the template.
How to make flowers from paper can be seen in the photograph of the work above. All long strips are glued to the edge and placed angles at one central point, similar to the rays of the sun. The free edge is folded with a loop and glued to the other end. When the strips have formed a full circle, a bright yellow circle is glued to the middle. Making such a flower out of paper is quick and easy, and the craft looks voluminous and original.
Volumetric flowers from circles
The next option for making flowers pasted on cardboard is assembled from the same color of round petals. The complexity of the crafts lies in the correct folding of circles. First, the parts are cut according to the template. The color of the petals should be bright. Then you will need to cook the middle of the flower of a contrasting color, the stem (a thin green strip) and a leaf. It is also cut according to the existing template and folded similarly to the petals.
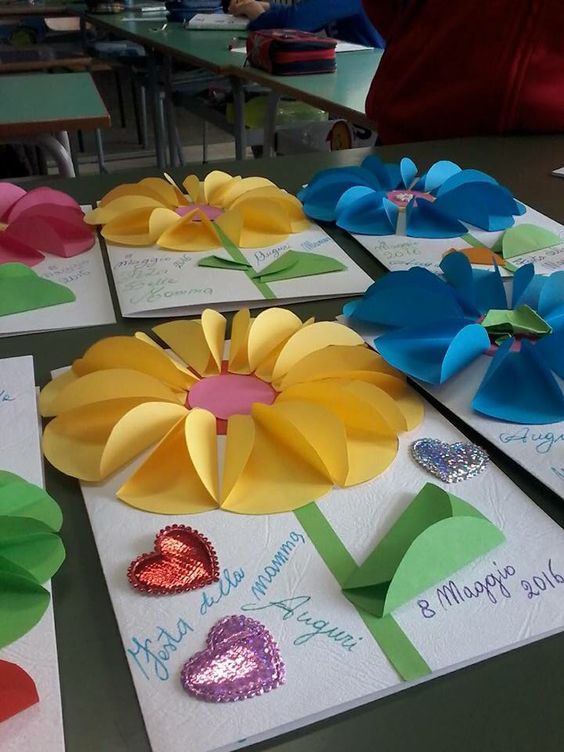
In order to fold the flowers of colored paper correctly with your own hands, you need to put the circle on a flat surface and bend the edges from opposite sides to the middle. You can bend the paper with a slight overlap. The inside of the petal should have a triangular shape. What paper flowers look like (it’s not difficult for children to do such a craft), you can carefully consider the picture in the article. Petals are smeared only on the lower flat surface. The remaining elements are not smeared with glue. Do not forget to leave space in the center for gluing the contrasting middle of the flower.
Paper flowers - daisies
As you can see in the photo, this flower has a large size. They make it in two stages. Each of them requires preparatory work.

- Separately, the center folds. They make it from a strip of yellow paper, which on one side is cut into very small "noodles." You can facilitate your work and purchase quilling strips in needlework or stationery stores. To perform such a middle, like our chamomile, you need a wide strip. If one prepared strip is not enough, then you can glue the next one on the edge and continue wrapping. For convenience, you can use a thin rod, for example, a toothpick. Winding is done tightly so that there are no voids between the turns. The edge is smeared with PVA glue and attached to the last turn.
- For such large flowers, rather large petals need to be cut out of paper. Each folds in half so that there is a fold in the center. You will need a lot of details, the more petals, the more beautiful the daisy will look. All elements have the same size, so they are cut according to a single template. Items are placed around the middle in a checkerboard pattern. All petals should be clearly visible, not overlap each other.
How to make flowers from paper in stages, you already understood. Now let's think about where such a flower can be placed. Often decorate a room for special occasions with large bright flowers made of paper. So that they can be transferred, you need to place a small circle on the back, on which the middle and petals will be glued. On it you can attach a loop of rope or satin ribbon and hang the craft on a hook or nail on the wall. Sometimes large flowers are placed on tables or even on the floor of a room. At the wedding, you can decorate the arch with such flowers for the ceremony.
Autumn Chrysanthemums
Do-it-yourself autumn flowers from colored paper can be made voluminous by attaching it to a wire or wooden stick. They can be put in a vase or arrange a bouquet as a gift to a loved one for the holiday. To create a flower, buy thick double-sided paper and green corrugated for the stalk. First of all, the prepared core is wrapped in a tightly thin strip of corrugated paper. It is lubricated with PVA glue. The blank is put aside for now, and work continues on the flower itself.
Paper colors are chosen according to the petals of chrysanthemums. They are white, pink, light purple, yellow, burgundy. Wide strips of thick double-sided paper are cut and one edge is cut into small “noodles”. You need to leave unprocessed approximately 1.5-2 cm so that the strip can be wound on the stalk.
Making flowers from paper according to the instructions will take a little time. When the strips are prepared, it remains only to stick the edge of the strip on the wire and wind the rest of it around it. Hold the paper tight with your fingers so that the strip fits snugly. The edge remaining at the end is glued to the last turn.
Remains the work of decorating the bottom of the flower. So that the unprocessed edges of the craft do not look out, the bottom of the chrysanthemum is wrapped with a wide strip of green corrugated paper. They wrap several layers, capturing both the flower and several centimeters of the stem.
Spring daffodils
For crafts on March 8, you can paste on cardboard some of the most beautiful spring flowers - daffodils. Make them in several stages. Midpoints are cut from strips of bright orange. Petals are performed by folding the squares four times. For each flower you will need two of these elements. These small paper flowers are glued in turn. The first step is to attach a stem and a long leaf cut out of green paper. Then the flower itself is placed. First, the bottom element, on top of it is placed the same, only it is shifted to the middle between the petals of the first part.
How to cut a flower out of paper, you already understood, let's now look at how the middle of daffodils are made. A 4 cm strip is cut out of orange double-sided paper. It is folded in half in length. Then, with scissors, cuts should be made on the bend. As you can see in the photo in the article, they are not too small. Then the part is twisted around a thick felt-tip pen and the edges are glued together.
Then the part is carefully removed from the rod and the loops are pressed with the fingers so that they are deployed to the outside. So that you can glue the middle onto the cardboard, the lower edge is slightly pressed and the paper is folded inward with your fingers.
To get a whole bunch, you can make different daffodils. One is white, the rest is light yellow and bright orange. Such a beautiful card will surely please mom.
Hyacinths
The creation of these spring flowers can also be timed to the holiday of March 8. Since these small paper flowers are voluminous, you can make a whole bouquet and give it to mom on International Women's Day. The green cocktail stick is most often used as a rod, but completely different objects can be selected: a wooden skewer, a twig of a tree or shrub. The main requirement is that it be smooth and not too thin. Indeed, in nature, the hyacinths stem is quite dense.
The flower itself is made of double-sided colored paper. First, a wide strip is cut, about 10 cm. If you have paper in sheets A-4, then it can be divided in half in length. Then each part is bent in half and the bend is cut with the same width of "noodles". The photo above shows how large the incisions are. They do not do it to the end. Approximately 1 cm is left for sticking to the shaft.
The flower is attached to PVA glue at the upper end of the stem, then a strip is wrapped in a spiral around the stick. The bottom edge is also attached to the glue. You now know how to make such flowers out of paper (in stages, the process itself is shown in the picture above). And for sure you can independently perform this work at home.
Corrugated tulips
You can create an original craft from folded tulips. For work, you need the following materials:
- double-sided color paper in bright colors;
- tulip pattern;
- stem stem; it is most convenient to use a plastic cocktail tube;
- an awl for making holes in tulips in order to insert a straw;
- PVA glue;
- scissors;
- glue gun;
- cardboard sheet for background.
Work begins with drawing a template. Since the tulip will subsequently be folded "accordion", its length, accordingly, will decrease, then the pattern should be large. Then, on colored sheets, a contour pattern is drawn with a simple pencil. Several tulips of different colors are cut, the number must be taken odd, it is better to create a bouquet of 5 or 7 flowers.
Flowers made of paper tulips are placed on a flat surface and bent several times, turning the paper so that it turns out "accordion". All you need to do a couple of folds. Then the flower is folded along the fold lines and in the center is made with an awl through hole through all layers. Then a stem-tube is inserted there and the flower is laid out evenly. Two leaflets, cut from bright green double-sided paper, are attached to the bottom of the stem.
Such flowers can be glued to any contrasting background. For attachment, it is better to use a glue gun instead of PVA.
Volumetric tulips in a pot
Flowers tulips from paper can be made in another way. So that they are stored for a long time and not deformed, it is better to use dense colored paper, you can even glossy. For each flower, four identical details are cut out according to the template. Then they are bent in half and fastened together by halves. The glue used is a thick and fresh PVA. A thin wooden stick is inserted between the petals below. This procedure must be done quickly, until the glue is seized.

Then cut out from thick green paper long wide leaves characteristic of this plant. You can arrange ready-made flowers in a simple vase, but they will look more beautiful in a small plastic flower pot. So that the sticks are positioned vertically upwards and do not fall, you need to properly strengthen them. You can pour small gravel or sand into the pot, but if you want the craft to be preserved for a long time, you can mix a mixture of gypsum with water. Kneading should resemble the consistency of thick sour cream. If necessary, you can always add dry powder or add water.
The pot is filled just above half and sticks are immediately inserted. Gypsum sets quickly enough, so you should not waste time. When the solution hardens, the upper empty part of the flower pot is filled with sisal or crumpled corrugated paper. You can also decorate the pot by sticking the applique or brightly painting it with acrylic paints.
Finally
The article describes in detail how to make flowers from paper in different ways. Such simple crafts can be created together with children of both the senior preschool and primary school age.