The roof is one of the main elements of protecting the house from the external environment, therefore, the correctness of its installation significantly affects the functionality of the roof in the future. Very often in our time, such a roofing material as metal tile is used, since it is of high quality and has other positive properties. A detailed installation instruction for metal allows you to do the procedure yourself.
The process of organizing the roof is important and is divided into several stages. First you need to take the dimensions of the roof and calculate the amount of material. To do this, the cornice length is divided by the width of the sheet of material, taking into account the overlap. That is, the usable sheet width is taken. When purchasing roofing material, it is necessary to purchase several sheets more than indicated in the calculation.
Further, a detailed installation instruction for a metal tile provides for the arrangement of a waterproofing and vapor barrier layer of the future roof. The ventilation gap must also not be overlooked. The gap should have a width of at least 5 cm. It is also worth providing a hole in the area of the ridge so that all the fumes can be freely discharged to the outside. The fact is that the arrangement of such a “pie” will not only protect the attic from moisture, rotting processes of the supporting structure, but also significantly reduce the amount of thermal insulation material. And it ensures the integrity of the structure.
The next step is a detailed installation instruction for a metal tile called the arrangement of the crate, on which, in fact, sheets of roofing material will be laid. For this, boards about 3 cm thick are used. Here it must be taken into account that the cornice strip, to which the very first sheets will be attached, must be additionally reinforced with boards. Next, the
end plate is installed. It is better if it is higher than the crate by the height of the wave material. After this, the
cornice strip is nailed
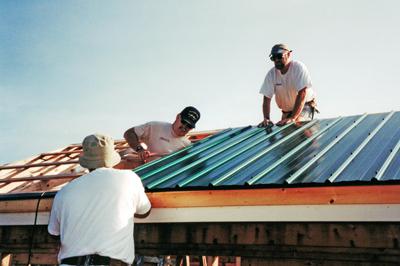
.After preparatory work, a detailed installation instruction for a metal tile advises to proceed with the installation of sheets. You need to start it from the ridge to the left or right. It must be taken into account that the sheets should protrude 4 cm beyond the cornice when laying. All waves must go correctly, therefore increased attention is paid to the wave step.
A metal roof, installation of which is not difficult, should nevertheless be done carefully so as not to damage the material. During installation, it is also advisable to carefully move along the roof. Please note that if you have to cut sheets, then in no case should you use
abrasive wheels. It is best to limit
yourself to scissors for metal.The first few sheets are first baited to the crate, and then, if they are stacked evenly and correctly, are screwed tightly. The material is attached using screws with rubber gaskets that prevent metal damage. At the joints and under the ridge, it is better to lay a strip of sealant. The skate strap is attached last.
Do-it-yourself installation of metal tiles may also include installation of stairs, snow retainers, and design of through holes. However, these processes are not complex and can be performed even by an unprofessional builder.