For wall cladding with brick, you must have a certain skill, because all the work done must be neat and even. To do this on your own, you need to study the execution technology in detail, and then get to work. Finishing with such blocks is widely appreciated because of the visual appeal and durability.
Material
For cladding, these bricks are most often used:
- classic of ceramic and light clay;
- glazed on the sides;
- hyper pressed, heavy and clinker.
The first option impresses with a huge selection of colors, is easy to masonry and affordable. Quality and durability depend on the equipment and raw materials used. Quite often you can get on a fake of a famous brand.
Glazed - looks very beautiful, but, in turn, and is expensive. It is used gradually and when purchased in batches it is checked individually. You need to know how to lay a facing brick, since errors can be fraught with large financial costs.
Hyperpressed, heavy or clinker are used both for facing and for basic work. They are very resistant to moisture and ice.
Types of masonry
Facade decoration can differ both in work technology and in appearance. In order to figure out how to lay the facing brick correctly, it is necessary to take into account its technical characteristics, as well as the preferences of the owner of the house. In construction, several basic ways of arranging whetstones and the mass of their varieties are used. The main ones include:
- tychykovy - a technique in which the ends of the material protrude on the front side;
- front - outwardly the widest edge of the brick becomes visible;
- spoon - this is a technique in which the face extends the narrowest part.
And you can also highlight the external parameters of the masonry, which depend on the methods of distribution of elements in the series:
- Flemish - performed by a constant alternation of narrow and wide sides of the blocks;
- masonry in half-brick - formed by mixing vertical seams to half the element, as a result, all lines are staggered;
- American - a technology in which spoon and facial schemes alternate with rows;
- stacked - can be characterized by solid vertical seams in a single line.
Instruments
In order to figure out how to put a facing brick on a wall, you need to prepare special devices, which include:
- trowel for cement mortar coating;
- building cord;
- hammer - pickaxe;
- grinder (angle grinder);
- wire;
- construction level to control the masonry rows;
- metal bars for leveling;
- anchor.
Solution
Every builder, even a beginner, needs to know how and on which mortar to lay the facing brick, since the strength of the future structure will depend on this. It is not difficult to cook it; the mass consists of sand and cement. The optimal ratio is 5: 1, that is, five parts of sand and one share of cement will be needed. To give the mixture ductility, clay or lime can be added to it.
Initially, it is necessary to combine all the dry components, and then add water to the prepared mass and mix well.
In order to save the amount of the mixture, it is not recommended to use hollow bricks, since a larger amount of the solution will go to fill the holes.
Strapping
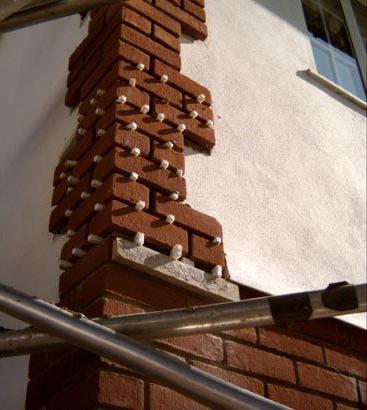
A decorative wall must be connected with the carrier, therefore, it is important to know how to properly lay the facing brick with your own hands. To do this, most often used knitting wire and anchor bolts.
A bunch with anchors means driving them from the inner edge of the wall so that the outer edge protrudes between the rows of bricks. Of course, it is worth paying attention to the thickness of the mount, it should be less than about half the width of the seam.
Wiring is performed using the following technology. A dowel is inserted into the supporting wall, into which the wire is attached, so that the outer part is located between the rows, but does not protrude from the outside of the lining. The frequency of arrangement of similar fasteners is 5-6 pieces per square meter.
Technology and stages
How to lay a facing brick, should know every professional craftsman or builder who wants to ennoble the house with his own hands. The whole system can be represented in the following step-by-step instructions:
- Bottom row. Before you start installing the blocks, they must first be soaked in water so that they stretch the moisture. Since the length of the wall is not always equal to the number of bricks, this rad is necessarily laid without mortar, so that you can trim the elements if necessary.
- Angles. Any manipulations need to start directly with them. They are laid at a height of 5-6 lines. This requires placing a square rod on the outer edge of the already located lower row. Then, using a trowel, the solution is carefully laid out on the bottom row. Then everything is leveled and a brick is attached on top, so that it lies closely on a metal rod stretched along the entire length. After the level is applied, and if necessary, the side of the brick that is skewed is knocked out with a trowel handle. Then, when everything is laid correctly, the rod is drawn and the excess solution is removed. This procedure is carried out from the other half of the angle.
- Stacking rows. Following is a direct facing. A building cord is pulled between the corner blocks of the second row and fixed on the surface. Then the bricks of the next row are located nearby, they must necessarily stand at the end. The square rod must be laid on the bottom line and apply the solution in the same way as at the corners.
- Slopes. Most often, the technology is similar to the corner principle and bonded masonry. Sometimes in this case, a block of a different color is used to give variety to the finish.
- Stitching. After 5-6 rows have been laid, it is necessary to stop. This is done so that the solution seizes and does not deform under the weight, and it is also required to perform the joint stitching, their decorative adjustment. Those who know how to lay the facing brick after the work done, be sure to remove the crumbs of cement and moisten it with water. To decorate, you need to prepare a special solution, namely, mix lime and cement in equal proportions, and then add 10 parts of sand there. All this mixture is diluted with water to obtain a pasty mass. With this gruel, all the seams are neatly filled. To give the line a beautiful shape, a special tool with nozzles is often used, which is called “embroidery”.
Stitches
They can be divided into the following types:
- Into a wasteland - this method is used for further plastering walls. The solution does not reach the outer border of the brick, forming a gap.
- Into undercut - the method is often used for laying chimney pipes, the solution spreads uniformly over the whole brick without protruding beyond the border of the bar.
- Concave or convex - the method is used by everyone who knows how to lay a facing brick, since it is considered a decorative seam.
Secrets
Every five rows, you need to lay out the reinforcing mesh and do not forget about the dressing.
Before starting self-laying, it is better to practice the construction of small structures: steps, columns.
Before starting work, the material needs to be wetted, this will make the building more durable.
It is very important to calculate the exact amount of material spent, especially brick, since its transportation will require the rental of equipment, and this will entail additional costs.
The most important thing is not to rush, constantly take measurements and monitor the evenness of vertical and horizontal surfaces.
Recommendations
In order to understand how to lay a facing brick under a bar, you need to adhere to the advice of experienced builders:
- Initially, you need to draw a work plan where the required number of rows will be indicated (for calculating the spent material).
- At the time of the facade, it is required to ensure that the seams of the other rows do not coincide, since the wall will lose its stability and fall apart under the influence of time.
- If there is no practice in working with the facing material, but there is a need for independent execution, then you can use the traditional method, the result will be very similar.
- When calculating the spent brick, you need to add 10% of the total volume to the resulting number, this is necessary because approximately this part breaks down during installation.
- In order for the brick and mortar to have the highest degree of adhesion, patience is required. The mortar does not harden so quickly, so you can easily correct minor flaws.