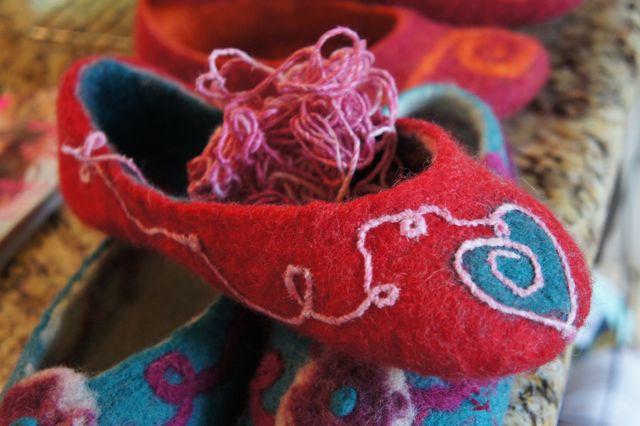
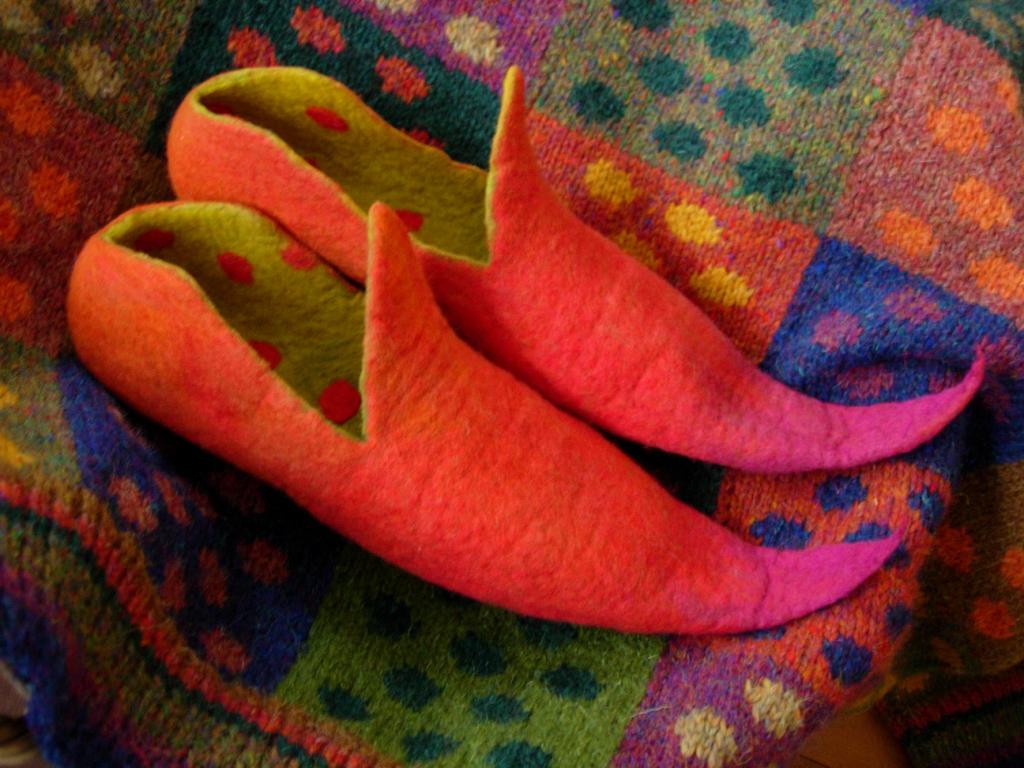
Felting shoes is a very time-consuming and lengthy process, because not every craftswoman dares to create such products. In this type of needlework there are a lot of different nuances and subtleties, a lot depends on the material and tools. But subject to the technology of felting slippers from wool, you can get a very beautiful, comfortable and natural thing. Such shoes will bring special joy to people with non-standard foot sizes - things from felt are created individually, so they suit everyone.
How to choose the right wool
Skilled craftsmen who make shoes professionally buy wool on farms. The most tender is the one that is removed during the first haircut - it does not yet have the outer hair, therefore it does not prick. It is used for knitting and creating children's things. The older the sheep, the harder her hair. Felting for beginners does not require searching for raw wool. In any needlework store, you can purchase carded and roll from it.
Tools for felting slippers
Wool shoe makers can have a variety of tools. Some needlewomen use felts, goats, fittings, specially crafted rolling pins and old washboards. In this master class, we will use reinforcement for rolling wool. The ability to choose a convenient tool for yourself comes with experience, because it can be difficult to recommend some universal products that everyone will be comfortable using. To outline the contours and translate the drawing, it is best to purchase a watercolor pencil - it is easy to wash it off with plain water. Other similar materials may leave behind ugly marks. A ruler will be needed to create a template - it is most convenient to use an iron one, where the counting starts not from zero, but from one.
All work is most often carried out on a film with air capsules, which helps to respect the coat. Sometimes it is replaced with other types of film or rolled on a board for washing. When working on order, you will need special shoe pads for felting slippers. If you make shoes for yourself, they are not needed. Also, scales can be useful for work to accurately measure the right amount of material. For wet felting, we prepare a container with water in which we put a piece of laundry soap. Before starting work, we protect the working surface with a film and put on gloves.
Correct measurement
Felting wool slippers begins with a measurement. A template is made on it, which is cut in the shape of the foot. In order to correctly determine its size, it should be borne in mind that the coefficient of shrinkage of the wool after stalling is 30-50%. It can vary greatly depending on the type of material, its quality, and even within the same batch. Therefore, before felting slippers or other large products, it is best to check how much wool sits on a small amount.
Making a template and taking measurements requires a careful approach and accurate calculation. The feet of people are different, because it is so important to measure correctly. For example, for a leg of the 39th size, the length of the template is 38.5 cm. If you do not know how to get the right size, measure the foot length, divide the number of centimeters by 2, and then multiply the resulting number by 3. Accordingly, if the size is known, to get the length of the foot, the number must be multiplied by 2 and divided by 3. In order to determine exactly how much wool to fel slippers, you need to take into account the size of the foot, the height of the foot and the desired thickness of the product.
Template making
Take a sheet of paper and draw the desired shape with a watercolor pencil. If you have pads, circle them and then resize to fit. When working on an order, the masters ask the foot size in centimeters, since currently there is no single standard and different shoe factories use their own scales. It is also important to measure the rise and width, so that later slippers are comfortable to wear. Approximately 1 cm on each side is added to the width. The resulting size is increased by 30-50%, depending on the coefficient of shrinkage of the wool. As the material for the template, you can use the substrate under the laminate and pieces of linoleum. A properly made felt is able to keep moisture out for up to half an hour. Therefore, in high-quality boots, you can stand in the water and not wet your feet. For slippers, such a density is not needed, but it is important to be able to work with wool correctly to get a comfortable and beautiful product.
How much wool do you need on slippers
When the blanks are ready, proceed to felting slippers. Weigh the wool first. About 300 grams are usually enough for one pair of shoes. For the 36th size - about 200 grams, and for the 45th - 290. It is important to divide the material equally, so that both slippers are the same. For wet felting, you can use erased wool, but non-washed felts faster. During processing, the material still stretches. Next, we begin to lay out the wool. From the layout of 90% depends on what thing will turn out in the end - this is one of the most important stages of the wizard. Felting wool slippers is a long process, so you need to be patient. We lay out the material in layers in three stages.
The process of creating wool slippers
We begin to lay out the first layer of wool. We take the templates and put them on top of the prepared material, and then pluck off the excess at the edges. If it turns out too thin somewhere, add pieces of wool. When the workpieces are laid out, we take a container of water and soap. Soap is best dissolved in advance to speed up the process. One piece of laundry soap is enough for five pairs of slippers. Next, remove the template and begin to apply a soap solution to the wool and wipe it with the palm of your hand, gradually dumping. This is necessary so that the sole becomes more dense. Then we put the template back, again we take the solution and we begin to wrap the edges of the wool along the edges so that there are no creases.
How to evenly distribute wool
It is important to understand that the edges of the template are not the edges of the future slipper. In the middle, it is necessary to put so much wool so that the layer thickness is equal to the sole under the workpiece. Tear the fibers into pieces and spread them evenly over the entire surface. If this is not done, the slippers will be irregularly shaped. On top we put another, thicker layer of wool and begin to roll with water and soap. In order for the wool not to stick to the hands and fail equally in all places, the craftsmen use a net or a cloth that is placed on top of the product. But usually it’s enough to take thin gloves or a plastic bag. It is important to ensure that the edges of the upper layer do not spread to the sides - then it will have to be turned down, then on the bottom of the slipper there will be more wool and the shape of the product will be distorted. Therefore, you need to try to align the material according to the template. Turn the workpiece over and start processing from the back. In the process of felting slippers, we ensure that wrinkles do not form on the wool, otherwise creases and scars will form in these places later. The edges are carefully wrapped and smooth.
Secrets of felting wool slippers
After working with the first coat of wool, you must wipe your hands. Then proceed to the layout of the new layer. We start with the so-called stabilizing in the central part of the workpiece. Tear the wool into shreds to lay it out evenly, and lay it on the surface of the future slipper. We check with our palm how well the material was distributed, and then roll it with soapy water. Since the toe and heel are usually wiped, in these places the coat should be thicker and wider. Therefore, in the second stage, a little more material can be added around the edges, but so as not to create wrinkles. Turn the workpiece over and add a layer of wool from the back. We use soap only during layout. After we pull out the template, we will no longer need it. So that water does not flow on the table, we take the workpiece and slightly squeeze it.
We continue our master class on felting slippers: we begin to lay down the third layer of wool. When finished, we roll a small piece of wool of a contrasting color so as not to confuse the right and left blanks. We begin to dump all the layers in one circular motion towards the center. It is necessary to bring the material to such a state that the template inside becomes cramped. Turn over and repeat on the reverse side. Then squeeze and soap again. The more often we do this, the cleaner the coat will be. This is especially important with white material - if something is underworked, all the flaws will be visible on the finished product. We continue to lather our hands and roll our wool on both sides. We wipe it with the palm of the width, moving up and down. When the wool is sufficiently rolled, we take the reinforcement and begin to forcefully roll the workpiece with it, working the same way as a rolling pin. We process the product from two sides. Our task is not to seat, but to compact the felt. The dense material itself sits as it should. At this stage, you do not need to use a lot of water - we lather the felt to wash the wool.
Product Modeling
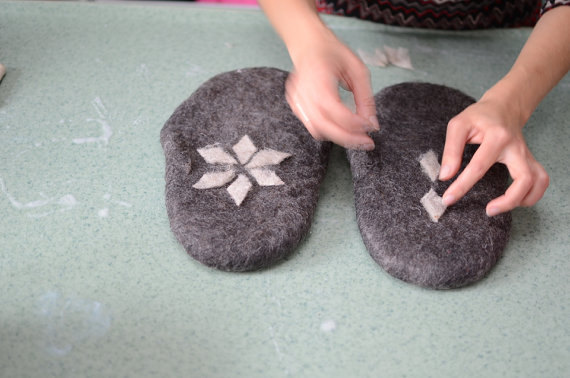
At the next stage of felting slippers, product modeling begins. To do this, take a ruler and a watercolor pencil and find the center of the workpiece. Then we calculate where and what size the cut will be. It should not be too big. It is important to determine what shape slippers will be - with or without a backdrop. It depends on where the cut will be located. Slippers without a backside will be harder to respect. Some masters use a washing machine to felting slippers, but this is not recommended for beginners to use this method, since it is difficult to calculate how much the hair will sit down.
How to make a slot
Having outlined the incision, we take the scissors and, having made a small hole, we introduce the blade inside and we begin to cut out the part without closing the scissors to the end. This method will help to avoid chipping on the felt. It is impossible to trim the cut-out, you can only slightly adjust the excess. Now proceed to extract the template. First we take the soap, soap our hands and, placing our fingers inside the product, we begin to quickly process the edge of the cutout with quick movements. It will begin to grow and stretch - that is why the cut should be small. We completely wipe the entire cutout and seams around the edges to avoid scarring. We add a soap solution and, while the template is still inside, we begin to simulate slippers, raising the edges of the product. Having finished giving the original form, we remove the workpiece. Slippers are almost ready.
We dump the product from the inside
Since the surface of the felt was processed by us mainly from the outside, the inner surface of the product was piled worse. Therefore, at the next stage, we proceed to felting the slipper from the inside. We wipe the surface from all sides, then wring it out and rinse under running water. After this step, the product can be set aside and dried. In the process of felting, static electricity has accumulated in the product so that it leaves, you can give the product a "rest" for a day.
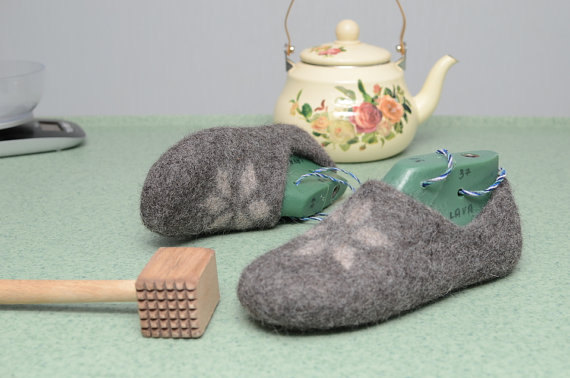
Final processing of slippers
In the future, we will no longer use soap. Subsequent processing of wool can be done on a conventional film with air capsules or on a washboard. Felting for beginners can be complicated by the lack of professional tools. But masters usually use materials that can be replaced with something. To respect the felt, we need several types of rolling pins with prongs, a crush and a ruble. We begin processing the slipper with the setting of the heel. A special tool for this can be replaced with a normal pusher:
- We put the product on a film or a washboard and inside, in the area of the heel, put the tool.
- We begin to roll the wool in shape with dry hands, ironing it with quick movements back and forth.
- Then, without taking out the nudge, we roll the slippers on the board.
- Now we remove it and inward we prevent a small ribbed rolling pin without handles, and we wrap the heel inward and again roll along the board.
- We take out the rolling pin and roll the product with it from the outside, but not to the end, otherwise a crease will appear on the toe, which cannot be leveled.
Again, we repeat all the steps until we give the product the desired shape: put the heel, bend it and roll it from the inside, and then from the outside with a small ribbed rolling pin.
After that, we take out all the tools and just work with our hands, rolling the slippers on the washboard. Moving forward, we press the product to the board, and back - release. So you can fix small irregularities that could not be corrected when cutting holes. If the felt is not well enough ridged, in the process of wearing it will begin to creep. Therefore, at this stage of work, you need to dump the product as best as possible. All subsequent actions are repeated, only the tool changes. We take very small rolling pins with cloves at the final stage. For the convenience of felting, you can use the ruble. So gradually bring the product to the desired shape. Of course, for beginners, felting slippers can seem very difficult. This technique does require perseverance and physical strength. There is also a dry felting of slippers - using special needles. Needlewomen can try different options and choose the one that is closer to them.