The skirt is one of the most irreplaceable gizmos in the wardrobe of any woman. As a garment, she was known in ancient Egypt, it was worn by everyone: men and women, commoners and pharaohs. If you have long wanted to sew a skirt yourself, but did not dare, it's time to start!
Interesting about skirts
In the modern world, a skirt is generally considered exclusively women's clothing, despite the fact that in many nations it is often found in national men's suits. For example, in Scotland, men wear a kilt - a skirt to the knees with pleats at the back that allow free movement. Usually it is sewn of checkered material, which is based on real wool.
The skirt can be worn as casual clothing, or used in evening dresses. Even with one single basic skirt, you can create an incredible number of images, the main thing is to correctly combine outerwear with her.
If you decide to sew this outfit yourself, but you have never picked up scissors, we recommend that you follow our tips. This walkthrough for beginners is the perfect way to break into the world of tailoring your own fashion. First tip: take the simple model as the first test, otherwise many people take on the difficult construction of a 6-blade skirt pattern and as a result, after unsuccessful attempts, they decide never to sew again on their own.
How to choose a fabric?
The most important step when sewing any clothes is the choice of material, because it depends on the texture of the fabric whether the skirt will turn out as it was intended. You should choose the fabric depending on the style of the future skirt, as well as on the following factors: comfortable wearing, season (winter / summer), practicality (ease of care).
Classical products (straight and strict skirts) are sewn from dense material that does not lose shape for a long time. An ideal option would be mixed costume fabric, which is made from natural and synthetic fibers. Manufacturers offer a huge variety of products: silk, tweed, velveteen, knitwear and many others.
It is easiest to work with natural materials, but not all of them give the desired effect. Cotton or linen things very quickly lose their shape, wrinkle and spoil the whole image. We recommend choosing materials with the addition of stretch, viscose, polyester or elastane. Sewing a skirt from them will be as simple as building a sun skirt pattern from a stretching fabric.
Find your style among a variety of styles
Another important step when sewing a skirt is the choice of a suitable style. Here you can use all your imagination and create your own design, however, you should know some rules for the compatibility of skirts, depending on the type of figure.
- For girls with curvaceous, the best option would be a wrap skirt. Using this idea, you can create an incredible number of different models.
- Refined and slender girls fit bell skirts, they add femininity due to the effect of "volume in the hips."
- Mini-skirts longer than knees, as it were, stretch the growth, visually making the girl's legs longer. In this case, it is advisable to choose a mini model with a high waist.
- For owners of an hourglass figure, a skirt or a straight skirt will be an ideal style (a pattern for beginners will be the easiest when choosing this model, since direct cut does not require unnecessary work).
Coco Chanel came up with the ideal proportions for her skirt: her length should be just below her knees.
How to take measurements
To build a skirt drawing, it is necessary to correctly measure. All measurements are taken from the person for whom the product is sewn. If you first decided to sew a skirt for yourself, but still do not know your size, first measure your volumes. So, you will need to take a regular centimeter tape and grab the right part of the body with it. Some girls, for various reasons, deliberately hug their waist too tight. It is very important not to “reduce” your volumes, because exactly how the finished skirt will sit on you depends on it.
To build a skirt, we need the following values:
- Waist circumference (the part of the body where our future skirt will begin).
- Hip circumference (measure the volume in the widest part of the body below the waist).
- Desired product length.
Depending on the style you have chosen, you may also need more information about the width of the skirt at the very bottom.
Pattern skirts for beginners: step by step instructions
In general, the process of sewing any clothes can be divided into three steps: the first is to take measurements, the second step is a pattern, the third is the sewing stage.
If you do not have a finished drawing, you will have to do the pattern yourself. So, for this we need the following: graph paper (or tracing paper), measurements (values of waist half-circumference - PT, half-circumference of hips - PT, length from the waist line to the hip line of the TB, and also the length of the product itself - DIZ). When patterning should take into account a few "extra" centimeters in favor of an increase in the freedom of fitting the finished skirt. Do not be afraid of these values, they are calculated very simply: if you have a waist circumference of 70 cm, then the half-circumference will be equal to half, i.e. 45 cm. We repeat the same steps with each measurement.
The following instructions are for sewing a regular straight classic skirt. Before sewing other models, it is best to practice on a straight-cut skirt, since with her example it is easiest to understand the principles of drawing and sewing.
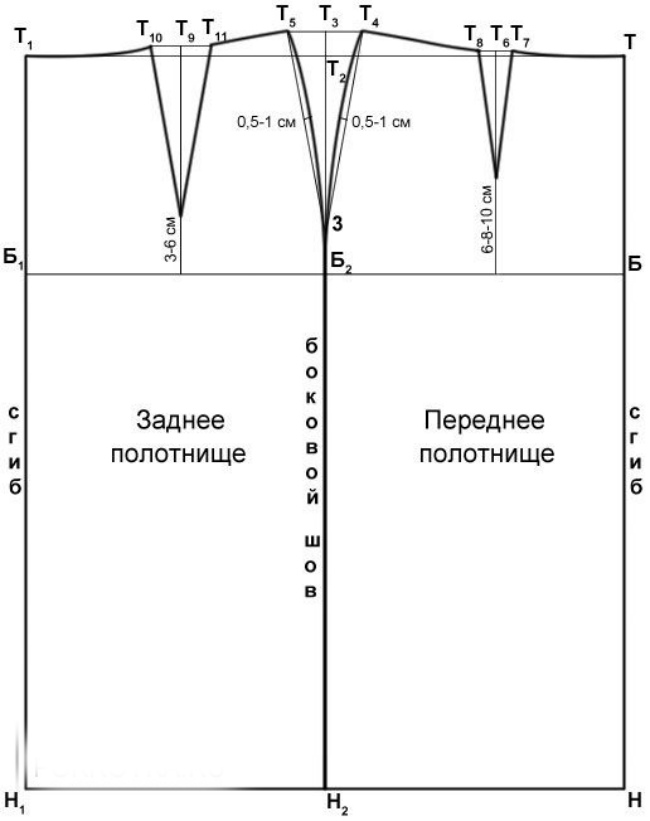
- To build a skirt and its pattern, select a flat and spacious surface and lay out paper or tracing paper on it, then arm yourself with a pencil and proceed to the drawing. In our pattern, we must designate one point, let it be the point T.
- Further, according to our measurements, we lower the line from point T to point H - this will be the length of our skirt (DIZ)
- The TB segment is the length from the waistline to the hips, usually about 20 cm.
- From each point T, H and B draw horizontal lines and mark the new points T 1 , H 1 and B 1 .
- The width of the BB 1 is the sum of the PT values (half hips = 48 cm + 2 cm per increase).
- Then BB 1 must be divided into two parts and put point B 2 , from which we must lower the vertical line down - this is the side seam.
- In the drawing of a straight skirt (in the pattern for beginners, shown in the picture) you can see the points T 2 , T 3 and T 4 , which are the grooves of the side seam (about 2.5 cm each)
- Next, draw the waist deflections on two parts: RFP and PP. To do this, lay 2 cm from the points T and T 1 (for protruding buttocks we take 1 cm) and draw a line where the waist passes.
- The same undercut needs to be done on the middle seam (where our fastener will be). From point T ' draw 2 cm to the right and connect with a dotted line to point B.
- If you want a straight skirt below the knees, you should cut 1-2 cm from the bottom line so that the width decreases and the skirt retains the silhouette.
And last, you need to think over an important detail - a belt. If the skirt sits on the waist, then it is better to make a belt about 3 cm wide. At the same time, "extra" centimeters in the drawing should be noted (TT 1 belt width and shade 1.5 cm).
If you learn to cut according to our manual, then stitching other models will be as simple as making a pattern for a pencil skirt.
How to draw a drawing on the material?
The construction of the skirt on the fabric must begin with the correct location of the material itself. The fact is that any fabric has a warp and wefts (these are the threads from which it is made), which stretch in different ways. It is necessary to correctly lay the cut so that in the future the skirt does not skew in one direction. If the selected fabric stretches well on the basis, then we translate our pattern in this direction. To save before buying fabric, be sure to measure its consumption. So, for example, when constructing a pattern of a skirt with a smell, you need to take into account not only the circumference of the hips and the length of the product, but also the width of the additional part.
The next step is to perform cutting on the material itself. To do this, fold the fabric in half, while the front side should be inside. Then we put our finished drawing on it and carefully trace it with chalk. An interesting life hack: if you didn’t have a tailor's chalk at hand, you can take a piece of dried soap and circle the pattern with it.
When cutting the skirt base on fabric, additional centimeters for “seams” should be taken into account - approximately 1.5 cm on each side. We cut out our future belt on a separate piece of fabric (its length is equal to the waist circumference). In order for the belt to be reliable and emphasize the figure, it is necessary to sew a lining into it. Non-woven is best for this.
This completes the construction of the skirt, and we can proceed to the next step.
And now we sew!
Many people think that the most exciting part of sewing is the very process of sewing together parts, because it is at this stage that you can already see how our skirt turns out. So, before you start sewing, you should prepare a sewing machine with seasoned threads of the desired color, pins and, of course, be patient!
Before you start stitching the details of the skirt, it is better to pin them with pins so that they do not move relative to each other. For beginner needlewomen, this is one of the main problems, so do not be lazy and put in the seams along the edges. These stitches will allow you to move parts freely while you sew them on the sewing machine.
Make sure that the seam is straight, smooth and continuous, otherwise the finished skirt will turn out with ugly puffs along the line connecting the front and rear paintings. When all the parts are sewn together and the middle back seam remains, you should leave a place for a fastener in it (about 2-3 cm).
It remains to sew a belt and install a zipper. Pay attention to the joints of the “darts” when sewing on the belt: if they are too thick, just grab the iron and go over them.
The simplest product
For girls, a tulle skirt decorated with details in the form of flowers or bows. Sewing such an outfit is very simple, because it does not have a zipper, it rests on a decorated elastic band.
To sew a skirt on a girl about 160 cm tall, we need the following materials: tulle (size 3 x 3 m), satin fabric (about 60 cm long and 1.5 meters wide), standard elastic (4 cm wide, 3 cm long) more waist circumference). In addition, pins, threads, measuring tape, scissors and, of course, a sewing machine with an adjusted mode will be needed.
We always start with a pattern: for this we need to spread our eurofatin on a flat surface, and then arm ourselves with a measuring tape and tailor's chalk and mark five details on the fabric. Since we have a square cut (with sides of 3 meters), we can divide it into 5 pieces 60 cm long and 3 m wide. From each detail we will sew a new layer of a tulle skirt. For younger girls, you can take a piece of fabric three times smaller.
So, the next step is the assembly of each part. You need to take a needle with a thread of a suitable color and pick up each received section at the upper extreme section. Be careful, the assembly must be distributed evenly over the entire width of the fabric. It should get the same patch as in the picture.
Step by step, you need to perform the same actions with each layer. Then you need to connect each patch to each other, you get a voluminous and lush design, to which we will sew the lining.
A little trick for beginner needlewomen: if you want the process to go faster and at the same time the seams are applied carefully, we recommend periodically ironing each layer of the skirt before stitching it with the next one.
Process completion
The lining for the skirt needs to be cut out of an opaque fabric, the ideal option is a satin fabric. The choice of color is limited only by your imagination, so here we give only one piece of advice: let the lining look organically under the tulle layers.
It is necessary to scribble the bottom edge of the satin cut, and on the top - make uniform assemblies. Then unscrew the tulle part of the skirt and sew the lining on the sewing machine. Make sure the seams are smooth.
Our skirt is almost ready, it remains to connect the elastic to it. The stores have a large assortment of decorated rubber bands, so the process of choosing the right color element will not be difficult. Need a gum length equal to the circumference of your waistline + 3 cm for seam allowances. Sew it in one whole "circle".
Stretch it and sweep it with the main part of the skirt with wide stitches. Then put under the machine and carefully sew along the line of the marking seams. The construction of a skirt, although it looks complicated, actually turns out to be very easy, and most importantly - an interesting occupation.
There are a lot of variations of tulle skirts! And the advantage of this particular model is that it can be combined with absolutely anything: a tutu skirt looks great both with summer tops and winter sweaters.
Adding Details: Interesting Ideas
If you decide to dilute a plain skirt with bright colors, you can add embroidery to the top layer of the skirt. Scarlet roses, purple butterflies, elegant bows embroidered on delicate tulle will add romantic notes to your image.
It is best to buy ready-made items in the decor store, where you can also buy special sparkles and beads. We assure you that you don’t have to bother with them for long. Modern manufacturers produce these elements with ready-made glue, so only an iron is needed to decorate the skirt.
A couple of years ago was a fashionable skirt with a train. Usually it is worn at ceremonial events, but if you sew such a model from tulle, then it can be used as casual clothes. When constructing a pattern of a skirt with a slot in the back, it should be taken into account that tulle and satin will need more, because now the length of the skirt will be longer.