You can decorate the interior with interesting things made by yourself. Try, for example, making a braid rug. The master class presented in this article with photos of some stages of work clearly demonstrates the whole process.
The history of rugs
It is believed that the first wickerwork was made by man more than 2500 years ago. The beginning of the formation of manual techniques for the manufacture of various rugs and knitted items dates back to the same time . The Slavs carpets belonged to the "grassroots" techniques. This meant that knitting, weaving thin fabrics, weaving lace suggested a higher level of craftsmanship. And the manufacture of simple paintings did not require the presence of virtuoso skills. Therefore, in any hut, the main decoration was the rugs on the benches, stoves and chests. Later, it became customary to cover the floor as well, since the old rooms were heated by rapidly cooling Russian stoves. So various rugs and rugs have become an integral part of the traditional Slavic decor. Since the 19th century homespun paths have been especially popular. The primitive manufacturing technique became the basis for the creation of various weaving trends characteristic of each nation.
Materials used
Very often in the old days, to make various rugs from braids with their own hands or knitted rugs, straw, flax, hemp were used as raw materials. Such rough products found their place at the entrance to the hut. To obtain softer bedspreads, old things were used, which were cut into narrow strips and, after spindle scrolling, were woven on a dense basis. A special place among all household items was occupied by round products, such as, for example, the aforementioned braid rug. The master class, which is described later in this article, will help create a similar simple product in folk technology. To learn how to perform, at first glance, a simple job, you need to gradually master the entire technology. When choosing a material, take into account its structure, density and thickness. So, for example, when making rugs from braids with your own hands to cover chairs, sofas and stools, you should not use old thin knitwear and strips of warm drape at the same time in one product.

Production of blanks for weaving
Prepare a sufficient amount of appropriate material before starting work. To make do-it-yourself mats with braids, you will need fabric ribbons for weaving. To do this, cut any old thing into equal strips. Width can be from 2 to 4 cm, the length is limited by the size of the product. Sew knitwear and light fabrics by stitching strips on a sewing machine or with your hands, joining diagonal sections. Such material (in addition, if it is strewed and frayed around the edges) must first be rolled up into tubular "threads". To do this, fold up the two edges of the tape on both sides, and then fold it in half. Thus, a four-layer product is obtained. Using an iron, iron each fold, then the contours of the lace will be clear and accurate. To make it easier to carry out such painstaking work, you can use pre-pins for stabbing. If the fabric does not sprinkle and is sufficiently dense, other methods can be used to obtain a whole ball of continuous filaments, which are described below.
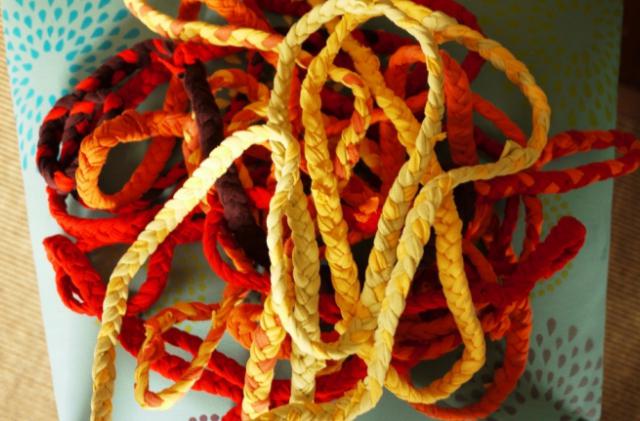
Options for connecting two weaving tapes to each other
To make the canvas beautiful and without unnecessary bumps, the fabric “yarn” should be wound into balls in continuous threads. This is especially important if the braid mat is knitted or braided in a circle. Consider two ways to connect two separate pieces of cloth tape:
- First option. Make small longitudinal cuts from both edges with a length of about 0.7-0.8 cm (provided that the finished folded tape has a width of about 1-1.2 cm). Place them close to each other. Then push the end of the right tape through the hole in the left tape. Pull out the free end by 2-3 cm. After that, thread the back side of the left ribbon piece through the hole in the threaded right ribbon. Pull both ends of the formed tissue segment slightly in different directions.
- The second option. Make two cuts in a manner similar to that described in the first embodiment of the connection. Then place the two ends of the ribbons a little overlap, creating a whole “thread” (left over right). In this case, the holes should match. After that, pass the back end of the left tape into the slot from the bottom and pull to get a loop-knot.
Making braids using different braiding options
Since ancient times, there are many techniques for creating blanks from which rugs and capes are made. Do-it-yourself multicolor braids rugs could be decorated with original ornaments. An unpretentious pattern on a rectangular canvas was obtained due to the alternation of fabric "threads" of different shades when working. Woven into one and adjacent strips docked in color. Thanks to this, a mosaic effect was created due to the combination of the same interspersed common ornament. Circular weaving was usually distinguished by alternating alternation of monophonic braids. But if you prefer brightness, originality and variegation, alternate when weaving several threads from different balls. Their number can range from 3 pieces to 5. Blanks from a large number of threads are more suitable for rectangular products. Round rugs, as a rule, are made of traditional tapes of three threads.
Different ways to pin based
After making woven ribbons of sufficient length and winding them into balls, you must first decide on the shape of the rug. Then braided rugs from braids are fixed on the basis (whether it is a rectangle, square or circle) in one of two ways:
- with glue;
- machine or manual seam.
The first option is more convenient when laying dense and rigid workpieces. And how to sew a rug from braids woven from thin material? You can carefully create the product row by row, attaching to the base, for example, with a zigzag seam. Contrasting color stitch will be an additional product design. In the event that you do not have special equipment in the form of a machine, you can connect improvised laces with secret stitches manually. Then you need to do the work in two stages, immediately following one after the other: stitching the adjacent braids and laying them with fastening on a fairly dense fabric base.
Edging rugs or tracks
The edge of both the base of the product and the ends of the braids fixed on top of it must be accurate. The simplest situation is when choosing a round shape of the rug. Cut two blanks of the desired diameter from the fabric and sew them, departing from the edge by 1-1.2 cm and leaving a small hole unstitched. Turn the face out and sew the lumen manually with hidden stitches. Lay long woven woven strips over the resulting base, moving in a spiral. If desired, the ribbons can also be sewn without using a backing. Then the handmade homemade rug will not be too tough. The ideal option for its use is a cloak on a sofa or chair. When processing a rectangular base, do not sew it on all sides. Indeed, in the gaps located at the ends, it will be possible to hide the tails of the braids. If you like fringe, you can leave the ends of the ribbons after weaving, fastening them on top with a machine line and aligning the edge.
As you can see, you can endlessly fantasize and experiment in the manufacture of paths and rugs, creating unique designer accessories and items to decorate the interior.