The favorite toys of girls of all generations are dolls! You can’t argue with this fact! And for several decades now, the favorite among Barbie's little mischief has remained the favorite. How to create clothes for dolls with your own hands? Patterns will gradually help to understand the process and allow you to create more and more new masterpieces. Two options for making a template for sewing things of varying complexity will help develop the girl’s design abilities and, perhaps, in the future, the basics of cut will also be useful for sewing my own clothes.
In the meantime, what could be more interesting than the process of creating an outfit for a cute toy girlfriend? How to create a chic doll wardrobe for Barbie and other dolls will be discussed in this article.
Create Template
How is the pattern built? DIY doll clothes can be sewn on the same principle as for people. You can start work by taking measurements with a centimeter tape. The only thing that needs to be changed is the unit of measurement, and record the measurements not in centimeters, but in millimeters.
For many, the second option seems simpler. Here, the pattern of clothes for dolls with their own hands is done by wrapping the figure with baking foil.
Both the first and second methods involve the participation of parents in the process of making patterns, but the child will be able to sew clothes for dolls with his own hands, patterns of which are already ready, on his own.
Building patterns using measurements
It doesn’t matter a textile doll, plastic or porcelain. In any case, she can measure the circumference of her chest, waist, hips, width of the back, height of the armhole and chest, shoulder width, length of the sleeve and the bottom of the product, and take other additional measures indicated in the description of the construction of the drawing. It is such measurements that will be required to get things that are suitable in size. Then it remains only to understand the principle of how to create clothes for textile dolls with their own hands.
Clothing patterns are the foundation. It is worth creating one template and on its basis it will be possible to model various styles of dresses, blouses, skirts and cardigans.
Description of drawing construction
In order to develop a pattern on a piece of paper, draw a rectangle. Its vertical side should be equal to the length of the doll from the shoulder to the foot. It is best to make the base pattern exactly in full growth. This will further facilitate the design. The other side is half the measure of chest circumference. In this embodiment, the half half of the back and half of the front shelf for a straight dress with a fitted silhouette up to the floor will come out on the drawing.
After you need to retreat down from the upper left and right corners, which is equal to the measurement of the height of the chest. Measure it from the shoulder to the protruding portion of the chest. If this is a textile doll without roundness, then you need to take this measurement approximately. The two points obtained should be connected to get the line of the chest and the border of the armhole for the sleeve. After, in the upper corners you need to draw the neck, in front the cutout should be twice as deep. You will also need to postpone the shoulder width, a little diagonally, repeating the bevel in accordance with the torso of the doll. Then comes the turn of the armhole. First, half the width of the back along the chest line should be noted, then ½ of the chest circumference should be divided into 4 parts and put this value on the line, starting from the point of the edge of the width of the back. The resulting segment will be the armhole zone, where it will be necessary to draw rounded lines from the shoulder and to the chest line.
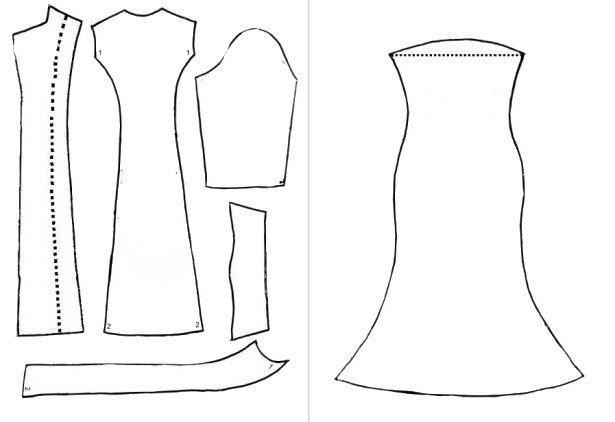
Here it already becomes clear how the pattern is built. DIY doll clothes are created by simply transferring the measurements to paper. And the next step is the designation of the waistline. It is located in accordance with the measurements of the length of the back and front to the waist. Here, on both vertical sides of the rectangle, lay the back length and draw a line parallel to the chest. If the length of the front is longer, then find the middle of the line and from it to the front lay another additional line. Next, the difference between the measurement of the waist and the obtained length is calculated and the tucks that need to be picked up for a good fit of the clothes are distributed along the line. Next is the turn behind the line of the hips. Usually their width is greater than at the waist, and sometimes more than the chest. In this drawing, after constructing the side slices, taking into account the size of the hips, the parts will be found on top of each other. After determining the level of the hips line from the vertical sides of the rectangle on the left and on the right, I put off the hip circumference measurements by and put points. Then it remains to draw a side slice, connecting the center point of the armhole, the points of the lateral notches of the waist, hips and draw a line down.
Pattern with foil
How else can a pattern be built? DIY doll clothes can be sewn using patterns made by wrapping the doll with foil for baking. This option is perfect for Barbie and other plastic dolls. The toy is wrapped in a rather thick layer, after which they take a marker and draw all future product seams. Next, the foil is cut with manicure scissors and removed from the doll. After the whole pattern is divided into elements.
Fabric selection
DIY clothes for Barbie dolls, patterns of which can be built in the two ways described in the article, can be sewn on a typewriter or manually. It all depends on the skill level and type of material. If the fabric is loose, then manually it will be very difficult to handle. If this is knitwear, then manual sewing is perfect. In addition, this option due to the fact that the fabric stretches, will hide minor defects of the cut. But in any case, the fabric for the doll should be colorful, bright and beautiful. For ball gowns, it is best to choose a material with sequins or embroidery. Here you can use a variety of lace, tulle, mesh, brocade, sequin fabric, velvet, velor and other expensive materials.
Fastener design
How to make a clasp, and how the pattern should be changed for it? DIY doll clothes can be decorated with Velcro, buttons, buttons or hooks. It all depends on the idea. If you need to fasten a sufficiently long incision, then it is better to give preference to Velcro, and if it is a thin strip of fabric, then a small button or hook will do. As a rule, the fastener for dresses, skirts and sarafans is made on the back, starting from the very edge of the product and below the line of the hips.
Now you know the necessary base. Good luck with your work!