The word “batik”, according to one version, consists of two words (“ba” means “fabric”, and “tick” means a dot) and comes from the language of Java. This name appeared due to the special technology of dyeing matter using a drop of wax. Now it is a synonym for fabric painting. Even in Ancient Egypt they learned to paint the cloth in a special way, pulling it and lowering it into the water with various plants that can give color. Such technology was used until the 19th century. Costume historians suggest that in Japan in the 7th century, nodular batik, or shibori, came to this country from China. Due to the cultural characteristics of the country, technology did not extend beyond its borders, but was cultivated in small workshops where knowledge was passed on from generation to generation. In Japan, any work by a fabric maker was equated with the artist’s art. Most often, in the technique of nodal batik, kimonos were created. It was not only immersed in color completely, but the nodules themselves painted with a brush. Then, painting on already dried fabric, embroidery with silk and gold thread was added.
History of Shibori
The word "shibori" means the color of indigo. Natural indigo was obtained from a bean plant called indigofer, which grew in tropical countries and therefore was expensive. The process of dyeing fabrics was long, as a result of which the cost of indigo products turned out to be very high. Depending on the duration of dye exposure to the fabric, various shades were obtained: from light turquoise to deep blue. To obtain a bright, juicy color, the products were kept in solution for about a week, periodically removing, drying and again lowering into a tub with liquid.
Batik and synthetic paints
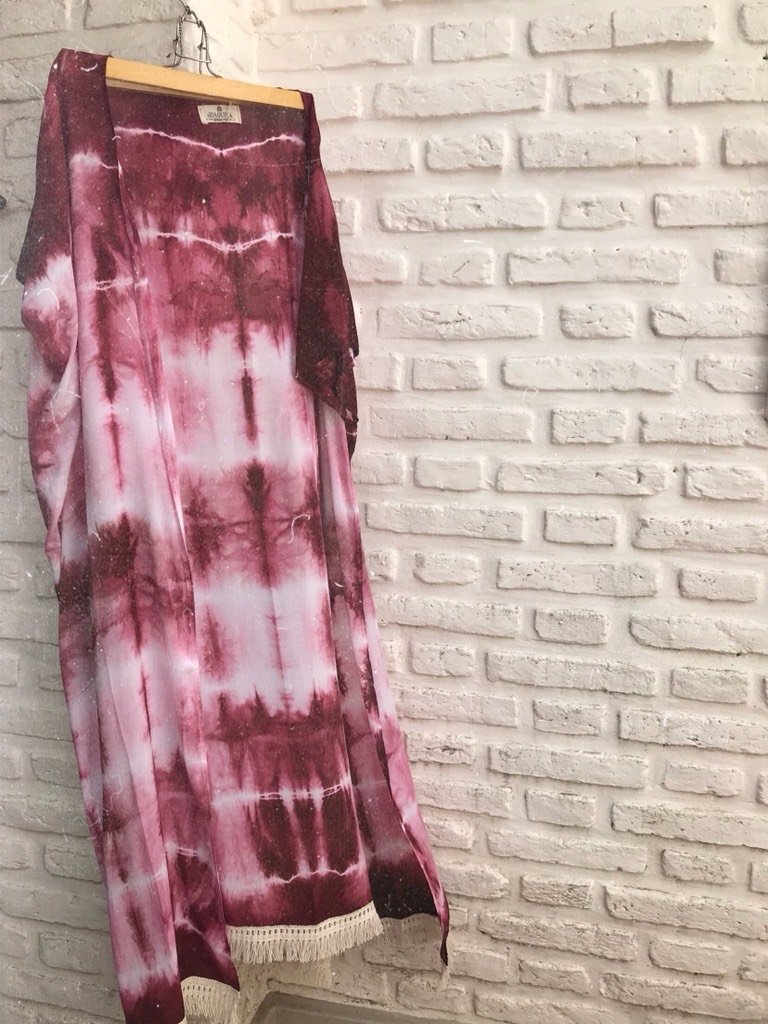
Only in 1859 as a result of synthesis did aniline dyes appear. After that, the spread of synthetic paints could no longer be stopped. There were more and more different shades on the market. Nodal batik is often associated with hippie culture - this applies to very bright, flashy colors, in which its representatives traditionally dyed their clothes. But, using restrained, cold shades in the work, you can create completely different images, more strict and classic. Having bought a ready-made dress or skirt, even beginners using the technique of knotted batik can easily create a thing in their own original style.
Material Processing Options
Much of the folding batik technique depends on whether the dye will be fixed at each stage of processing the material. By fixing the paint on a fabric already knotted or on a dried surface, very different effects can be obtained. There are many options, which is why a large number of clothes are created in the folding batik technique. Many craftsmen do not smooth wrinkles after the material dries. But this can only be done with special fixing methods. In order to fix the product with steam, before that it still needs to be smoothed out.
Features of the technique
Fabric painting using batik technique is used in various fields: for decorating clothes, home decoration, and accessories. There are a lot of opportunities in this type of needlework and there are no restrictions on either age or level of knowledge. You can apply various paints of varying degrees of consolidation. The technique for making a nodal batik is quite simple: knots are tied onto the fabric, which are painted first in one color, then the folds change and the material is painted in a different color. So, step by step, an unusual pattern appears on the fabric. Painting with small knots allows you to get a relief surface with a smooth transition of color. The peculiarity of the technique is that it is possible to work both with fabric cuts and with finished products. Using special clamps and even ordinary stones, craftsmen give the product relief and corrugation. There is no need for a stretcher and there are no restrictions on the size of the canvas. You can color any amount of material. Another option is to paint the fabric first and only then create the background with dye. It is not necessary to use color on the entire product, very often only certain details are painted.
Batik in the interior
When dyeing fabrics in restrained shades of blue, you can get stylish textiles for a Scandinavian interior. Bright shades are suitable for creating accents in a classic or oriental style. Folding batik masters create paintings, bedspreads, curtains, decorative pillows and even lampshades for lamps, using simple techniques and combining various methods of applying fabric dye. Depending on the way the dye is fixed, beautiful folds or embossed patterns may remain on the material. This allows the manufacture of bulk products.
Nodal batik: master class
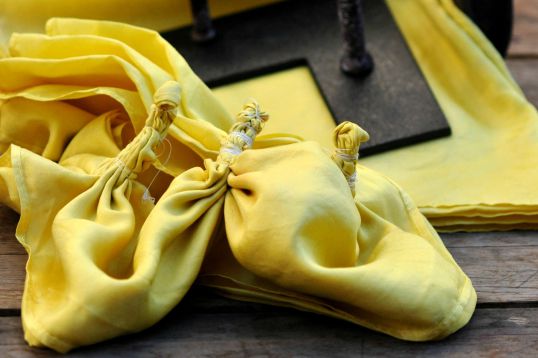
Folding batik is a very affordable type of needlework. Even children can master it. For beginners, a nodal batik is a great option for exploring the technique of hand-painted. Prepare everything you need: you will need a product made of natural material, such as a linen or canvas bag, as well as special dyes, scissors, a rope and a container of water. Paint for the fabric will need a special one, for dyeing plant fibers in cold water. The pattern can be supplemented with stencils to make it look more interesting, as well as add volume using a contour with a pearl effect. Before painting the bag, it must be washed and dried, as the fabrics are impregnated with special substances that may prevent the paint from absorbing. Work only with clean material. We will immerse the dyeing fabric in a plastic container with 2 liters of warm water. Do not use metal utensils and basins for this technique. Before starting work, to protect your hands from pigment, put on gloves, and also cover the work surface with a film and, just in case, prepare napkins.
Preparation and coloring of the product
In order to get spectacular vertical strips of various colors on the fabric, the bag needs to be folded in a similar way as children make a fan of paper. Now at one end of the product we fix the twine and begin to wrap it around the bag. The rope should be tight enough, otherwise the ornament will not appear. Depending on its tension, the pattern on the material will also change.
Next, you need to prepare a dye, diluting the pigment in water with a temperature of about 40 degrees. Carefully read the instructions from the paint manufacturer and dilute it in the correct proportion. Often together with the dye in the kit is salt for fixing. It also needs to be carefully poured into a container of water, being careful not to inhale it, and then gently mix and immerse the material in a liquid. Squeeze the fabric slightly so that the dye is better absorbed, and leave it for the time specified in the instructions. Usually it is 1-3 hours.
Processing material after staining
Now the product needs to be removed and wrung out. The rope can be cut or removed, then used to decorate the same bag. We open the product and look at the result. Then, if desired, you can again lower it into a dye to obtain a smoother color transition or place the fabric in a pigment of a different color. Depending on the time at which the material is immersed, different shades are obtained. After this, the bag must be dried, rinsed to get rid of the fixing salt, dried again - and the product can be used.