Today, the entrances of most high-rise buildings are equipped with intercoms, however, there are exceptions - at home, where they have not thought about it yet. But it is worth paying attention to the fact that the intercom will solve a number of problems at once. Firstly, you can save yourself from a society of strangers or suspicious individuals. If you forgot the key to the door to the entrance, then you do not need to ask the neighbors for help and freeze in the cold. Let's see how the installation of the doorphone is done with your own hands. Believe me, this is a perfectly feasible task for everyone.
General concepts and terms
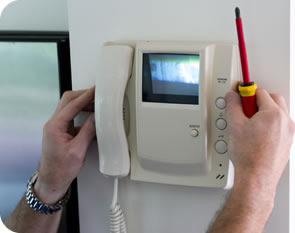
To begin with, let's deal with the basic concepts. Everything is extremely simple here. There is a calling device that is installed outside and serves to communicate with the owner of the apartment. There are both single and multi-subscriber. Modern advanced systems allow you to install various additional functions, for example, a telephone, access control system, etc. In addition, there is a doorphone that is installed inside an apartment or house. As you can understand, the device is intended for dialogue with the visitor. In the simplest solution, this is a regular handset, like in a phone, but in an expensive version it can be a video intercom, allowing you to see not only the person you are talking to, but also the place near it. This allows you to evaluate the situation and make appropriate decisions. As you can see, all this is very convenient, although the point here is not only in comfort, but also in security.
The necessary tool for the job
In order for the installation of the intercom with your own hands to go without problems and violations, you will need to acquire the necessary tool. As a rule, most men already have all this, but something will have to be bought up, especially since this will be very handy on the farm. Well, you can ask something from a neighbor or friend. First, you need to carry a drill, insulation, as well as a knife and a screwdriver. Also get a pack of alabaster, you do not need a lot of it, a few kilograms will be enough. You will also need dowels and self-tapping screws to them. It is advisable to do all the work with gloves, so you will avoid ridiculous injuries. Of course, you can buy a nozzle for a drill, which will allow you to perform a wall chipping, but often home masters do without this tool and cope with a bang.
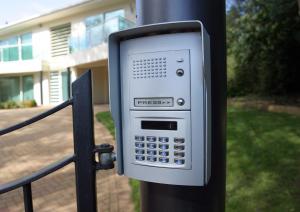
Before installation, we select a set of intercom
After you have acquired the necessary tool, you need to buy something with which, in fact, we will work. In our case, this is an intercom. This may be a budget option, consisting of the most common audio handset and an external device, but most today prefer to pay a little more and buy a video intercom. The principle of its operation is exactly the same, but the set, except for the audio handset, includes a base with a screen, as well as video eyes. The latter is installed directly on the front door instead of the usual peephole. To do everything right, you need to pay attention to the labeling of the cables. As a rule, they have a different color, which will help you connect the system in series and not mix anything up. We can say with confidence that for a multi-storey building, the simplest model of an intercom is best suited. It is advisable that the installation be carried out collectively, with the entire entrance. As for the video intercom, this is an excellent solution for a summer residence, a private house or a cottage.
Choose a mounting location
Any serious undertaking is realized only when you decide on the installation location. In our case, you need to at least roughly figure out where the handset will be in the apartment. In principle, it can be almost anywhere. As practice shows, most often an audio device is mounted near the front door. Of course, installing an intercom system in an apartment involves laying a cable. And this is perhaps the most difficult. It is important to remember that the cable length should not exceed 40 meters, as the signal will decay and, as a result, may completely disappear. First of all, you need to open the shield on the stairwell and find there the cable that comes from the external device. Next, you need to connect this end with a twisted pair, which is done to lengthen it. Next, you need to make channels in the wall, through which the cable to the apartment will go. At the end of laying the wire, the channel is laid with alabaster and putty.
Do-it-yourself doorphone installation without wall chipping
There are similar options that do not provide for hollowing the wall, for example, laying the cable through the corrugation or in plastic cable channels, but this is not always as easy to implement as we would like. The first option is only suitable when the handset is mounted in close proximity to the door. In this case, the channels are laid along the door frame. As for the corrugation, this refers to the cable, which is located in the front door. All this is done to protect against mechanical damage. Do not forget that sagging wires, as well as creases, are undesirable. Carefully ensure that there is no power cable near. In any case, after purchasing the product, you will receive a complete set, which, in fact, includes the connection diagram, but which way you decide to go is a completely different story. But this does not end the installation of the intercom system in the apartment, so let's move on.
Audio tube mounting
Compared with laying the cable, this step will seem like a child’s task to you. Here, all work is carried out extremely simply and very quickly. To get started, make notes at the place where there will be fastenings in the future. Then, according to the corresponding designations, make holes in the wall. Insert the dowels of the corresponding sizes into the resulting holes. Then you just need to screw in the screws and install the intercom in its place. By the way, do not forget that before this you need to connect all the wires. And one more thing regarding electrics: do not forget to power the 220 V cable while connecting the external and internal devices. If you did everything in order and correctly, then the intercom should work. If the device does not turn on, then, most likely, at one of the stages you made a mistake. In this case, you will have to start all over again, although do not rush to get the wires out of the wall. First, check the connection in the shield, as well as the health of the device. I would like to note that installing intercoms in a house today costs a lot. The amount can range from 5 to 10 thousand rubles (including materials), therefore, having done everything yourself, you can save a lot of money.
Installation of the intercom in a private house
There are several fundamental differences. For example, you should choose not audio but a video intercom, as it is more preferable. Consequently, there are new nuances in the installation. The indoor unit is installed behind the door, although you can choose any other place. The outdoor unit is mounted on the other side of the door or fence. But here you need to take care of the presence of a visor that will protect the device from moisture, bright sunlight. Set the angle of rotation correctly. You need to do this so that you can clearly see the person and the environment. We can say that the do-it-yourself installation of the intercom is done by half, it remains only to connect the internal and external units. The fundamental difference is that here it is better to lay the cable underground. The optimal depth is 40-55 centimeters. By the way, the wire is not included, you have to buy it. But it is not difficult, get a standard 4-wire shielded (4x0.22). And all will be well.
A few important points
I would like to note that the installation of access doorphones takes very little time, but if you make a mistake somewhere, then a lot of effort will be spent on remaking. It is worth paying your attention to the fact that not everyone has an outlet near the door in the hallway, where the indoor unit is installed. Without it, you will have to pull the 220 V wire and connect it to the system. Pay particular attention to this point. If you have a repair, do not be lazy - put the outlet. When mounting the call device, special attention also needs to be paid to the quality of the fastening. This is due to the fact that everything happens in our country, so they can simply steal it. Do not forget that the installation of multi-unit intercoms is slightly different. There should be a special distributor that will help the visitor get to the exact apartment where he needs to.
Conclusion
As you can see, installing a doorphone with your own hands is not as difficult as you might think. Nevertheless, you will save decent money, the same 5,000-7,000 rubles can go for other needs, and you will have a new tool, and experience too, which is much more valuable. It is not necessary to do everything alone. Invite your neighbors and do great teamwork. In this case, several people will ditch the wall, others will lay the cable, and others will cover the channels with alabaster. Of course, the installation of the doorphone handset will be carried out by each individually, depending on the preferences of the landlord, but the rest of the work is much faster and more fun to do together. Well, that’s all with regard to the hand-mounted installation of the intercom.