Handmade craftsmen love soft and easy-to-use corrugated paper. It is mainly used for the manufacture of all types of flowers. The latest fashion trend is decorating large halls for anniversaries and wedding ceremonies with large flowers made of corrugated paper. Since in nature there is a large variety of flowering plants, you need to learn how to make flowers of various kinds.
There are easy versions of crafts that older preschoolers can handle, but there are also quite complex elements, especially if large-sized products are made.
In the article, we will consider several different methods for making flowers from corrugated paper according to schemes and patterns. After reading the detailed instructions, you can easily create a beautiful bouquet or decorate a room for receiving guests for a festive celebration. Step-by-step photographs will help in the implementation of the constituent parts of the work and the correct combination of them into a single whole.
What do you need for work?
First, you need to determine the size of the crafts and the color scheme of the selected plants. Next, think about how the flower will be made out of corrugated paper. If this is a bouquet that is placed in a vase, then to strengthen the stems you will need wire. It should be thin, but strong, it is desirable that it bends well and takes any shape.
If the flowers after production will be suspended, then you need to purchase a suitable rope or strong fishing line.
To bond the petals together, a kapron thread is required. If the flower made of corrugated paper is hollow inside, then you will need to stock up on internal filler. It can be a foil rolled into a ball, a small tennis ball or a golf ball. To draw a template, prepare a simple pencil, and to cut out the details - medium-sized sharp scissors. Attach parts using thick PVA glue.
Cosmea
To create such a flower from corrugated paper, you need to prepare yellow, pink, raspberry and light green sheets, thin wire, scissors. First you need to make the stems. To do this, take a thin wire and tightly wound green paper on it. The first turn is glued to the edge of the strip, like the last.
The master class of corrugated paper flowers continues to work on the core of each element. To do this, cut strips of yellow paper 1-1.5 cm wide and cut one long side finely and densely with scissors, making a fringe. Then the edge is glued with PVA glue to the end of the stem and wound tightly around the wire. The end of the strip is also fixed on the last turn of paper. You can make the yellow center of the cut threads, which are tied into a bundle and attached to the wire with a strong thread.
Now we begin to make the petals. In shape they resemble a rectangle, but the pattern is drawn not with even sides, but slightly narrowed at the ends. For each flower from corrugated paper, you need to cut 7-8 petals. Connect them around the wire, placing each petal with a slight offset to the side. After the lower part of the petals is tightly tied with threads, they need to be hidden behind green paper. To do this, a thin strip of green corrugated paper is cut out and wound around a bundle under the petals. The edge is glued with PVA. You can cut this strip on one side with sharp corners, then it will look like sepals.
To get a beautiful bouquet, the minimum number of flowers made must be 9-11 elements.
Making roses
Do-it-yourself flowers from corrugated paper after viewing a step-by-step photo. Here, all the stages of making a beautiful rose are clearly visible. You will need two types of corrugated paper - pink (you can use any other, as you wish) and green for the stalk and sepals. It will also require the preparation of an internal filler. It is made of cotton or crumpled paper wrapped in foil or wrapping paper, a knot is tied at the bottom.
It should be light so as not to burden the flower. When the required number of inserts is prepared, work begins on corrugated paper. First cut the same squares of pink paper. Then the blanks are folded in half and corners are cut in a semicircle. After unrolling, the inner filler is placed on top of the bundle and the sheets around it are tightly wrapped. Excess paper from the bottom is tied with a thread into a sturdy knot.
Further work is already on do-it-yourself sepals for flowers from corrugated paper. Rectangles of green paper are cut out, and one edge is formed by large sharp corners, as in the photo in the article. Then the blank must be wrapped around the base of the rose and the edge glued or tied with thread.
It remains to put a flower on a wire wrapped in green paper and hide all the nodules under a strip wrapped around the entire lower bundle. The corrugated paper flower is completed in this process.
Eustoma or Japanese rose
Recently, a very delicate and stunningly beautiful flower called eustoma has appeared on sale in flower shops. But many call it the French or Japanese rose. Indeed, the flower externally resembles a rose, only more delicate and with a thin stalk without thorns. A lush flower has numerous petals that have a flat surface on top. Let's try to create such flowers from corrugated paper. For beginners, there is a photograph in the article with step-by-step instructions.
Composing a bouquet
First, isosceles triangles are cut from light paper. There must be a large number of them, so that the flower turns out to be magnificent. The vertices of the triangles go down and tightly wrapped all in turn the petals around the wire. The lower part of the beam is fixed on the wire with a strong thread.
Next, you need to wrap the entire wire with green paper. To make the stalk thicker, you need to put a string or a piece of fabric under the paper, and only then start wrapping. The upper and lower edges are fastened with PVA glue around the last turn.
At the end, sepals are made. As in the previous sample, a rectangle is cut out of green paper, and sharp corners are cut from one of its edges. Then the lower even edge is smeared with PVA glue and wound around the base of the eustoma. These flowers come in a variety of colors: from white to dark purple. So to make a bouquet, you can choose a variety of shades of paper.
Hibiscus
Hibiscus or Chinese rose is a houseplant, very common in our country. His mistresses love for unpretentiousness and frequent flowering with beautiful scarlet flowers. How to make flowers from corrugated paper, we will consider further in the article. If you carefully look at the sample in the photo, it is noticeable that each petal has a beautiful oval shape. In order to make a flower from the petals of this shape, it is necessary to cut an additional small strip of paper from the bottom of each element.
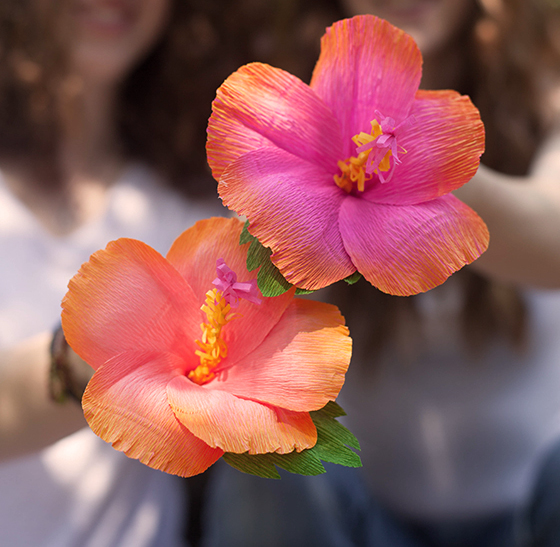
Its width should be one third of the size of the petal. It is on these segments that the petals around the wire will be wound. They are located with a slight overlap on each other. But before you form a flower, you need to make an unusual shape of a stamen in the middle of the flower. You need to make it from a thin strip of yellow paper folded in half. The inside of the strip is cut with "noodles", but not completely. Then the “stamen” does not unfold, but is wound onto the end of the wire. The edges are smeared with glue.
The sepals are made carved and wound from below under the flower onto the wire. At the end of the work, the wire itself is decorated. Some masters use gouache paints when decorating flowers, giving different shades to each petal.
Bouquet of chrysanthemums
Autumn chrysanthemum flowers have very large inflorescences with numerous pointed narrow petals. A master class of flowers from corrugated paper, read on in the article. To make beautiful chrysanthemums, you need to cut a long and wide strip of paper and cut one side of the strip with sharp and frequent corners. The thinner and more of them will be in the flower, the more magnificent and beautiful it will be. When the entire strip is prepared, a wire is taken, and the future flower is wound on it. After the procedure, the edges are tightened well with a strong thread. Hand need to spread all the petals in different directions.
Then cut out the leaves of chrysanthemum. They have a wavy shape and are attached throughout the stalk. To make it convenient to weave, an additional stick is cut out at the end of each leaflet. It is she who joins the wire and is wrapped on top by a strip of green paper. You can smear it with glue so that the leaves do not come off.
Volume flowers from corrugated paper
To make the flower bouquet large and spectacular, you can use the tooltip and create voluminous bouquets. Each flower consists of several hollow petals, which are made separately. You will also need a small tennis ball or golf ball.
First, rectangular blanks are cut. The edges of the sheet are bent along the length of both sides, and the folds are smoothed with a finger. A ball is placed in the middle of the workpiece, and on both sides the petal is twisted, like a candy wrapper. Only its edges should be tightly wound. On the one hand, the edge is short, and on the other, long. Thus, you need to draw five petals.
Flower decoration
To make a complete flower you need from five petals by twisting the long twisted ends. They are wound on a wire and fixed with a strong thread. Then, over the twist, you need to wrap the craft several times with a strip of green corrugated paper. So the stem is formed, and at the same time all the petals are attached. At the end of the work, the petals neatly straighten in different directions. It turns out large bulk flowers from corrugated paper.
Lush flower
Now the reader will learn how to create a very fluffy and beautiful multi-colored flower from corrugated paper. To make it, you will need several squares of different colors. Shades of the same color are selected for the product, for example, pink and raspberry or yellow and light orange. The bottom few squares are green. Then, in layers, 2-3 green blanks, 4-5 raspberry and the same number of pink squares are laid on the table first. The next step is folding the paper with an accordion. The folds are well rubbed by the fingers. In the center, the accordion is tied with a green rope, and the edges are cut in a semicircle from above and below.
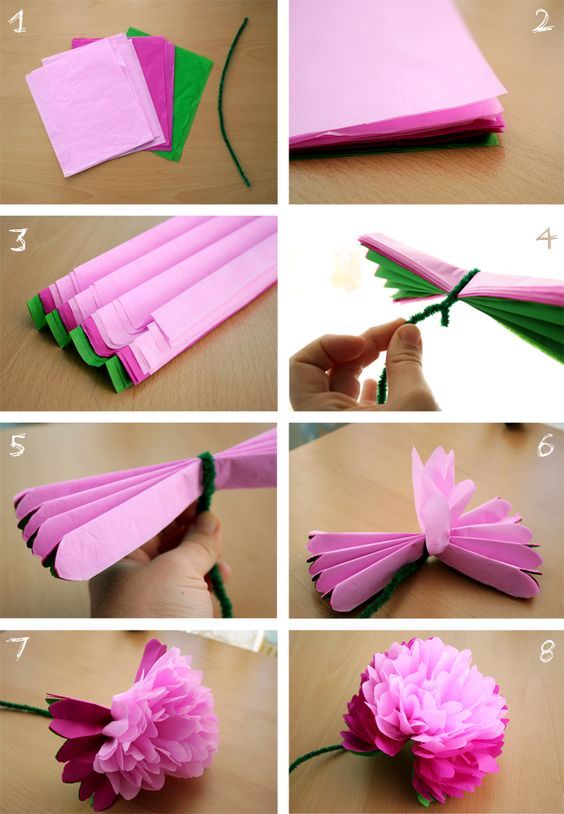
Further in the article you will learn how to make flowers from corrugated paper from prepared blanks. It is necessary to form the middle of the flower. To do this, a thin strip of pink paper is cut out and fixed with a thread around the middle. The edges of the strip are notched in a semicircle. This will be the central part of the volumetric flower.
Then the distribution of the paper layers begins in such a way that the shape of the ball is obtained. This procedure must be done carefully so as not to tear delicate paper. When everything is correctly straightened out, the result will be excellent.
Big flowers
From corrugated paper, you can make not just big, but huge flowers that will decorate a banquet hall or a wedding arch for a wedding ceremony. Such crafts are made from whole sheets of corrugated paper. As cores, you can use a bunch of artificial small flowers or beads on a wire. For a change, each petal can be painted with gouache to give shades to the primary color.
The edges of each petal can either be torn or crushed so that they are not even, but more like a real flower.
Where can I place large crafts?
Flowers are made from corrugated paper to decorate the hall for anniversaries, weddings, woman's birthdays, children's parties. If the flowers are small, they can be laid out on the festive table, hung on the entrance arch or as a garland over the dance floor.
The largest flowers are located in secluded corners of the room and serve as decor elements. They can decorate the walls of the room, be on soft chairs or even on the floor.
Conclusion
As you can see, it’s easy to make flowers using corrugated paper, as this material is perfectly bent, curled, wrinkled, cut and tied. PVA glue keeps parts in position perfectly. Such crafts can be painted as you wish. In addition, the finished product is durable, looks great and will decorate any holiday table and room. Try it, after reading the material, even novice masters will cope with such work. Good luck