Cranes are majestic birds that remain faithful to their partner for life. Therefore, it does not surprise the existence of the legend that the crane symbolizes longevity and a happy life. And the Japanese believe that when you add a thousand pieces of such birds, the most secret desire will come true. Perhaps because of this, the crane is one of the most popular types of origami in Japan, which has spread throughout the world.
We offer you several workshops to learn how to make origami cranes. Perhaps your wish will come true.
Necessary materials
Japanese cranes are made of paper. It can be absolutely any:
- album sheet;
- notebook sheet;
- special paper for origami, which has a special texture and properties;
- wallpaper residues;
- colored paper;
- tracing paper;
- other things.
Size can also be any. But for beginners it is better to choose medium-sized paper, because from a small leaf it will be difficult to put together the details of the craft, and working with too large will not be very convenient.
If you used plain paper and want to decorate the finished craft, then you may need felt-tip pens (markers), glue with sparkles, paints and other decorations designed to decorate paper products.
Paper blank
If you do not have a square sheet of paper, then take any and give it such a shape.
1st method:
- take a pencil or felt-tip pen, ruler, scissors and paper;
- draw a square;
- cut it out.
2nd method (if the sheet is rectangular):
- wrap one corner of the sheet to its opposite side;
- cut or tear off an extra strip of paper;
- expand the sheet.
Crane blank
Consider how to make a crane:
- Take a square piece of paper.
- Fold it in half to make a rectangle.
- Open a sheet of paper and fold it in half again, only now you need to connect the other sides.
- Expand the sheet, you should get two folds in the form of a plus sign.
- Connect the upper right corner to the lower left. You got a triangle.
- Expand the sheet and fold the other opposite corners together (now this is the top left and bottom right).
- Expand the sheet of paper and lay it in front of you so that you get a lozenge.
- Connect the upper and lower corners together.
- Place the left and bottom corners under the top of the figure. The fold lines will help to do this.
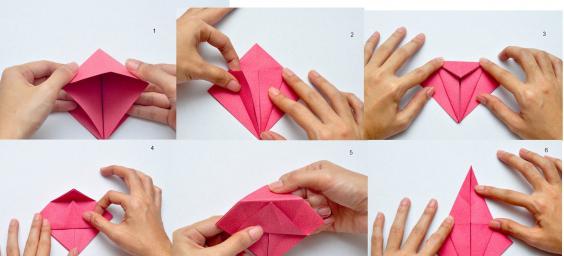
- You should have a figure resembling a kite (Figure 1).
- Connect the left and right corners of the upper part of the figure with the central fold line (Figure 2).
- Wrap the top-triangle down (Figure 3).
- Expand the last three parts. You will again get a kite figure, only now with three additional folds.
- Fold the bottom corner of the square along the horizontal crease from the previous steps to the top corner (Figure 4).
- Fold the upper triangle back (Figure 5).
- Fold the outer edges of the paper to the middle and align it. This will create a diamond shape with two flaps on the right and left sides (Figure 6).
Half the work is done.
Completing Origami Crafts
Master class "How to make origami cranes", continued:
- Turn the paper over and repeat steps 14-16 on this side (Figure 7).
- Fold the outer edges of the shape to the middle (Figure 8).
- Wrap the right side on the left as if you were turning the page of a book (Figure 9).
- Flip the shape. Repeat on this side from step 2. Then fold the right wing to the left leaf again (Figure 10).
- Lift the lower tip to the top of the figure. Turn over and repeat on the other side (Figure 11).
- Wrap the right side on the left side as if you were turning the page of a book (Figure 12).
- Turn the figure over and do exactly as in the previous paragraph (Figure 13). It turned wings.
- Fold the wings down so that they are perpendicular to the body, head and tail of the future crane (Figure 14).
- Bend the tip on one of the tops (Figure 15).
- Pull the figure by the head and tail so that they are at the same level (Figure 16).
You turned out a flat crane.
Volumetric Crane
Master class "Volumetric Japanese crane" (photo of the finished work is below):
- Pull the plane crane on the wings in different directions.
- The paper between the wings will straighten out. Hand-shape if necessary (Figure 17).
- Wrap some wings. This can be done with your hands or scissors (the principle of operation is as if you are making wavy ribbons for gifts or bouquets).
The voluminous Japanese crane origami is ready (Figure 18).
Furry Crane
If you want to make a truly original gift, then craft a Japanese origami crane with a fluffy tail. Such a paper bird will surprise and delight anyone. She will become a source of inspiration. Origami crane (a diagram with step-by-step instructions is below) will become a real masterpiece.
- Fold the sheet several times so that then five folds are formed that resemble the letter “G” (Figures 1-5).
- Make a diamond-like shape (illustrations 5 and 6).
- Make a few folds, as in illustrations 7 and 8.
- Make a square inside the sheet (Figure 9).
- Make a shape that resembles a diamond with wings (illustrations 10 through 15).
- You have a blank for the crane that needs to be deployed (Figure 16).
- Illustrations 17 through 25 show how to assemble a crane from a blank.
- When the leaf is folded, spread the wings of the crane in different directions (Figure 26).
Origami original crane: scheme
A paper bird can be original if you make not only a magnificent tail, but also wings.
Master class on making cranes with magnificent wings:
- Fold the sheet several times so that then five folds form, which join together and resemble the letter "F".
- Fold the sheet in the shape of a triangle, bending inward the extra sides, as in previous workshops.
- Make two pairs of wings, as in illustrations 3 and 4.
- Bend the two halves of the triangle with wings together.
- Bend the corners of the new wings to the middle of the figure (Figure 5).
- Make the tail and head the resulting shape (Figures 7-9).
- Fold each wing harmoniously, as in Figure 10.
- Spread wings to the sides, give shape to the craft (Figure 11).
The magnificent crane with magnificent wings is ready!
How can paper cranes be used?
Origami "Japanese crane" is not only an interesting craft, but also an original decoration.
From a dozen or more paper cranes, you can make a garland on a wall or a chandelier, decorations, paintings. And if you make a lot of small crafts and put them in a transparent jar or vase, you get a great decoration element that will give your home a touch of personality.
Garlands, by the way, can be made very different:
- linear
- multi-level;
- spiral and so on.
In order to make a garland, you will need a thread or fishing line. Just pierce the inside of the crane with a needle and pass a thread (fishing line) through the hole. And so every craft. Then either connect all the cranes into a single whole, or tie them on a separate thread or stick (cornice).
Show your imagination or look for sources of inspiration.
Make Japanese origami cranes with your children or your friends. This is a very interesting and exciting activity!