Everyone is waiting for the New Year holidays with special trepidation. Both children and adults prepare in advance: they buy a Christmas tree, decorate an apartment or a house, and draw up an appropriate workplace at work. Children create greeting cards for all loved ones, prepare home-made toys and garlands to decorate a kindergarten group or school class.
Adults also make Christmas balls with their own hands. Purchased Chinese Christmas tree toys look so banal and uninteresting that every year more and more people try to engage in their independent manufacture. Moreover, now there are a variety of materials for crafts on sale. The main thing is to have a desire, to want the holiday in your family to go best. It is not in vain that the proverb says: “As you celebrate the New Year, you will spend it!”
You will create a unique holiday atmosphere by yourself or together with your child making Christmas balls with your own hands, by investing in each piece a piece of your soul. Only then does the moment of satisfaction come when each toy has its own story.
Even after many years, looking at the photos from the holiday, you and your child will remember how you made this or that Christmas tree toy. And the time spent with my family on making Christmas balls with our own hands will be remembered with warmth. After all, a common activity, moreover, creative, is very close.
Materials for work
Many people think before the holiday: how to make Christmas balls with your own hands, what is needed for this, where to get the materials? In the article, we will give readers comprehensive information and tell in detail about the methods of making crafts for decorating the Christmas tree. Let's start with the simplest option. It is convenient to make Christmas toys if a foam ball is taken as the basis . Such items of different diameters can be purchased in needlework stores or sewing accessories, in the markets. Polyfoam in products is durable, although light in weight. Decorate it with PVA glue, pins with a bead at the end, trim it with fabric or satin ribbons.
But this is far from all that can be thought up. Many make crafts from threads and ropes, yarn and braid, lace and fabric. There are many options for making Christmas balls with your own hands out of paper. In our article we will present several samples of such products.
Ball coloring
If you have old balls with a smooth base, you can update them by painting with paints as you wish. Also on sale are transparent, unpainted Christmas balls, which are also used for self-decoration. There are handmade lovers who fill transparent balls with small details - multi-colored pom-poms, strips of paper and even fill in plastic stars or hearts. Such crafts look funny too.
Paint balls with acrylic paints. First, a sketch is drawn with a marker, then the picture is painted over with paints. They dry quickly, and the balls are quite colorful and bright. A drawing can be anything - from a fairy tale character to a winter landscape.
Thread and fabric decoration
To make original balls, as in the photo below, we will take a foam ball as a basis. Spreading its circumference in layers with thick PVA glue, starting from the top, we wind a tightly natural hemp rope.
When the winding is completed, you can decorate the surface with an element of fabric or lace. It can be a simple strip of glued fabric in the center of the Christmas ball. With your own hands, you can tie a lush bow of lace or satin ribbons to the top to match the fabric insert.
Basis - a balloon
Yes, do not be surprised! Even with this basis, you can make wonderful bright and original New Year's toys. Do-it-yourself ball is created from knitting threads, PVA glue. You will need another round air balloon and a small bowl. The rubber ball is inflated to the desired size and tied tightly to the knot. The yarn is selected not too thin, bright shades. Pour some PVA glue into a small bowl.
If it is too thick, you can add a little water. Threads are lowered into the container and completely dipped into the liquid. After a couple of minutes, you can remove the yarn and start wrapping them on the surface of the balloon. Turn the knitting threads in different directions so that the winding covers the surface. Then the ball is suspended on a rope until it dries completely. From below, just in case, substitute the pallet, suddenly the remaining glue will drip down. It remains only to take the needle and pierce the balloon. Rubber is removed through the hole between the threads.
Do-it-yourself Christmas ball made of threads pretty quickly. Even a child in the older kindergarten group will be able to do such a craft. To hang a toy on a Christmas tree branch, you need to tie a thin nylon thread or a beautiful ribbon to any loop, tying it at the base with a bow.
Stripes of paper balls
It is very easy to stitch Christmas balls with your own hands out of paper. To do this, you need a needle with a strong thread, strips of paper of the same width. The paper length is also selected by eye. The longer the strip, the larger the ball will be. It is better to take thick paper, otherwise the surface of the toy will be deformed. The stripes can be plain or different, it is possible to use paper with a printer pattern.
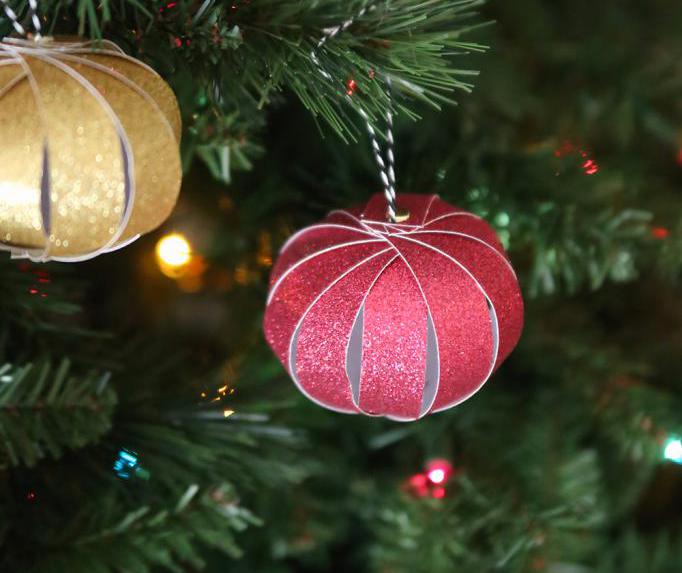
A thread is threaded into the needle and a large knot is tied. All the strips are laid out on the table so that the central points of each converge in the middle like a snowflake. A needle is inserted into the middle itself and one stitch is sewn. The thread is not cut, but pulled through all edges, stepping the same length from the end of each strip. The thread is also passed in one stitch so that the edge with the knot does not come out of the strip. At the end, you need to attach a hook or paper clip so that the crafts can be hung on a Christmas tree branch. You can insert a beautiful bead from above and below in front of the strips.
Paper ball
How to put together such an original Christmas ball with your own hands, the step-by-step instructions explain in detail. First, circles of the same size are cut out of any thick paper. The size of the crafts will depend on the number of details. The corners of each circle are bent so that an equilateral triangle is formed in the middle. When all the blanks are done, you need to take PVA glue and a thin brush to smear only the folds. Then the attachment of one circle to another begins, gradually forming a ball.
You can decorate the Christmas ball with your own hands (see the photo carefully in the article) with pebbles glued in the middle of each triangle. The thread is threaded with a needle, a loop is formed, on which a toy is subsequently hung on a branch.
Mirror toy
DIY foam balls with your own hands can be glued with pieces with a mirror surface. In order for the ball to shimmer beautifully in the lights of the New Year's garland, you need to find an old and unnecessary CD-ROM.
With the help of a hammer over the table, he neatly breaks into pieces. Try to ensure that all the fragments are the same size, then the Christmas tree toy will look spectacular. Stick small elements on the foam ball using PVA glue. It must be thick and fresh. If you are not sure about its quality, it is better to use a glue gun, then the ball will last several years and will not crumble.
Ball decoration using decoupage technique
To get started, you need to pick up a beautiful plot picture on a napkin in the store. This can be a fairy tale character or Santa Claus, a favorite cartoon character. Images with nature in winter look very beautiful on Christmas balls. For the decoupage of Christmas balls with your own hands, you will also need to pick up a smooth and plain ball, preferably a glass one. You also need PVA glue and acrylic paints.
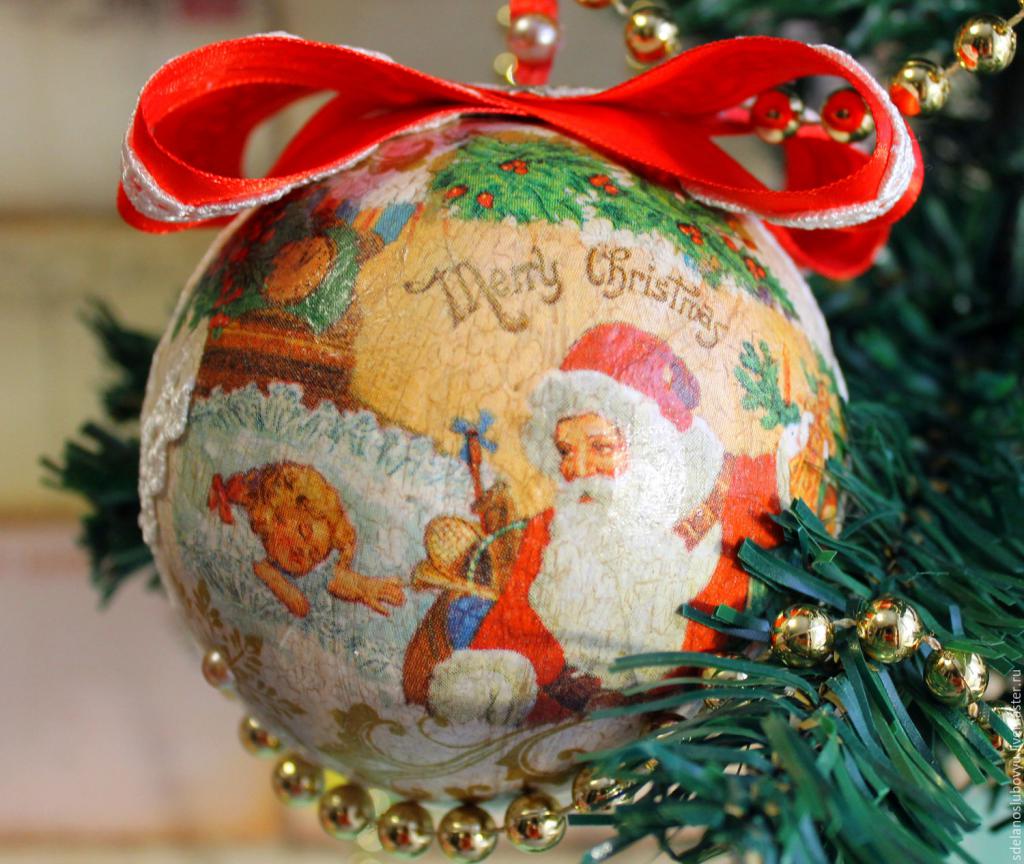
First you need to carefully remove the top layer of the multilayer napkin, on which there is a picture. This is a delicate and very thin paper, so you need to work without rushing. The excess part of the napkin needs to be removed. It is most convenient to use a brush dipped in water. It is simply carried out on the border of the image and with a slight movement tear off the edges. On the ball, the place of attachment of the picture is smeared with PVA glue and the picture is superimposed on this place. In order not to tear thin paper, use cling film for pressure. It is placed on top of the picture and gently crushed by hand.
After this procedure, the film is removed and the image is smeared with PVA glue. The rest, the empty part of the ball is covered with acrylic paint. Instead of a brush, it is better to take foam rubber. By blotting the swab, the remaining surface of the ball is painted. If a layer of acrylic varnish is applied over the whole Christmas tree toy, then the ball will serve for a long time.
Satin Ribbon Ball
Do-it- yourself Christmas ball made of foam can be decorated with satin thin ribbons. It is better to choose bright, saturated colors, with a golden or silver border. The edge of the ribbon can be pinned with a pin or attached to the center point of the foam with a glue gun. When the beginning of the tape is fixed, you can start winding the tape on the foam. The tape is placed with a shift of half the width. When the entire surface is covered, the upper edge of the strip is also fixed to the glue or pin. It remains only to attach the thread so that the ball can be hung on a tree branch.
You can leave the craft in this form, but it will be prettier to attach flowers collected from satin ribbons or purchased, tie a gold bow at the base, stick rhinestones or pebbles, create a pattern of beads, etc.
Tissue paper balls
Such spectacular and light balls are made of thin paper of various bright colors. Leaflets are folded into a bundle and a semicircle outline is drawn on a cardboard stencil. Then gently cut the semicircles. Next, there is a delicate and painstaking work of gluing parts together. The glue is smeared pointwise in a checkerboard pattern. Semicircles of cardboard are glued to the first and last leaf. Then they take hands for cardboard parts and unfold the craft. The beginning and end of the accordion are glued to each other.
At a central point on the cardboard, a hole is pierced with a needle and a thread is threaded, for which such a beautiful ball is placed on a branch.
Pompons
For lovers of knitting (and not only), you can offer an excellent option for making Christmas balls from knitting yarn. Who does not know how to make pompons, we can assure you that this is not difficult at all. You just need to cut out two identical cardboard wheels and wind the threads on them, threading them into the hole in the center. When everything is filled so that the needle no longer fits in the middle, winding ends.
Scissors are pushed into the hole between the two rings and the threads are cut in a circle. In the resulting gap, you need to insert a kapron thread and tie it tightly onto a knot. Then cardboard is cut and paper removed from the craft. Scissors equal the edges of the pompom. To keep the New Year ball well, a plastic bottle cap with a cut hole is hooked on top of it. A thread is also drawn through it and tied in a loop.
Conclusion
As you can see from the text of the article, it’s easy to create beautiful things with your own hands, but, on the contrary, it’s interesting and exciting. This hobby does not require a lot of money, and a self-decorated Christmas tree will be very effective and will certainly attract the surprised looks of guests and children. Do not worry, if you do not succeed the first time, you can try again. Difficulties should not arise if you carefully read everything and examined the samples in the photograph.