Hats have always been a necessity, which in most cases has taken many fashionistas by surprise. Now, when many are very busy, there is absolutely no time left to choose a winter accessory. It is for such busy people - our article.
Forced accessory
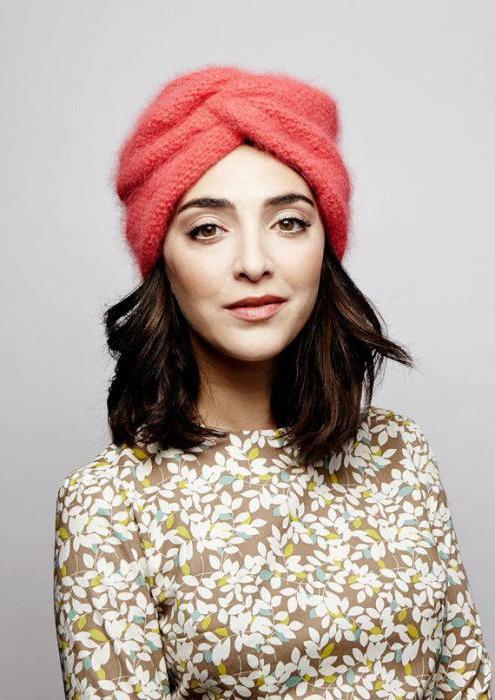
Unfortunately, not everyone likes hats because of their peculiarity to spoil hairstyles that are created for long hours and destroyed as soon as this or that hat was put on. We offer a modern solution - a knitted turban hat, which you can create with your own hands, spending a minimum of time.
Due to the peculiarities of the shape, the cap sits neatly, taking the shape of the head and not crushing styling. And thanks to the presence of warm wool in the composition of the yarn, it is a real heating pad for the ears and head as a whole.
Oriental roots
From the name it’s easy to understand: a knitted turban has some kind of connection with eastern countries. Hats of this form are worn not only by women, but also by men in northern Africa, in India and Asia. And always, they are more than a piece of cloth wrapped around the head.
The turban carries not only a protective function, protecting the person’s head from the sun, but also religious. The fact is that in some cultures it is forbidden to cut hair for men, and they use a turban as an auxiliary device for styling hair. Later, this accessory went beyond the boundaries of these communities and became popular around the world.
Thin matter
Materials are selected for the turban so that, despite the length of the flap of fabric of 5-10 meters, the head does not sweat and is well ventilated. That is why great attention is paid to the quality of the fabric.
In our case, the knitted turban is made of fluffy yarn, which will provide our hat with a windproof and aesthetic appearance. In addition, we will need:
- Knitting needles. Their size depends on your personal preference. If you want to get a large knit, the structure of which will be very clearly visible, then choose a thicker knitting needle. And if, on the contrary, you prefer a knitted fabric with inconspicuous loops, then thin knitting needles will be just perfect for such a case.
- Circular knitting needles are not needed here, so at first only a strip of 15-20 centimeters wide is knitted, which is later stitched into a full-fledged turban.
- As for the yarn, it is worth saying only that it should be soft and fluffy. When you put a turban on your head, you will understand why this is necessary - since the headgear is in contact with a large area of the face, spiky yarn will certainly cause unpleasant irritation and redness.
- Threads. In the future, we will have to sew a turban, and the choice of thread is yours. You can take the cotton version (to match your yarn) or use the leftover yarn after knitting.
Beginning of work
Now we begin to manufacture a knitted turban. To make the sequence understandable, we will make a step-by-step list of all the necessary items, which will significantly facilitate the process of creating a winter accessory.
- We pick up such a number of loops on the needles so that the width of the future canvas is about 15 centimeters. In this case, you can’t give an exact figure, since both the knitting needles and yarn are different.
- We will knit the front surface to get a clean fabric from even identical loops. Its length should be about a meter or a little less. In general, all this will look like a children's scarf, which is usually wrapped a couple of times around the neck, and then around the baby’s chest.
- Now let's move on to the stage of headgear formation: for this, we will determine the exact center of the knitted fabric by folding it in half. Then we put the “scarf” on the surface and bend its edges so as to form the shape of a “pretzel”, laying one edge on the other.
- Without changing the form, we begin to unite the basis of our turban. To do this, combine the ends of the knitted fabric together and sew along the entire length, where the ends of the scarf are in contact with each other. Thus we connect the crown of our cap.
- It's time to connect the remaining parts of the cap: these are the two ends of the scarf, or more precisely, their width is 15 centimeters. We also sew it to the base, without speaking for the length indicated above.
- The last details: unsecured side panels, which we sew along the length of 9 centimeters on both sides. It remains to fill the protruding threads, carefully securing them with a couple of strong knots and removing the visible part with scissors.
Strokes for flawlessness
That knitted turban with knitting needles is ready! You probably noticed that its production did not take more than 3 hours, and experienced craftswomen spent even less time on this. Well, in the finale of the work, we suggest you decorate the resulting knitted turbans (photo of the samples are presented in the article). For decoration, you can use anything you want (at your fingertips):
- brooches are already on the ready mount;
- beads of all colors and sizes;
- feathers;
- thermal stickers and needlework embroideries.
Although all this is not so important, the main beauty lies in ordinary simplicity. Wear this knitted turban as you wish, and be happy!