Halloween masks and costumes, unusual, strange and frightening - this is not only a tribute to traditions, but also a way to express your imagination by inventing and creating an original carnival image. How to make a scary mask with your own hands on Halloween? The article lists a few simple ways.
Simple cardboard mask
How to make a scary mask with cardboard yourself? The easiest way is to cut out the mask-glasses with slots for the eyes, and then colorize or decorate. This is the best option for a children's masquerade look, for example, if a thematic holiday is planned at school: a mask-mask made of cardboard will not be too intimidating or repulsive. In addition, you can make it with your child. This will require:
- Cardboard and colored paper.
- Glue.
- Markers or paints for coloring.
- Soft elastic or tape.
First of all, you need to choose an image for the future mask. For Halloween, a mask of a spider, a bat, a pumpkin or a funny ghost - Casper is perfect. You can draw a mask template on cardboard yourself, or you can print it from the Internet. Then everything is simple: the cardboard template is neatly cut, painted or decorated with elements of colored paper. If desired, you can decorate the mask with sparkles, sequins, appliqués and more. On the sides you will need to make holes into which the tape or elastic is threaded.
Cardboard volume mask
To make a regular mask-glasses volumetric, complementing the product with parts from cardboard or papier-mâché, is another option how to make a scary mask with your own hands (see the photo below in the article). This will require:
- Draw (print) and cut out mask and volumetric patterns.
- Papier-mâché details, if any, must be prepared in advance and dried well.
- Glue or connect all mask parts with a stapler, make side holes.
- Colorize the mask. If there are elements from papier-mâché, they will need to be primed first and dried again before painting.
- Insert tape or elastic into the side holes.
Volumetric masks: what can be made of?
The original volume mask that covers the face completely or only half looks really impressive. The creation of such a product will require patience and accuracy, it will take a little longer. How to make a scary mask of this type? There are several ways available.
- The most common and affordable technique for making a volume mask is papier-mâché: gluing a product from pieces of paper.
- How to make a scary mask yet? An interesting option is a volume mask made of fabric shreds. This technology is similar to papier-mâché and allows you to show your imagination using fabric blanks of different textures and colors.
- The most modern, original, beautiful, but also the most expensive material for volume masks - plastic or polymer clay. The main condition for working with such material is strict adherence to the technology for creating the product described in the instructions.
Regardless of what material it is planned to make a three-dimensional mask from, most likely, you will have to start work with the manufacture of a basis of gypsum or plasticine.
Mask base
Why do I need a mask shape? And is it possible to do without it? Often you can find a description of the manufacturing process of a volume mask from papier-mâché, which is made directly on the face. This method, of course, saves time, but it’s not very convenient to sculpt and dry the mask. Also, a plaster or plasticine form can be replaced, for example, with a hockey mask or an inflated balloon.
You can make a more accurate base shape from plasticine: either sculpt the head of the character whose mask you plan to make, or make an anatomical cast from the face.
However, experienced craftsmen are advised not to be too lazy to make a plaster mold before making a scary mask. Such a base can be used several times, in addition, the gypsum mold is suitable not only for working in the papier-mâché technique, but also for the manufacture of plastic masks with the subsequent heat treatment of the product. There are two ways to make a gypsum mold:
- Make a cast of the face using cooking foil. Gently pour gypsum into the resulting mold, avoiding deformation of the foil, and allow the gypsum to harden. After drying, remove the foil.
- Another way is somewhat more complicated: to make a plaster cast on the face. It will not work out independently to make such a base form; you will need an assistant who will apply the gypsum mass. The cast is made in the following order:
- First, you need to remove the hair under a bathing cap, fix the shape of the eyebrow with gel or wipe it with a damp bar of soap and apply a greasy cream to your skin (suitable for children or petroleum jelly). Next, tubes for cocktail are inserted into the nostrils (the ends of the tubes need to be wrapped with gauze or cotton wool). This will allow you to breathe freely during the procedure.
- After all the preparations, it remains only to sit comfortably on the floor, fixing the head with wet towels or an absorbent cloth so that the gypsum mass does not drain onto the clothes and the floor when applied.
- The assistant must quickly apply a thin layer of gypsum, starting from the middle of the face to the edge. Liquid gypsum can be replaced with gypsum bandages from a pharmacy, then they must be applied, previously cut into pieces and soaked in warm water.
- When the surface of the gypsum mold hardens, the assistant can accurately take the impression. Finally, the shape needs to be aligned at the edges.
What materials are needed for a papier-mâché mask?
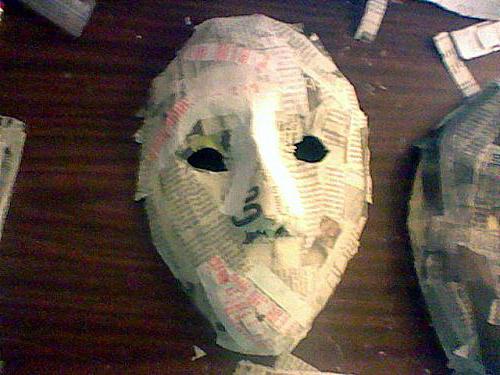
Papier-mache, that is, modeling from "chewing paper", is an affordable, convenient and inexpensive answer to the question "how to make a scary mask with your own hands." To work in this technique you will need:
- Paper sheets. Suitable unnecessary magazines, newspapers, flyers, paper napkins and more.
- Bonding agent. It can be PVA glue or wallpaper glue. But since the mask will come in contact with the skin of the face, it is best to prepare a paste from flour and water (at a rate of 1: 2).
- Fatty cream or oil to lubricate the base form. This will allow in the future to easily remove the finished product from the mold.
Step-by-step procedure for creating a papier-mâché mask
How to make a scary mask with your own hands out of paper? The procedure is quite simple:
- A layer of grease is applied to the base form - a greasy cream (petroleum jelly, vegetable oil).
- The paper sheets need to be torn into small strips and soaked in a container with paste, the denser the paper - the longer.
- Paper strips are glued onto the base layer by layer, gradually forming a mask. It is important to apply each subsequent layer evenly, without air bubbles and irregularities.
- During the molding process, the mask can be fixed with one or two layers of a bandage or strips of soft tissue, laying them between the layers of paper strips.
- Dry the mask for 2-3 days at room temperature. After drying, cut the side holes for the gum (tape), align the slots for the eyes, nose, mouth.
- The mask must be removed from the mold, primed and painted. For painting a paper mask, ordinary gouache or oil paints are suitable.
- If desired, the mask can be decorated with bright details (feathers, sequins, elements made of fabric, metal, etc.), thread an elastic band (tape) into the side slots.

Heat treated plastic mask
Plastic, hardening after heating at high temperature, is a material very popular among people who are passionate about needlework. However, working with it requires strict adherence to technology and safety rules. For this reason, you should always start the process of creating a mask by reading the instructions on the plastic packaging. It is especially necessary to remember that in different grades of this material, the working technology and processing temperature may vary. How to make a scary mask of polymer clay (plastic)? To create a mask from this material you will need:
- Set of colored plastic with instructions.
- Crockery and stack (knife) for work.
- Capacity with warm water.
- Oven (oven in the stove).
- Plaster mold for the mask.
- Decorative elements (optional).
Important! Do not use dishes for work with thermoplastics for food purposes. After work, the oven must be washed thoroughly with water and a detergent.
The manufacture of a carnival mask from plastic is carried out in several stages:
- The plaster mold is oiled or oily cream.
- Pieces of material are softened according to the instructions on the packaging. For faster heating, it is often recommended to use warm water or the non-hot air of a regular hair dryer. Of these, a mask is applied to the gypsum base.
- It is important to avoid getting dust, small debris, hair or threads on softened plastic.
- When sculpting on a mold, it is necessary to immediately cut through the nasal and eye openings of the mask. For a beautiful tight fit of the mask to the face, you should try to create a smooth transition to the gypsum form, negating the plastic mass in the eye area and around the edges of the mask.
- All slots, including holes for the gum (tape), must be done until the plastic completely hardens.
- If desired, the mask can be immediately decorated before heat treatment, decorated with heat-resistant parts made of metal, glass, stone and other things.
- Heat treatment is carried out in strict accordance with the instructions: in the oven, preheated to the recommended baking temperature, a plaster mold with a molded mask is placed. The product is aged in the oven specified by the manufacturer, after which the mask should gradually cool in the oven.
- Important! The temperature of the oven must be constantly monitored. All grades of plastics can begin to melt with the release of toxic smoke if the temperature in the oven reaches 170-175 ° C. If this happens, you must immediately turn off the oven, open the doors and windows to ventilate, and leave the house before the final weathering.
- Repeated heat treatment of plastics is allowed. After cooling completely, the mask can be supplemented with molded parts and baked again.
- The cooled product is carefully removed from the mold. The finished mask can be primed and painted, glued decorative elements.