A hook is a unique working tool, with the help of which for several centuries needlewomen have successfully knitted rugs and curtains, delicate tablecloths and napkins, warm blankets and bedspreads. It allows you to create great things - hats, dresses, skirts, sweaters and even swimwear. Even bright fun toys, fancy flowers and unique decorations are crocheted ! To this day, many masters give preference to this tool, because it allows you to implement a wide variety of ideas. In this article we will tell you what you can crochet, and share with you clear patterns of manufacturing various products and their details, including such as yoke, beret and tack. And for beginner needlewomen, detailed step-by-step descriptions of the work will come in handy.
What can be crocheted? Piggy Bank Ideas - A Fun Toy
Using a hook, you can create not only bedspreads and tablecloths, but also great toys. For example, you can make such a cute elephant! This toy can become a real talisman, attracting good luck, giving good and peace and protecting its owner from all dangers. For work, you will need a hook number 3 and some yarn (about 50 g). Choose the color of the knitting threads as you like. And our elephant will be green
(yarn "Pehorka - Children's novelty", 200 m / 100 g). We start the work with making ears. We perform a “magic” ring and 5 single crochet. Next, we bind them according to the scheme:
By analogy, we perform the second crochet ear of the toy. Schemes clearly demonstrate the technology of work.
How to make the head, trunk and trunk of an elephant?
After making the ears, we proceed to knitting other parts. We form a “magic” ring and knit 6 SC in it. The second and third rows are also performed with single crochet, without making increases. And in the fourth and fifth we make an increase by knitting 7 SC. In the sixth and seventh rows we increase the number of Art. b / n to 8. That's all, the trunk is ready.
Now we begin to make the head. We increase the number of columns in the eighth row to 16 pcs. From the ninth to sixteenth row, we knit 24 columns. We make allowances according to the scheme "2 tbsp. B / n - 1 tbsp. B / n". From the fourteenth row, we begin to reduce the loops - we knit 16 columns. To do this, we repeat the pattern eight times: "skip 1 tbsp. B / n - then we knit 1 tbsp. B / n." In the fifteenth row, we reduce the number of loops to 12, making the necessary decreases. That's all - the elephant's head is ready.
We continue to knit the toy "Elephant"
Now proceed to making the body of the toy crocheted. The operation schemes are described below. In the sixteenth row, we begin the increase - we perform 24 columns. To do this, we knit 2 st. non-cash From the seventeenth to the twenty first row inclusive, we knit 24 columns.
From the twenty second row we begin to reduce the loops. We knit 18 tbsp. non-cash The loop reduction scheme "2 st b / n - skip column" is repeated 6 times. In the twenty third row, we perform 12 columns, making decreases according to the same pattern. In the twenty-fourth row we perform 6 tbsp b / n. That's all - the elephant’s body is ready. We stuff the toy with a padding polyester, sew a hole and make a tail. We braid a braid of sufficient length of three threads, tie it, and leave a brush at the end.
Elephant legs are performed as follows. We make a "magic ring", we recruit 8 tbsp. b / n and knit in a circle four more rows with the same number of columns. Fill the legs with synthetic winterizer or cotton and sew them to the body. We attach ears to the head. We make the elephant eyes from two black beads. If desired, decorate our toy with a bow.
Learning to knit bright potholders
What can be crocheted? In addition to cute toys, you can make such colorful and very elegant potholders. They will bring variety to the interior of any kitchen and will appeal to any housewife.
Next, we will tell you how to
crochet the oven mitts. For beginning masters it will not be difficult to complete a similar product. So, for the manufacture of two such tack, you need two skeins of white and red yarn, as well as hook number 3. How do
crochet tacks fit
? Schemes of work and descriptions are presented below.
So, we will begin the production of this beautiful kitchen accessory with a “magic” ring and three lifting air loops. Next, we knit 15 single crochet columns and end the row with a connecting loop. To complete the second row, we take a thread of contrasting color and begin work with one VP. Next, we knit according to the scheme "1 single crochet - 2 VP". We knit the whole row to the end and end it with a connecting half-column. We start the third row with three VPs, perform three CHs and 1 VP. Then we knit 4 columns with one crochet and again 1 air loop. We continue to knit according to the pattern to the end of the row. The fourth row is performed with the same thread as the second. We knit 1 VP, then 1 tbsp. b / n and make a chain of 5 VP. We perform the whole series in this way. We complete it with a connecting loop.
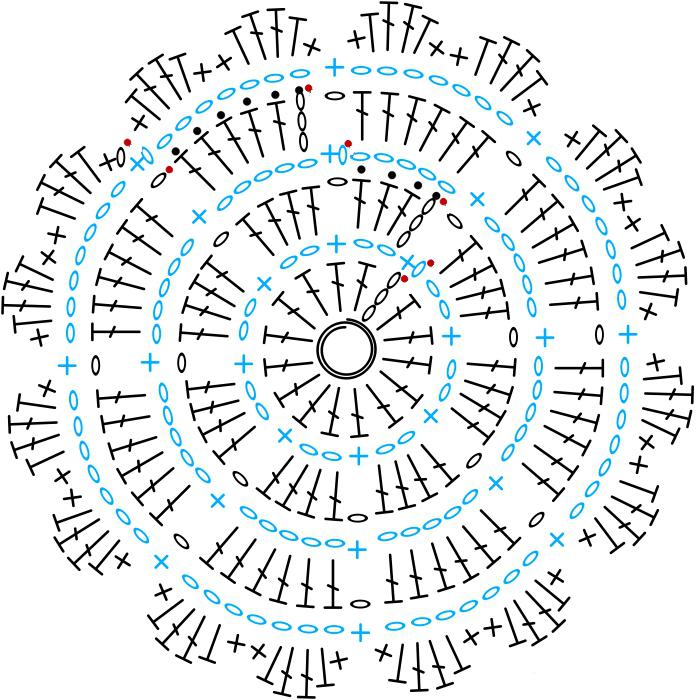
The fifth row begins with three VP and 5 CH. Then we knit to the end of the row according to the scheme “1 VP - 6 CH” and finish the work with one connecting loop. To create the sixth row, we take a contrasting thread, the same one with which the second and fourth rows were made. We knit according to the scheme "1 st b / n - 7 VP". Eighth row: we perform the strapping as follows. We make 1 VP lift, then 1 tbsp. b / n, 1 half-crochet with a crochet, 2 CH, again 1 half-crochet with a crochet and 1 tbsp. non-cash That's all, the charming tack is ready!
Tips "Watermelon slices": decorate the kitchen
What can be crocheted to design a kitchen? Of course, bright and original potholders in the form of watermelon slices! Making them simple enough. You will need thick woolen threads of three colors - red, green and beige. In addition, you will need black threads for decoration watermelon "grains", hook number 4 and a needle.
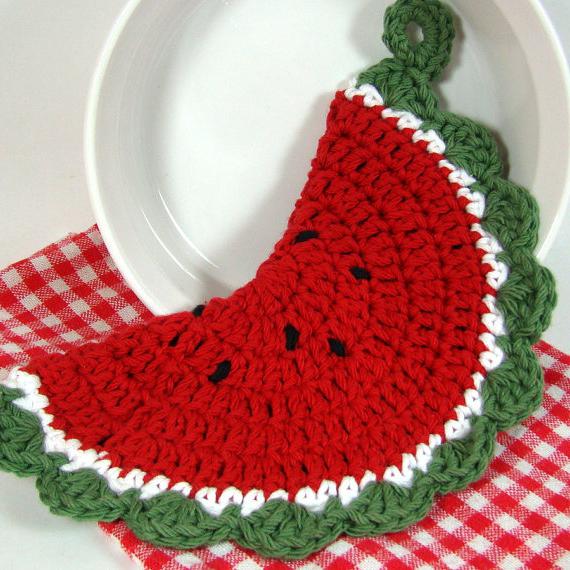
We will tell you in detail what is the procedure for making a crochet tack for beginners. First, we perform five air loops and close them in a ring using a connecting column or half- column . We carry out one VP for lifting. Next, we knit several rows with single crochet, and then with single crochet, not forgetting the necessary lifting loops and ending each tier with a connecting loop. After creating a red “pulp” of watermelon, we proceed to the design of a white “peel”. We take the necessary knitting thread and create one row with double crochet. As usual, we close it with a half-column. By analogy, make a green “peel” using the desired color of yarn. Now we fold the round blank in half and knit the two layers obtained together. You have got a beautiful potholder in the form of a wedge. It remains only to embroider black threads with watermelon seeds. We advise you to sew stitches from the center of the slice. If desired, you can make a loop from a chain of air loops tied in two rows of CH, and attach it to the tack on one edge.
Perform a bath sponge crochet: diagrams and description
What can be connected? Crocheting is still easy to make a convenient accessory for a bath - a washcloth. Such a product not only allows you to perfectly cleanse the skin, but also produces a massage effect. The washcloth is crocheted very quickly and simply, so we recommend that beginner needlewomen try to make such a useful accessory. For work, you will need
flaxen threads, rather dense, and hook number 4. It is advisable to choose bright yarn so that the product pleases the eye. Flaxen threads can be replaced with kapron twine or sisal if desired. We will begin manufacturing the accessory by dialing a chain of 40 VPs and locking it into a ring. We knit the first six rows with single crochet. The seventh and subsequent rows are performed with long loops that must remain inside the product. After the workpiece reaches the desired length, we turn it inside out and connect the edges on one side. That's all - a comfortable bath sponge is ready.
We knit an openwork dress for a one-year-old baby
In addition to useful things in the household and original toys, you can also use the hook to carry out various details of the wardrobe. Using this working tool, it is possible to connect the most delicate and very beautiful coquets that will decorate any dress. In this article we will share with you the technique of performing a beautiful children's sundress.
To make such a charming thing for a little fashionista is not difficult. For work you need cotton threads (100 g) of yellow and pink colors. In addition, hook number 2.5 is required. This charming children's sundress consists of two parts - coquette and skirt, which are made in turn.
Let's make a yoke for a summer children's sundress
How to make this openwork detail crochet? With schemes that are clear and simple, a rectangular coquette fits quickly enough. In our work, we will use this simple technology. For the manufacture of bodice sundress we take the yellow thread. We start knitting by performing a chain of air loops of the required length (it should equal the girth of the chest). Next, create rows with single crochet columns. In the corners we make the necessary increases with the help of an element consisting of 2 CH, 1 VP and 2 CH.
We knit, following the scheme, five rows, and we get a charming coquette.
How to tie a summer sundress for a baby: a scheme
Next, we proceed to the implementation of the skirt sundress. It can be made any - openwork, with a floral motif, or simpler, laconic, made with ordinary columns with one crochet. We offer you such a skirt execution scheme.
The skirt should be knitted in a circle until it reaches the desired length. Then fasten the details of the sundress (for this you can use contrast pink yarn). After the skirt and yoke are crocheted, we do the strapping of the whole product. For example, you can design a dress with a "crustacean step" or any other delicate border. Our charming sarafan is almost ready. It remains to sew buttons on the yoke and make loops, as well as decorate the product. As a decor, you can use knitted flowers, satin ribbons or a cord with tassels, which can be passed under the bodice.
We crochet a summer beret for the girl
We suggest you tie an openwork summer beret in addition to a sundress. It is very easy to do. You will need thin yellow knitting threads and a No. 2.5 hook. The hat is light, openwork and very beautiful. Next, we will describe in detail how crocheted baby berets fit. Schemes of work: we begin the implementation of the product with a “magic” ring and three air loops.
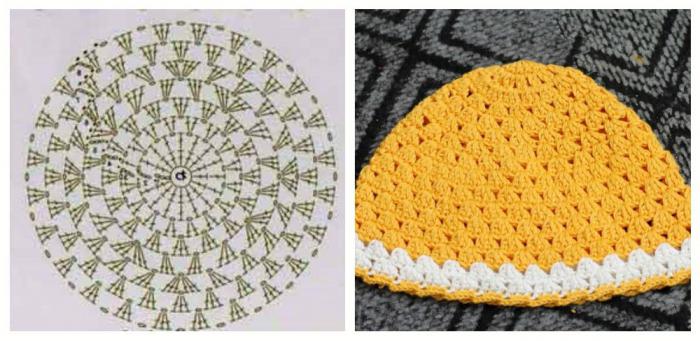
Next, we knit 15 double crochet. We complete the initial row with a connecting loop. Then we perform three VPs and we knit, alternating with double crochet and air loops, as shown in the diagram. We start the third row with three VPs and we will knit 2 CH under the base air loop. The fourth and subsequent rows will be performed by analogy with the third, making the necessary increases and focus on the presented scheme. As a result, you will get such a charming beret. The strapping of the product can be done with a contrast thread, two rows of single crochet columns or a crustacean step. You can decorate such a product with openwork volumetric rose. In such a summer beret, any girl will look like a real princess.
Instead of a conclusion
In our material, we described the patterns and sequence of work in the manufacture of crocheted knitwear. We hope that now you know what you can crochet and what interesting ideas you can implement with this tool. Go ahead and do it! Good luck