How beautiful knitted socks look! However, many cannot buy the right product in the store for two main reasons. The first is the value of the goods. After all, the price of everything in demand is rarely available. The second one is pretty banal: every person wants to get not only a beautiful thing, but also an original one-of-a-kind. Stores provide a range of sizes, so they are not able to satisfy this requirement. But enterprising people are not upset and knit beautiful socks themselves. How to crochet such products, we will tell in the material presented below.
Tool and yarn preparation
To make the finished product really spectacular, you need to take into account many nuances. First of all, determine the pattern. In this case, you can rely on your taste. But at the same time, consider the purpose of the socks. If the hostess will wear them with sandals, it is better to make thin lace socks. Another thing if the idea is needed for home use. For example, as an original alternative to slippers. Professional knitters, telling beginners how to crochet socks , are advised only after choosing a pattern to think about a suitable yarn. For warm products, you can take woolen. For the lungs - thin cotton. The tool is even easier to pick up. You can navigate the label on the yarn or the thickness of the thread. An ideal tool should be the same or slightly larger in diameter.
Foot measurement
It is very difficult for beginners to knit socks according to the schemes presented in magazines. They still do not know the whole technology and cannot adapt someone else’s product to what they want to knit on their own. Therefore, we recommend that you learn how to calculate the size of the product that will fit on the leg. And do not use someone else's master class "How to crochet socks."
To do this, we take an elastic centimeter, a piece of paper and a pen. We draw a silhouette of a sock. Next to it we will indicate the parameters of a specific leg:
- A is the length of the sole, foot;
- B - the length of the upper part of the sock;
- B - girth of the tibia at the level of the proposed upper edge of the sock;
- G is the distance from the heel to the base of the little finger.
Sample for calculating loops and rows
Professionals have one secret: to knit a suitable product in size, you need to make a fragment of the pattern. Moreover, to create it, you need to use materials and tools prepared for your idea. Therefore, the next step for beginners will be to study the scheme or technology of the selected pattern, and then prepare the sample. You don’t have to do too much. For socks, a square with a side of 5 cm is enough. This is a very serious step in the beginner's guide “How to crochet socks”. Therefore, it is important to perform the necessary actions with soul and zeal.
When the sample is ready, count the loops and rows. The first number is divided by the width of the fragment, the second by the length. As a result, we get the value for 1 cm:
How to find out the parameters of the required product
Many beginners knit socks, constantly checking with a centimeter. In this case, the knitting process lasts a very long time and over time bothers. However, professionals recommend that all parameters be calculated in advance. And then children's, women's or men's crocheted socks will not only please the eye, but also motivate them to improve their skills and knit beautiful products for the whole family.
So, in order to determine the parameters of the desired product, it is necessary to multiply the value of P by all horizontal measures, and the value of P by vertical.
Buttonhole Technology
Some knitters begin to knit socks from the fingers to the lower leg. However, professionals do not recommend this. Especially if a novice takes up the matter. It is much more convenient, in their opinion, to dial the number of loops equal to the circumference of the lower leg. Then, knit the desired height of the upper part of the product, place the heel, create a pattern along the entire length of the foot, and finally smoothly reduce the loops for the tip of the toe. In the current article, we propose to crochet just such socks. How to do this, we will tell further, but for now we’ll deal with the required number of loops. To calculate this parameter, multiply the values of P and B.
After that, we knit a chain of the desired length and close it in a ring. Then we move in a circle. Professionals advise first to make cuffs from simple columns. Its width can be varied depending on the wishes. The upper edge of the product is knitted with an even cloth to the base of the lower leg: P x B.
How to knit a heel
Most beginner knitters complain that they don’t understand how to crochet their socks because they don’t represent the technology of the heel. However, professionals say that there is nothing complicated. Let's try to make sure of this:
- Having tied the product to the base of the lower leg, we divide the resulting “tube” into two parts.
- After we begin to knit the heel.
- We knit the first row of one half.
- In the second, we go back and grabs one loop from the separated part.
- Next, we move back and forth, adding in each next row one loop from the second half of the “pipe”.
- We finish the design of the heel when the main and additional parts are reconnected.
How to finish a sock
Having studied and completed the most difficult stage of the beginner's instructions “How to crochet your socks step by step”, we knit the product again without adding and adding loops, moving in a circle. Having knitted the following number of rows: P x D, we begin to reduce the loops. Professionals advise at this stage to finish the openwork pattern and complete the sock with ordinary columns. On them, the decrease will not be so noticeable. It is also important to correctly distribute the number of extra loops on the remaining rows. The algorithm is simple.
- We determine the length of the product, multiplying the values of P and A.
- Subtract from the resulting number the number of knitted rows - from the heel to the base of the little finger.
- At the end of the product we should have a chain of eight loops. Knowing this, subtract eight from the current number of loops.
- Divide the final number by the remaining rows. Thus, we find out how many loops need to be reduced in each row in order to finally get the desired chain.
- We proceed to the design of the tip of the sock.
That's all for beginners. For a video on how to crochet your socks and how to make the product from the back, see below. It will help you choose the most convenient option.
Socks
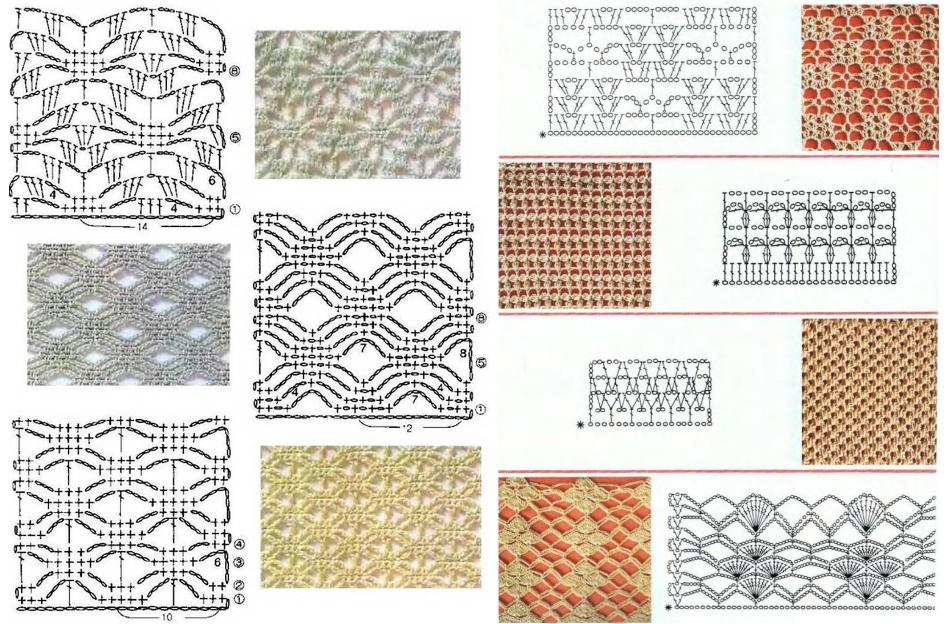
Having mastered the general technology for the implementation of the studied product, you can safely experiment and come up with something of your own. For example, many knitters use complex and very beautiful patterns. However, when choosing them, it is also important to consider the purpose of the product. For warm socks, it is better to choose a denser pattern. It is permissible to make light socks openwork, but motley or fashionable “shaggy” yarn is not recommended for them. Next, we suggest exploring a few simple hook patterns. Socks connected by them will look very beautiful and original. However, when calculating loops, it is important to consider the pattern repeat.
We hope that in the current article we were able to convince the reader that it’s possible to link the product, the purchase of which in the store is expensive, on our own. The main thing is not to be afraid to learn something new. An excellent incentive may be that over time it will be possible to make good money on work that brings great pleasure. Perhaps, someday the newcomer will even prepare his master class for beginners “How to crochet your socks step by step”. Good luck!