Village baths can be built on different technologies, to erect such a building yourself is quite simple. It will be necessary to make insulation and vapor barrier, only in this way you can get a steam room, which will not be inferior to brick architectural masterpieces in anything.
Moreover, frame buildings can be compared with baths made of logs. To make such manipulations will be quite simple, especially if you compare with the technique, which involves the use of bars or bricks. At the same time, there is no need to build a serious foundation, nor use expensive materials. The frame-based village baths have one valuable advantage, which is expressed in the fact that such buildings are lightweight and do not shrink, which cannot be avoided with chopped steam rooms. However, there are also disadvantages, which are expressed in humidity during rain and snow, water can penetrate into all cracks, as well as accumulate inside the frame. In order to eliminate this problem, it should be tried to solve at the first stages of construction.
Foundation construction
If you are interested in rustic baths based on a frame, then you should also know how the foundation is constructed. These works do not involve complex preliminary preparatory manipulations. This is due to the fact that the construction is lightweight. However, if the soil on the site is heaving or clay, then it is best to do the construction of a strip base.
Foundation Technology
Village baths are most often built on tape foundations. To do this, at the first stage, you need to carry out a plan, according to which a trench is excavated. The depth of the latter should be equal to 40 centimeters, while the depth will be 50 centimeters. The next step will be to fill the trench with sand to the surface of the earth. Each poured layer should be well tamped. In order to provide better shrinkage, the layers should be watered with water. To fill the foundation, a formwork is required, its height should be 50 centimeters, while the width should be 30 centimeters. The base should be reinforced with metal pipes and rods, which will give the structure strength. Now the master can start pouring concrete, sometimes these works are done in several approaches, whereas if you ordered concrete at the factory, then pouring can be done in one approach. If you decide to use the first option, you need to exclude freezing of the previous layer before filling the next. After the concrete has hardened, roofing material is laid over the base, which will act as a waterproofing of the frame walls.
Wall Recommendations
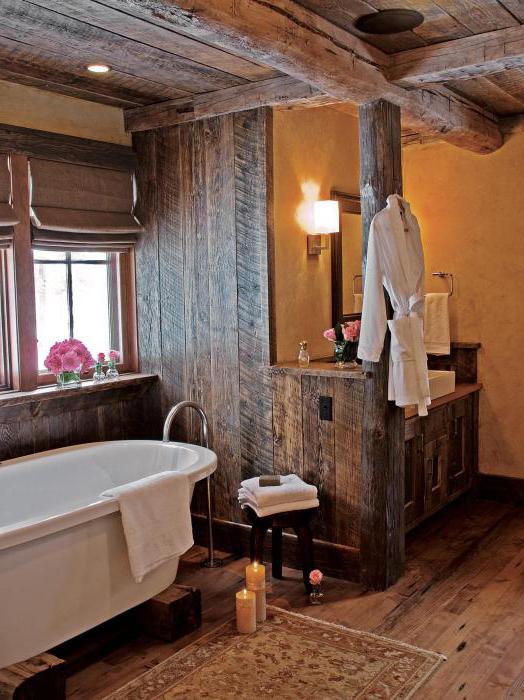
The bathhouse, the photo of which is presented in the article, should be bred using wood that is properly prepared. These works include drying lumber. The breed can be used almost any, except for birch, which quickly decays. Experts advise using aspen, larch or linden, the thermal conductivity of which is quite low, and the structure allows for a long time to maintain its original shape. For external cladding, it is best to use larch and pine, while any kind of tree is suitable for internal work, but aspen is the most valuable. A bathhouse, the photo of which will help you to build, should be protected with an antiseptic on the outside, inside the lining is sanded and coated in two layers with furniture varnish. The exception will be a steam room and a sink, where it is more advisable to use special impregnation. The lower harness is recommended to be formed from a strong beam, its cross section can be 10 x 10 centimeters. In the corners, the elements are connected in a quarter and additionally fastened with nails. In order to exclude the displacement of the lower harness and corner posts, they are mounted on steel rods of 2 centimeters, which are mounted in concrete. The same beam should be used to equip the upper harness. In order to ensure rigidity of the bath frame, 8 pieces of braces are installed in the corners.
Methodology
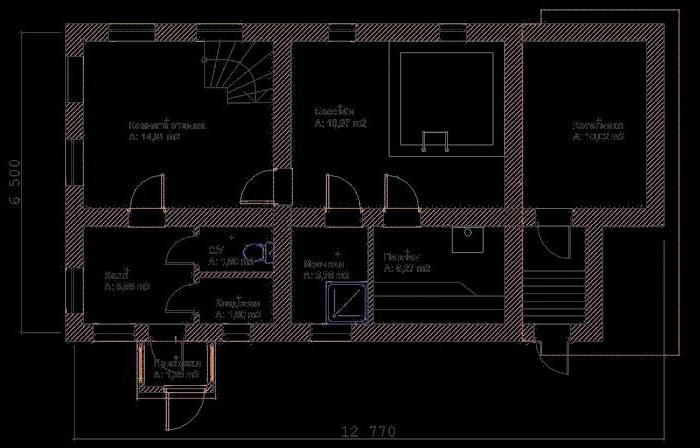
If you will be building a bathhouse, projects should be considered beforehand. This will help you understand which building is best to choose. On the walls are installed intermediate racks made of bars. The cross section of the latter should be the same as mentioned above. Then the logs for the floor are laid, paired boards with a section of 15 x 5 centimeters are perfect for them. They are laid on the base waterproofing. Outside, the walls can be studded with an imitation decorative wall paneling, which will become the most affordable and simple solution. If you use a similar technique in the construction of the bath, then it will turn out solid and attractive in appearance, it will not be embarrassing to invite friends into it. If you decide to choose a lining, then it is best to place it on the surface of the external wall horizontally, waterproofing from glassine is placed under the upholstery. Solid sheets are used, which are overlapped. All edges should be glued with adhesive tape, which is especially important to carry out as carefully as possible, only in this way you will exclude the penetration of unnecessary moisture into the bath.
Work on the arrangement of floors
Before you build a bathhouse, projects should be considered. This will allow you to determine the features of the building. In order to equip the floors in the bath, to the lower part of the lag, as for the steam room and the rest room, it is necessary to nail a square beam with a side of 5 centimeters. The subfloor boards are covered with top, then a layer of roofing material, and then comes mineral wool, it should be laid in a thickness of 10 centimeters. A vapor barrier is placed under the boards of the clean floor, which can be made of glassine.
Floor cleaning in the washing
When you will finish the bath inside, then special attention should be paid to the floors in the washing. Here the technology will be slightly different. In order for it to always stay warm in the winter and dry quickly, a separate foundation must be made around the perimeter. The master removes the soil layer, going deeper by 0, 5 meters. Gravel and sand are poured into the pit, while the layer should be 10 centimeters thick. If water enters a similar drainage well, then it will seep into the ground, without the need for a pit . Asbestos- cement pipes, the diameter of which is 10 centimeters , will be lags for the floor. They are laid on the foundation, and then poured with concrete, this will allow them to keep from displacement. When the bath is finished inside, the next step is to cover the edged rounded board with a thickness of 5 centimeters, while providing a 6 mm clearance by laying rubber pads, they are fixed with nails. After that, the floor can be pressed with skirting boards.
The design of the exhaust system
A private bath, as well as one intended for public use, should provide for the presence of a hood. For this, a pipe made of asbestos cement is used, its diameter should be 12 centimeters, only in this way you can eliminate the smell of mold in the steam room. It will be enough to remove the pipe to the attic, during the procedures and the furnace the hot air through the slot under the door will penetrate the sink, and the exhaust ventilation will take moisture through the floor slots. At the same time, the feet of the soaring ones will always be warm.
The installation of the rafter structure
If you will be building a private bath, then you definitely need to think about what technology is supposed to equip the rafter system. Floor beams, as well as rafters, should be built from boards, the cross section of which is 15 x 5 centimeters. They have to be installed on the edge, fixing each other. Ultimately, the distance between the rafters should be 10 x 12 centimeters. In an upright position, they are fastened with scarves, while from above the connection between themselves should provide for the formation of the same section as that of the ridge beam. Beams are released outwards by 40 centimeters. Drawings of bathhouses will help you to do the job correctly, the technology indicates the need to assemble the roof structure on the ground, after which it will have to be lifted up and installed in the finished state. The crate for this is made of boards, the thickness of which is 25 centimeters. The crate is laid directly from the ridge.
Vapor barrier and insulation behavior
Drawings of baths you can make yourself, which must be done before the start of construction. But after the construction of walls and roof, you can proceed to vapor barrier and insulation. If you follow the experience of professional builders, then thermal insulation is best done using a rolled "Ursa", the thickness of which is 50 millimeters. The laying of the material is carried out between the uprights, fixing to the rails. In some places, the insulation is nailed to the outer boards, however, special nails that are equipped with a rubber washer under the head should be used. The log cabin, as well as on the basis of the frame, must have a vapor barrier in order to prevent accumulation of moisture in the structure when the temperature inside is high and the window outside is winter. The most successful solution for this is a plastic film that fits under the lining. Particular attention should be paid to the process of lining the steam room. It is also important to lay a high-quality vapor barrier, for example, foil, film or glassine. However, it is worth abandoning roofing material or roofing, which, when heated, can exude a specific smell.
Interior Features
The bathhouse from the log house, like the one built on the basis of the frame, must be trimmed from the inside. Thus, it will be possible to get something like a puff cake. First comes the outer lining, then glassine, the next step is the insulation, and then the plastic film. The last one will be the inner lining. In this case, the main condition is the provision of an air gap, the thickness of which is 5 centimeters. It should be inside the walls. Specialists recommend paying special attention to the steam room, where the effect of a thermos should be provided. It is best to lay the insulation with foil inside the room, while in the ceiling it is necessary to use foil "Ursa", as well as a 5-cm ordinary insulation. When you build a rustic bathhouse with your own hands, the ceiling and walls inside the steam room are best finished with aspen lining, in extreme cases, you can use sheet pile or poplar linden boards.
Carrying out external wall decoration
The use of plaster and paint cannot be called the only option for the exterior decoration of facades. The features of the bath from the inside have been described above, but in order to give the structure an attractive appearance, you can use modern materials like thermal panels. For the reason that the traditional construction of a frame bath requires mandatory thermal insulation, it is possible to carry out these works with the help of thermal panels. They are a multilayer structure, the insulation of which is foam or mineral wool. Thermal insulation is enclosed between two layers of PVC. The outer surface is usually made in the form of masonry, then sprinkled with pressed crumbs. Decorating a village bath with the help of thermal panels is quite simple, since the products have mutual grooves that allow easy installation. Fixation of materials on the facade should be carried out with ordinary self-tapping screws that fix the panels to the profiles on the external walls.
Use of facing brick or siding
If you will be building a bath, lining for finishing external walls is perfect. However, in recent years, facing brick has been increasingly used, which allows you to create a smooth masonry that fits into any exterior. Between the facing brick and the main walls, insulation can be laid. Siding is the most popular and lightweight material for wall cladding, it is inexpensive, and it is as simple as possible to strengthen it. That is why in recent years, professionals and private developers refuse plaster and conventional materials, preferring new solutions that can transform the building, making it as attractive as possible. You can independently think about which finish is more acceptable for you, which one you can install on your own.