From early childhood, children learn to work with colored paper. From the nursery group of the kindergarten there is an application lesson in the schedule. With each age group, the training program expands and becomes more complex. If young children just learn to stick finished parts onto a piece of paper, then over time they begin to independently cut the parts first on straight lines, by folding the paper, then they learn to cut along circles and contours. The teacher gives the children of the older group part templates, the children circle them with a simple pencil, and then cut them out along the contours.
Children make crafts from colored paper with their own hands not only once a week, when there is a lesson in visual activity. In the evenings and in your free time, individual and additional work is carried out. For all holidays, children use this material in the manufacture of greeting cards. These are flowers for mothers and grandmothers on March 8, military equipment on February 23 and Victory Day, decoration of Easter eggs. And what wonderful DIY Christmas crafts are made of colored paper.
In the article, we will show parents several options for making interesting works using multi-colored paper. These are light crafts for young children, and complex ones for elders. We will share our knowledge about different ways of working with paper. We will give parents advice on what kind of work a child can be offered at what age so that his abilities coincide with the complexity of the implementation.
What do you need for work?
Before starting to make crafts from colored paper with their own hands, the child needs to prepare a workplace. It should be well-lit, free from excess and consistent with the growth of the child so that the spine does not bend in a sitting position. During the manufacture of the craft, the child should not stoop, the back should be even, and the position of the legs under the table should correspond to the shape of a right angle.
If the child is 2-4 years old, then the details are cut out by the parents. For gluing, you can use a brush and paste. It is easy to cook at home. A teaspoon of wheat flour is placed on a glass of cold water and thoroughly mixed in a small saucepan. Then the mixture is placed on the gas and brought to a thick state. Be sure to constantly stir so that there are no lumps. Please note that after cooling, the paste thickens even more.
You can offer a glue stick for older children for DIY colored paper crafts. It is convenient to use when working with paper. Then the brush is not needed. For older children, you also need to prepare scissors, a ruler and a simple pencil, make patterns for outlining contours.
Methods of working with colored paper
In addition to the planar work on the application, there are many more different ways. This is a folding of figures of characters from stripes, hearts, circles and semicircles. Cutting the ends of a sheet of paper with “noodles” and rounding the edges with a pencil. So you can make grass in the meadow, the hair of a princess, the mane of a lion, etc. There are original hand-made articles of colored paper in which you need to fold a strip of paper in half, forming a droplet. In this way, petals of flowers, animal fur, and hedgehog needles are formed.
There are many crafts that use the method of tearing paper into small pieces or thin strips. Not always in a child this is obtained the first time. It is necessary to show how such work is carried out, to train on the old newspaper.
Often, do-it-yourself and double-fold paper folding techniques are used in do-it-yourself color paper crafts, for example, for snowflakes or elements of the same type - leaflets, petals.
City street
This application is done in a combined way. Some elements are glued whole, and some are torn off paper. First, a background of blue sky above and green grass below. In the middle of the sheet, houses of brown and yellow are glued. Since they are multi-story, they stick rectangles. The windows are made of small identical elements of contrasting colors. If the house is yellow, then the windows are brown, and vice versa. The roofs on the houses are red and triangular in shape.
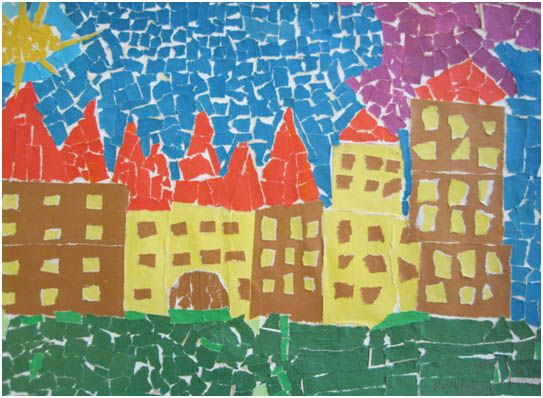
In addition, at the end of the children's hand-made article from colored paper (the photo is presented in the article), a sun with rays and a cloud are attached. Since the work is very laborious, it can be done at home in several stages. First stick the background, and then the rest of the picture. In a lesson in kindergarten, children of the middle group will be able to do it collectively. Each child is given a specific task, and he must perform his part of the work in a quality manner so that the general craft is beautifully designed.
Christmas beauty
One of the light crafts of colored paper with your own hands will be making a Christmas tree for a New Year's card. Younger children can be given ready-made strips, while older ones can cut them on their own. Each element of the picture should be smaller than the previous one, since the Christmas tree has the shape of a cone. The strips are not arranged in even rows, but randomly, only their sequence in size is observed. You can cut only green details, but a multi-colored tree will look more interesting.
Start to do the work from the bottom, with the longest strip. When all the elements have found their place, an asterisk is glued to the top. It can be made both red and yellow. If desired, balls of different colors are glued on top of the surface of the New Year tree.
Autumn tree
Before the autumn matinee, you can decorate the group room with such a beautiful colored paper craft. With their own hands, children should fold the sheets "accordion". Each fold is well ironed, otherwise the colorful leaves will look messy. First of all, a tree trunk is glued onto a sheet of Whatman paper. Brown colored paper is used. If one sheet is not enough, you can make it from two or three elements.
For the manufacture of leaflets, it is better to take double-sided colored paper. You can use only the colors of the leaves - yellow, green, orange and red, and you can add other bright colors for creativity. It will turn out a more beautiful craft from colored paper. With their own hands, the children fold the sheets folded in "accordion" in half.
The first fold is smeared with an adhesive pencil and attached to the last strip. Corrugated triangles should be obtained, as in the photo in the article. The glue is smeared on the edges of the paper folds, the leaf is pressed neatly to the tree, with the whole palm, so as not to crush the accordion lines.
Swan on the lake
As a craft, do-it-yourself birds from colored paper can create such an original swan. First, before gluing, preparatory work is performed. A children's palm is circled on a sheet of cardboard and a template is cut out. According to the pattern of different sheets of colored paper are cut along the contours of the palm. It will be the body of a swan. You can only make them white, or you can make them colorful, as in the sample in the article.
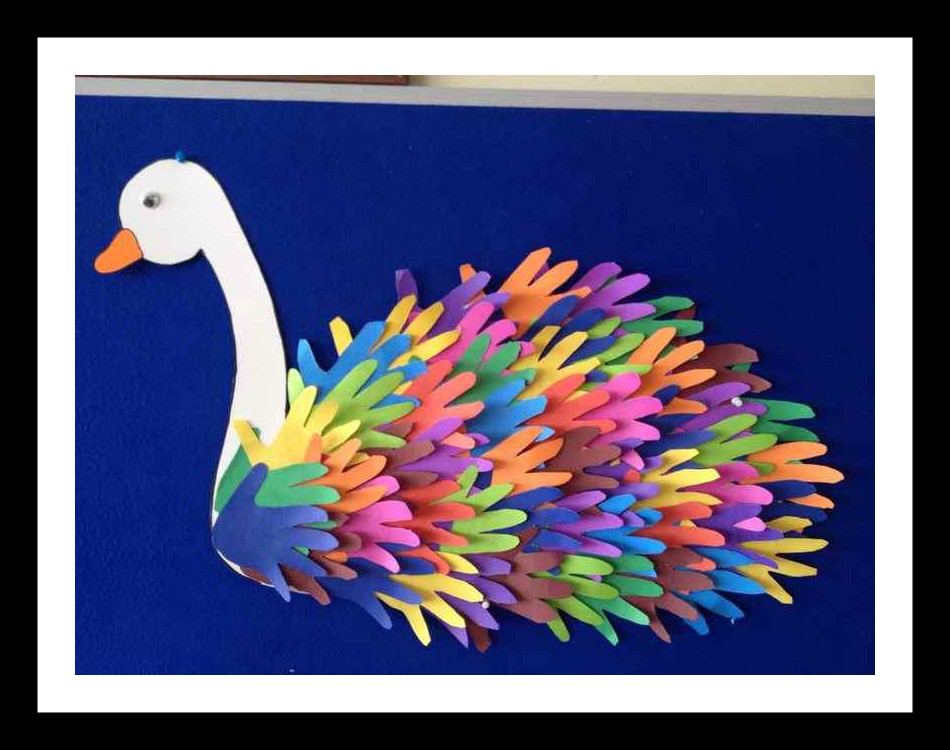
If the children are small, then the teacher independently prepares for the application. Children only stick the swan’s neck and red or orange beak first. Then begins the production of step-by-step DIY crafts from colored paper. For convenience, you can draw on the blue background of the lake the outline of the body of a bird. Then gluing starts from the tail. One palm is glued on the edge with the fingers back. Then elements are added in layers, increasing the size of the body. Work near the neck of a swan is coming to an end. Older children will be able to independently cut their hands, folding several sheets of paper at once. Preschoolers of the senior and preparatory groups cut their necks and beaks on their own, too. It is possible to supplement the application with reeds, the sun, water lilies on the water.
Volumetric fish
Volumetric work always looks more impressive than flat. Therefore, if you add such wonderful fish to the image of the aquarium or the sea, then the application will benefit from this. Cut them along the contours of the template. The head and tail are pointed, in the shape of a triangle, and the body is rectangular. Then, on the back side, the tutor draws five strips under the ruler from the tail to the level of the head. Then the child scissors in a straight line cuts colored paper. The smoother the cuts, the neater the tail will look.
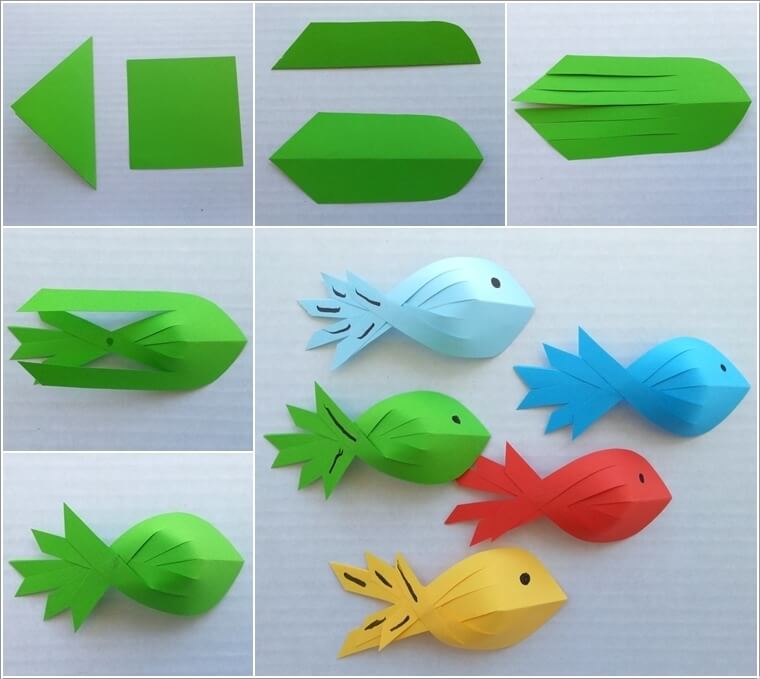
On the head, fish are drawn with a marker or glued on small details - eyes, mouth. Then comes the most crucial moment. The top three strips intersect with the bottom three and stick together. At the same time, part of the paper with the head of the fish bends, a three-dimensional image is obtained. On the main background of such an interesting do- it-yourself craft from colored paper, fish are attached at several points. You can apply glue to the mouth, end of the head and tail. The central part does not stick, but remains free.
Paper folding
You can make crafts from colored paper with your own hands, using the method of folding the sheet. Consider this example of marine life. First, a large fish or jellyfish is drawn on the back of the colored paper. Then, the figures of characters are cut out along the contours with scissors.
Only then begins decorating children's crafts from colored paper. With their own hands, the part is bent in half, and curly cuts are made. It can be triangles or hearts, stripes or wavy lines. If it is necessary to make an incision in another part of the marine life figure, then the paper is folded in this place.
A parrot
Do-it- yourself birds make this craft out of colored paper from circles and ovals cut in half. You can give children 4.5-5 years old ready-made figures with a drawn line in the middle. Scissors cut the figures in the center line. You can distribute the task for one parrot between two children. Then each half of the figure will receive both.
Sticking begins with a round head with an eye. Then the back and stomach are glued. Then work happens with feathers. They are glued in layers. Paws and beak are represented by two adjacent shallow semicircles. At the end, a tree branch is glued. It should touch the paws of the bird.
Craft "Flowers" from colored paper
With their own hands, children will be able to make such a picture already in the younger group. All elements are cut out by the tutor. If you decide to do such work with older preschoolers, then entrust them with scissors cutting out all the elements. First draw the contours of the middle of the flowers. These are three circles. Around them, like sun rays, strips of yellow paper are glued. Attach them only for one end. The outer edge remains free. When the petals are all in place, you can attach the black center, after drawing a checkmark on it with a marker. These are sunflower seeds.
Stalks can be done in green by adding carved leaflets. Position them at an angle, connecting the lower ends at a central point. Then a jug or vase is cut out. To make flowers of colored paper with your own hands, you can paint a vase with paints, felt-tip pens or stick a pattern of small details.
To make the vase look voluminous, it is smeared with glue not completely, but partially. The applique backing can be made of any color, preferably contrasting, so that the flowers stand out brighter against its background.
Wall panel
You can create an original wall panel from bright paper in saturated colors. It is better to make it on a sheet of plywood or fiberboard of white color. Collected crafts from individual squares. Each folds by bending the corners to the middle of the sheet. The folds need to be smoothed well so that they hold their shape for a long time. It is better to take thick paper for work.
Parts are arranged with alternating colors so that the adjacent squares are not the same color. If everything is done correctly, the wall panel will delight the eye for a long time. This is an easy and cheap way to decorate your living space.
Conclusion
The article presents in detail the options for making crafts from colored paper. Now parents, knowing all the intricacies of the methodology for conducting applications in kindergarten, will be able to independently conduct this type of crafts at home. Good luck and success!