Origami art has existed in the East for a long time. Europeans loved folding paper figures much later. There are two types of origami - picking up the figures according to the scheme of paper and composing the whole from separate modules. This is not only entertaining entertainment, but also cognitive. During the execution of the task, memory, attention, the ability to understand schemes, navigate in space, and distinguish the cardinal points develop. To create a beautiful figure, you still need to be careful and diligent.
With modular origami, you need to collapse the same modules in large numbers, so you still need to have patience and hard work. In the article we will look at how to make an origami swan according to schemes and from modules. Photos in the article will help you learn how to navigate through step-by-step instructions so that in the future you can do the work yourself. A detailed description will help those who make the figure for the first time.
Let's start with a simple origami swan for beginners according to the scheme below.
Simple option
Before you start, prepare a square piece of paper. A colorful glossy craft will look beautiful, with different colors on each side of the sheet. The square is located at an angle to the master and the first fold is done diagonally. Each of the triangular halves is bent once more. The parties should appear exactly in the center line. Fingers smooth the fold line well.
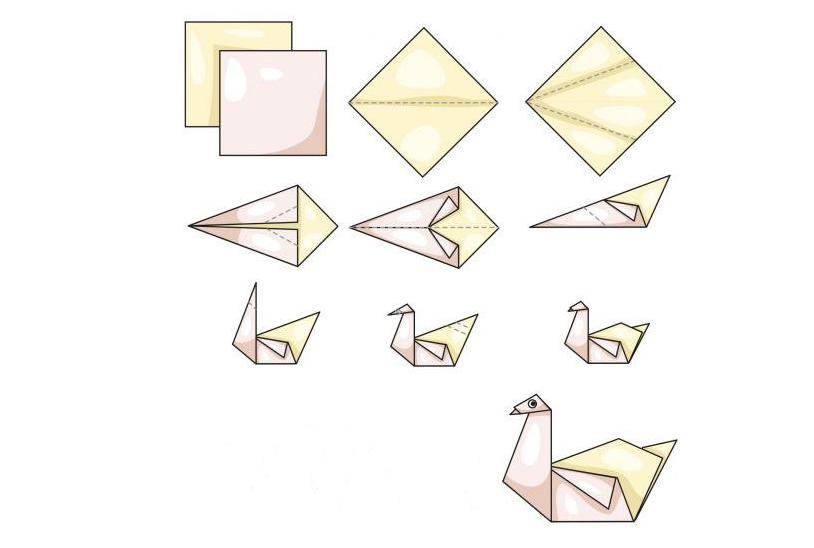
The right angles inside unfold at the same angle and also smooth out well. After that, two triangles turn outward, the fold line should be on top. The acute angle of the workpiece will subsequently be the neck and beak of the origami swan. Therefore, this part is turned upward and the very edge is bent forward. The final touch in the execution of the work will be the double folding of the tip of the tail of the bird. An eye is drawn on the head with a marker; the beak can be painted red. The figure of the origami swan is flat, with small bends of individual parts of the body of the bird. A child can either simply play with a swan, or use it as a blank when creating an applique or postcard.
3D Origami Swan
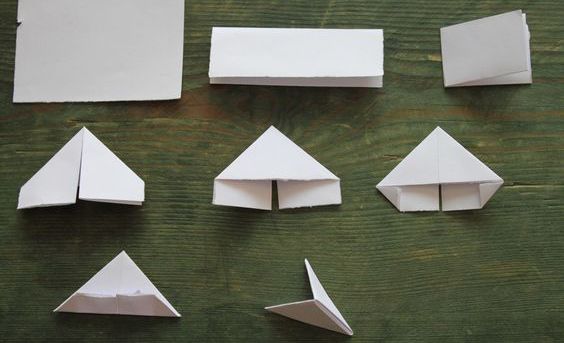
In the photo below you can see how to do the first part of the work. The initial stage of work is similar to the first simple method of making an origami swan according to the scheme. To work, you need a square sheet of colored thick paper. Swans can be assembled and white. The red beak and black eyes of the bird are made at the end by cutting out elements from colored paper.
A square is folded in half by folding the paper diagonally. Then the sides are connected inward along the center line. To make the work look neat, it is imperative to smooth the paper with a finger after folding it.
Continuation of work
To continue working on the origami of a swan with your own hands, you need to turn the blank over on the table on the back side. Two triangles bend a second time to the level of the central diagonal. The step-by-step photograph clearly shows how to work with paper.
Then the acute angle of the workpiece must be connected to the opposite. Remember to smooth all folds with your finger. The edge of the sharp corner bends forward. This will be the beak of the bird. In order for the craft to be put on the table, it is necessary to bend it along the center line in half. When the swan’s neck is turned up, the lower part is crushed with fingers. This part in the correct position should be at right angles to the body. The wings are spread left and right. The tail can be beautifully arched, as in the previous version.
Napkin Option
If you made such an article from a napkin folded four times, then after making the origami of a swan, a magnificent tail is formed. For this, all layers of tissue paper are carefully lifted in turn. Crafts look more impressive and voluminous than plain paper.
Such a swan can be made before the arrival of guests and arrange birds on each plate. After all, you can surprise guests not only with deliciously prepared dishes, but also with a beautiful table setting.
Origami swan made of modules
For beginners, we can recommend trying to make a small bird. It’s easier to start by making each level of the modules out of paper of a different color. Before you start making the bird itself, try, firstly, to practice folding the same modules, and secondly, first make a stand for the swan. How to make an origami of a swan, we will consider later in the article, but first, let's learn how to twist modules of the same size out of paper. To construct a medium-sized swan, you will need at least 300 pieces of modules, so take the time in advance and prepare the material for work in advance.
In addition to the manufacture of modules, you still need to learn how to connect them together. After all, an origami swan made of modules is absolutely glueless. The figure must be assembled tightly so that the modules do not pop out.
Learning to make modules
The first time we will use a simple white sheet of A-4 format for work. Fold the paper several times in half and cut along the fold lines with scissors. The task is executed until small rectangles remain. From one sheet A-4, 16 parts should be obtained. When the required number of parts has been cut, you can take it for folding the paper according to the scheme shown in the photograph below.
The workpiece is folded in half in length, then similarly bent in half and in width. The edges of the rectangle are wrapped forward and down so that the halves of the top line are connected in the center at right angles. Then turn the workpiece on the wrong side. It can be seen that the ends of the bent rectangle hang below the triangle. Their corners at the edges need to be bent at a right angle to the middle of the module. All that remains is to bend the hanging parts inward and smooth the fold line with your finger. The final touch in preparing the module is to bend the part in half. A narrow bend of paper is hidden in the middle of the module. From the back you can see two pockets, where later other details will be inserted when assembling the origami swan.
How to assemble a stand
The base for a bird can be made for the beginning the simplest, namely, consisting of a single layer of modules. For convenience, you need to make at least 30 modules of the same or different colors. With your hand, holding the first module with your fingers at the bifurcated edges, insert the second module into the pockets on the back, pushing the parts firmly in until they stop inward. In this way, a long strip is collected. Then gently bend it in a circle and connect the edges. It turns out a round stand, on which, after manufacturing, a swan figurine is simply placed.
Making the bird’s neck
If you already understood how to make the modules themselves and learned how to fasten them together, you can easily assemble the neck and head for the origami of a swan in the same way. If you are constructing an ordinary bird of white color, then for the beak, make one module of red or orange shade. The size of this part of the body depends on the shape of the neck. If it is curved down, then you need to prepare more modules, because in addition to lifting up to the desired length, you still need to turn it gently and slightly lower it.
Already known to us, the modules are inserted one into the other until the neck reaches the desired size. A red module is put on the very edge. You can glue the eyes of a swan by cutting out of black paper, or simply draw with a pencil or felt-tip pen.
The main body work
To lift the body up, the modules are fastened differently. If earlier we inserted the corners of one module into two pockets of another, then now we need to act differently. One module is inserted into the pocket of the second one close to it, and on the other hand, a part is attached, an acute angle of which is inserted from the other side also into the second module.
It turns out the shape of a triangle. Further work progresses similarly. It turns out that the assembly of the modules takes place in two rows at once. If in the first row we, for example, took 30 modules, then in the second row 31 pieces will be released. The third row also has one more module and already consists of 32 parts.
When there are already three rows drawn around, you can start assembling the wings. Consider carefully how to do this.
Making wings and tail
Since the base of our craft is round in shape, we begin the manufacture of the first wing from absolutely any place. The lower wing has 10 modules, which are inserted in the fourth row. The fifth row already has 9 pieces, each subsequent one is assembled from an amount less than one unit. Only one element should remain at the very top. The first wing is ready. The craft turns on the other side, and similar work is repeated. In front, where you plan to join the neck, it is enough to leave a segment in three parts between the wings.
The space that remains from the back of the body is designed to form the tail of a swan. The lift is small, depending on the number of modules between the wings.
Assembling parts together
An origami swan with step-by-step instructions is easy. The neck joins in front and bends beautifully at the right angle. The swan itself is placed on a round base. You can make a double stand, as in the photo in the article, and the lower circle is going to be larger, and the upper one is smaller. It looks beautiful stand, assembled from multi-colored elements, for example, composed through one. You can assemble the stand in three rows, made on the same principle as the swan's body. A swan looks very original, in which the colors of the modules alternate in a spiral or in layers. The shape and size of the wings may also vary. If you insert modules through one on the edge of each wing, you will get the impression that the swan spread its wings and feathers are visible. You can fantasize in different ways, that with the color scheme, that with the form of crafts.
For beginners who are working with modules for the first time, you can complete the task exactly according to the instructions in the article. With the acquisition of work skills and experience, you will try other options, complicating the task gradually.
To work faster, you can plan it sequentially. For example, first prepare a large number of modules in one day, and the next - already collect the origami from the prepared parts. All modules need to be executed in the same size so that the craft looks neat and even. Insert the corners into the pockets to the stop, tightly, but gently so as not to deform the module.
Follow the advice given in the article, and you will surely get a beautiful swan.