A home stove attracts users with its diverse capabilities. In addition to being used as a heating system, it serves other purposes. For example, the design of the old "grandfather" furnace contained many functions. This is baking bread, and cooking, and heating water, and drying fruits.
Materials for the furnace
A good and high-quality oven requires serious investment and quality materials. For a not-so-expensive option, the required materials make up the bulk of the price. Masonry stoves, made with their own hands, holds about 400 pieces of brick. Mainly used is a hollow ceramic brick brand M-175. For the firebox you need 20 refractory bricks of the brand ‑ 8.
In addition to brick, kitchen utensils are required - these are single-burner and two-burner stoves. Two gate valves are required for ventilation shafts. You will also need two blower doors of the DP brand measuring 15 × 16 cm and a furnace door of the brand measuring 27 × 30 cm. Clay-sand with lime is always used as a mortar for masonry. Clay is most convenient as it is hardy to high temperatures. And for laying the combustion chamber with refractory bricks, a cement-sand mortar with the addition of lime is required. You can start laying the stove with your own hands. Step-by-step instructions are presented below.
Step # 1 - choosing a place
The stove should provide maximum benefits for heating rooms, and for cooking - and even for drying clothes. It should heat several rooms.
Step number 2 - preparation of the foundation
It comes down to leveling the surface. The place must have a high degree of hardness so that after operation the furnace does not sag. Therefore, if the base is too soft, you need to create a stone-sand mixture or fill the base with concrete. To protect the base of the furnace from moisture, a layer of waterproofing bitumen is placed under the foundation to be poured. The 1st row of masonry is laid on the base. Reflective insulation is also installed to prevent heat from entering the ground.
There are no standard sizes. So, for example, the base of a small heating furnace is 3 × 2.5 bricks. For a standard size, without a bed, take 3 × 3 bricks. For laying the base, clay-sand mortar is used. If buckets are used in the preparation of the solution, then the proportions of clay and sand will be as follows: for greasy clay, 1 bucket of material will require 2.5 buckets of sand; for skinny - 1 bucket of clay 1 bucket of sand. And to prepare the solution, you first need to soak the clay for a day.
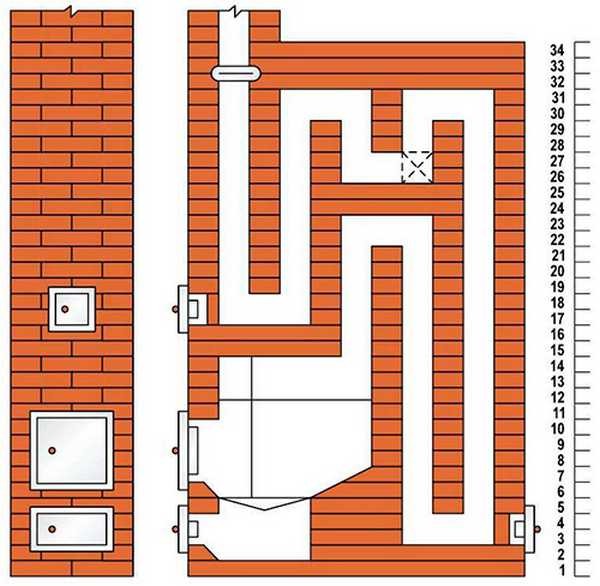
The first rows of masonry (step number 3)
In the laying of the 1st row, the exact dimensions, the thickness of the seams and the convergence of the diagonals must be observed so that there are no distortions. The thickness of the seams of the 1st row should not exceed 0.6–0.8 mm. Do-it-yourself masonry of stoves is made from a full-sized standard brick size. It must be level in order to maintain strict horizontalness.
In the 2nd row, the brick is laid out in such a way as to make the dressing of the 1st row on a half brick. Masonry starts from the extreme rows. Also in the 2nd row lay out a fire cutting 120 × 250 mm.
In the 3rd row they also make dressings for half-brick. Here begins the laying out of the blower door chamber. The blower chamber door is also laid.
Sometimes for laying stoves with your own hands in a living room, you can change the size by half a brick to fit the already installed chimney. Masonry of the 3rd row provides for the strengthening of the door of the blower chamber.
Chamber of an air door (step No. 4)
The next, 4th row continues to form the chamber of the blower door with an increased distance to the thickness of the brick in order to cover the combustion chamber with fireclay refractory bricks. This is where the formation of the lower horizontal channel begins. A separate fire row is formed between the stove and the piers in the simple masonry of the stoves with your own hands.
The masonry of the 5th row copies the masonry of the 4th - except that the ash pan opening tapers a little. An ash pan grill is placed on the 5th row brick. To control verticality, you need to install vertical plumb bangs on the corners of the masonry stoves with your own hands. The order provides for accurate horizontal
5th step. The formation of the combustion chamber
The next, 6th row of the masonry furnace forms two vertical smoke channels. To do this, brick the horizontal channel. In this way, a combustion chamber is connected to the vertical channels. A cast-iron grate is installed at the bottom of the furnace to create traction from the blower chamber and garbage ash from the furnace. In the 6th row, the laying of the refractory brick of the combustion chamber begins. To install your own hands in the masonry of the stove, you need to strictly comply with the dimensions to a centimeter. In the laying of the combustion chamber, it is necessary to create cracks in the bottom of the combustion chamber between bricks 1–1.5 cm. They will serve as compensators for expansion during heating.
Next, the 7th row continues the formation of the combustion chamber with the installation of the combustion door. It is installed on the 6th row of masonry stoves with their own hands. The order in this case provides the necessary dimensions for the door. You also need to block the U-shaped channels to create three smoke exhaust channels.
After that, the 8th and 9th rows are laid out equally. On the 9th, the furnace door is closed. The bricks are slightly crushed on both sides on the left side of the furnace, in order to make gas passages from the furnace to the left channel.
The next, 10th row of masonry is laid out from refractory bricks. He blocks the firebox. For good gas circulation, it is necessary to strictly observe the vertical and horizontal masonry.
Cooking surface of the furnace (step No. 6)
In the 11th row, in the masonry of brick ovens with your own hands, you also need to use refractory bricks to create the cooking surface of the furnace. At the edges with which the brick is in contact with the hob, it is necessary to cut the edges of the brick by 2 cm. In the 11th row, the hob is installed on the previous row of masonry. The layout of the laying of stoves with your own hands, the laying of the cooking stove in particular, indicates that in the 12th row there is a connection of two left channels into one, and in the next - division into two channels.
In the 14th row, which is laid out identically to the 13th, a damper is installed. It can overlap the hob. This allows you to disconnect the stove in the summer from the cooking chamber. In the 15th row of laying brick ovens with brickwork, the damper overlaps, and in the 16th the door of the cooking chamber is closed. A ventilation hatch is installed on the left between the cooking chamber and the front chambers, through which the vapor is removed.
In the 17th row, the ventilation door overlaps. Two steel rods are built into the masonry above the cooking chamber, which serve to overlap the cooking chamber. Further, the 18th and 19th rows completely overlap the cooking chamber.
7th step. The formation of smoke exhaust ducts
In the 20th row, on the back wall at the overlap of the cooking chamber, two bricks are installed on the edge at a distance of 4 cm from the rear wall of the chamber. For samovar pipe and cleaning two doors are installed. The masonry of the 21st row is identical.
In the 22nd row there is an overlap of all doors. Three channels are formed above the cooking part - two channels of 11 cm and one 5 cm.
In the 23rd and 24th rows, two long holes are overlapped by installing a brick on the rib.
The next rows of masonry, the 25th and 26th, repeat the masonry of the 22nd row, and the 27th and 28th rows consist of three bricks that are laid on the edge at the same distance between themselves and the walls.
Fireproof masonry zone (step No. 8)
DIY masonry drawings suggest that in the 29th row there is a formation of two channels of one. Two bricks are installed in front, connecting with bricks mounted on a rib.
In the 30th row, all channels are blocked with the opening of the chimney opening. The last rows of the masonry of the ordering furnace, the 31st and 32nd, are installed above the fuel chamber, forming a fireproof zone.
The last in the brick kiln masonry is the chimney masonry, in which all fire safety measures must be observed so that the chimney is most isolated from the flammable parts of the house.
This is how the arrangement of the ordering furnace is made, which can serve both as a stove for cooking, and as a heating, and as an oven.
Economical stove in the house
When we talk about home comfort, we will certainly remember the thermal characteristics of the apartment or premises in the house. To create the most optimal conditions, thermal insulation of external walls, windows and doors is required. But sometimes even with good insulation in the house there is not enough heat. And in order for it to fill our rooms all the time, there is the option of building an economical autonomous stove in the house. It, like no other heating, can create a guarantee of warmth, and with it the atmosphere of home comfort.
Building a furnace is not an easy task. It should not only be a hotbed of heat, but also not be a danger to the home. The main thing is to remember that fire safety requires reliable isolation of firing points from flammable things in the house.
Masonry furnaces and solutions
Construction begins, as usual, with a foundation, so that it is not “floated” and cracked, as it is said, the foundation foundation is covered with a stone-sand cushion with obligatory cement casting and waterproofing of the base. Laying out rows is carried out in several stages. The first stage in the laying of stoves with your own hands is the laying of the base, on which its fire part will be located. The material used is ordinary red brick and a solution of clay, sand and cement.
Clay is the most convenient and high-quality material for the construction of various kinds of heating structures. To give the solution higher qualities, instead of sand, slag or metal filings can be added, which will make the solution more durable. For laying the furnace, you need to use refractory bricks with high thermal conductivity. To increase the heat transfer of the furnace, the moves in the furnace must be done with all kinds of pockets and zigzag horizontal channels to retain heat in them. It is also important that the heat of the fire heat as much of the area as possible.
In the summer, when the house does not need to be heated, the clay solution absorbs moisture - and the stove becomes slightly slack. Therefore, in order to prevent deoxidation, especially of the fuel chamber, a cement-sand mortar is used for masonry. For him, you need to purchase high-quality Portland cement grade M400 and clean without impurities mountain sand.
Facing the stove with ceramic tiles
In the modern civilized world, an old stove in a house with an elegant interior can only spoil the reputation of the owner. In order to fit an old stove into a modern design, you can resort to a more interesting way of facing with ceramic tiles or finishing bricks.
For reliable bonding of tiles, the surface of the furnace is cleaned of dust, dirt and grease stains. All cracks and grooves are closed and plaster is made with cement mortar using a cement grade of at least M400. A special hot-melt adhesive can also be purchased for stuccoing the stove.
Fire chamber reinforcement
Sometimes in heated places around the firebox a metal mesh is used to reinforce the plaster. The grid is attached to the wall with metal dowels. A layer of plaster is applied to the grid so that it covers it by several millimeters. After the plaster has completely dried, the ceramic heat-resistant tile is laid on the heat-resistant adhesive.
Each part has its own heating temperature, at which the process of expansion of the tiles takes place. Therefore, it is stacked with a bark. To seal the joints, putty with high elasticities is used so that it does not crack when heated.
Swedish masonry
Let's talk about Swede, a cooking and heating stove, which is slightly inferior to the Russian one, but more practical in that it quickly heats up. A Swedish oven can be installed in the wall between the kitchen and the room. Only during the cooking period will it quickly heat both the kitchen and the room. In the masonry of a Swedish-made do-it-yourself oven, the order provides for several niches. The uppermost one is for drying clothes. It is also heated during cooking and continues to heat from the embers.
The niche above the stove serves as an oven for saving warm food in it during the winter cold. Through the night, a niche above the stove can keep warm food, which is needed in the morning for quick cooking. Sometimes, but not in all cases, the Swede was equipped with hail or simply smoke circulation, which gives quite a lot of heat from the smoke. But the smoke flow of the masonry of the Swedish kiln with its own hands is complex in design and significantly affects the price.
The Swedish oven also has a second oven, which gives a lot of heat. The only drawback is that it strongly heats the floor. In order not to lose heat, it is necessary to provide strong insulation of the furnace base from the floor. A very good insulator for a Swede today is basalt cardboard.
Isolation is carried out in such a way that not only does not the heat pass from the stove into the ground, but also reflect it up. For this, three layers of basalt cardboard are needed. The first layer of masonry stoves for the house with their own hands is laid directly on the ground under the foundation foundation. The middle consists of basalt fiberboard with a reflective foil coating that will reflect heat back into the oven.
For the firebox you need fireclay bricks and fireclay clay for mortar. It should be noted that the laying of refractory bricks should not be in contact with the laying of ordinary bricks. The gap between the laying of chamotte and ordinary brick should be up to 6 mm. Based on the fact that thermal brick is much more expensive, they only lay out the inner wall of the furnace. In the rest of the masonry, ordinary brick is used.