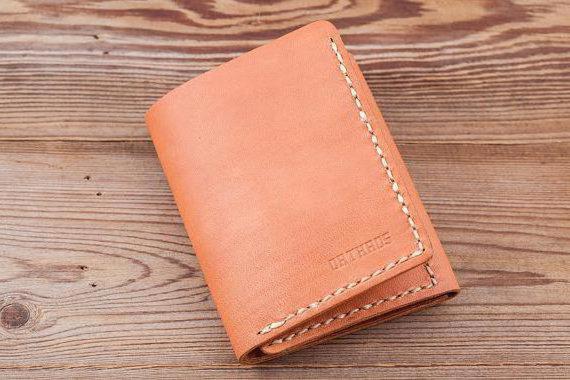
Surely every person who wants to buy a purse or handmade wallet is interested in the question of how strong and reliable the seams on the selected product will be. Will they not break with time or wipe themselves, thereby creating the risk of losing money or documents at the crucial moment? Therefore, the saddle seam itself will be the best option for flashing handmade products.
A bit of history
This seam got its name due to the fact that horse saddles and harnesses were stitched to them in ancient times, for which a strong, reliable seam is a very important issue, as human life can depend on it. It is considered almost the most powerful, which is used for flashing the skin. The saddle seam on the skin has incredible strength in comparison with the machine, as it is made manually with two needles along pre-punched holes. The principle of its operation is as follows: the needles are brought out on the opposite side of the skin and intersect each other with each stitch, thereby creating a strong bond. When using such a seam, if one stitch breaks, it will practically go unnoticed, since it is supported by a thread on the other side of the skin. Therefore, you simply will not see holes in it. This is where all the charm and uniqueness of this seam exists - durability and reliability for a long time. Those things that are sewn with this device will last much longer than those sewn with a sewing machine.
Beginning of work
Next, we consider the question of what the right saddle stitch is and how to make it using the example of inserting a zipper into a purse. There are two firmwares - easy and complex, and both of them require a certain practice, attentiveness and perseverance. If we are talking about a heavier method, we must remember that holes are marked out only with a special metal wheel, and punched already with an awl with a new stitch. It is necessary to practice for some time to make this seam smooth, beautiful and durable. What we need to do at the very beginning of our work:
- To punch holes, it is better to use a metal punch.
- Insert the punch into the wax during operation so that it can smoothly enter and exit the skin.
- Directly punch a series of holes in the place where you plan to make a line for further work.
- To fix the zipper and smooth lines you need to glue it to the skin in advance with glue. You can also take double-sided tape, but the minus is that it will cling to the needle.
Saddle stitch preparation
You need a prong tool or a bend fork that have a pair of oblique prongs. This makes the seam even and beautiful. Tools with straight teeth are commonly used for braiding, lacing, but not for stitching. So you should first check whether the tool you took. They come in different sizes, depending on how many stitches per centimeter you want to make. First of all, you need to choose a fork with wide teeth, otherwise you will spend a lot of time stitching.
Manual firmware steps
Scarring, hatching - the process of extruding lines, which will be a guide when making holes for stitching. You can also resort to a compass if there is no necessary tool nearby.
Hole making - they are usually punched on the surface of the skin with a rubber mallet or pricking device. Its purpose is to outline the places where the holes will be, but not to make them one hit.
Processing bends, if any. If you need to make holes along the curve of the zone, use a pricking roller. This is the guarantee that all your holes will be at the same distance and later the work will be done beautifully.
We open the holes. For this process, it is necessary to use an awl (cruciform with a diamond-shaped tip). Hold the awl handle in an upright position, push a hole in it.
Fixation. The weekly seam (for example, stitching with a saddle stitch) needs both hands in action. The clamp-clamp where you can place your product will help you with this. The standard clamp for this stitching is a piece of wood in the shape of large tongs.
Dratva (waxed linen thread). As a rule, a saddle seam is made with just such threads. Before use, they are treated with wax so that they do not smear and easily penetrate through leather products.
Threading the needle. To sew large items by hand, you need to choose needles with a blunt end.
Thread fixation. You need to pull the end of the thread and twist it into a loop.
What do we need for sewing?
Now we need sewing needles, which should be with slightly dull tips so that they freely pass into the holes and do not cling. For our purpose, we will need two needles. Next, go directly to the threads, it is better that it be waxed. Standard No. 10 is not suitable for such purposes, as it will break very quickly.
To make a strong and reliable seam, we need good, durable threads, it is better to use linen (waxed). Where they can be purchased, shoe shops will tell you. Now it's time to create a saddle seam. How to do it in accordance with all the rules and to make it reliable and good, we will consider below.
Stitching rules
Stapling is done according to the following rules:
- We thread the tip of the thread into the eye of the needle, then stick it at a distance of about 6 cm from its tip.
- Next, we stretch the needle into the loop.
- Then pull out the whole, hold the thread by the short tip, and then tighten tightly.
- We do the same with the other needle at the second end. As a result, we get a long thread with needles at both ends.
- It is better that the length of the thread be several times longer than the section that we are stitching (remember the golden rule: “The thicker the skin, the larger the thread”).
We start the sewing process
First of all, you need to remember how to sew a saddle seam correctly so that your thing is reliable and strong and lasts a very long time. We will analyze the stitching rules in stages:
- We thread the needle into the first hole, then you need to align the thread so that the length is the same.
- After we pass the left needle, which is in the left hand, into the other hole.
- Then we do the same manipulations with the right needle (the one in the right hand) into the same hole. It is advisable not to pierce the thread.
- Next, you need to tighten the thread tightly - pull the two ends until it is tight.
- Thread the left needle into the third hole.
- Pull and pass the right needle into the same hole and take out on the other side
- It is necessary to tighten very tightly, for two ends.
Recommendations
So we sew to the very end. It is necessary to remember and know how to finish the saddle seam so that it does not disperse very quickly. We do not need to produce any knots, since the double seams are very strong in themselves. All that is needed is to make three stitches “back with the needle” in the last holes. Then you need to cut the thread.
If the seam is made according to all the rules, then it will not dissolve and will last a long time. Therefore, the end must always be tightened tightly. The disadvantage of this work is that very soon your fingers will hurt, and the thread will cut the skin. Over time, everything will pass, and you will get used to it, but for now it is recommended to wrap the little finger with a band-aid where the thread cuts the skin. Of course, it’s better to remember right away how to sew a saddle stitch correctly, and learn how to do it quickly and efficiently.
That the work was quality
The following is required: the needle on the left goes through the hole and rests on the needle in the right hand with a cross. You need to hold the needle with the index finger and thumb of your right hand and then pull it out with your left hand. At first it will be a little uncomfortable and perhaps awkward, but the knobs will quickly get used to and your stitches will become even. After the work is completed, the seam must be tapped with a rubber or leather hammer so that the stitches go into the hole. Now this seam will serve you for more than one year, and you can be proud that you made it on your own.
So, we found out that the saddle seam is very strong, and the integrity of the product does not suffer, even if one thread is torn anywhere. This is the right seam, which is often used for decorative purposes. It represents not only style and beauty, but also the key to excellent quality and reliability.