The appearance of a screwdriver greatly facilitated the life of builders and just ordinary people with a summer house or private household. Thanks to this thing, you can completely abandon the use of a conventional screwdriver. Moreover, the use of special nozzles makes it possible for this tool not only to fasten the screw in a high-quality and fast manner, but also to drill a hole in a wooden or metal object. However, despite its reliability, the battery capacity of a screwdriver is not safe from breakage. Therefore, today we will consider how to repair the battery of this device with our own hands.
Warranty period
If you recently purchased this tool under warranty, and you have had a similar trouble, do not rush to disassemble the device and repair it yourself. In most cases, the service center will quickly replace or repair the battery, and absolutely free of charge. But if the tool was not purchased under warranty or its term has expired, you have no choice but to repair the batteries of a screwdriver with your own hands.
How to do it yourself?
First you need to prepare the battery for repair. To do this, remove it from the screwdriver and unscrew the retaining bolts on the top cover. Now you need to remove the battery assembly out. It is worth noting that some models of screwdrivers may differ in type of battery, and this applies not only to voltage. However, in any case, after removing the top cover, you will find several small "jars". These are the components of a large battery.
Now you need to deal with all the contacts in the battery. Most often there are 4 of them, two of which are power ones (intended for transmitting electric current of discharge and charge), one is the top one (performs the function of a manager), and another is service (it connects with resistance, thereby balancing the charge level on all “jars” ) By the way, the top contact interacts with a temperature sensor, which is also built into the battery. This is necessary so that the battery does not overheat during charging.
Diagnostics
At the next stage, the repair of the batteries of the screwdriver is accompanied by a diagnosis of the device. To do this, take a voltmeter in our hands and measure the voltage level on each bank. As a rule, the values on the arrow should be about 1.2-1.4 V. If the voltmeter showed values that do not correspond to the nominal ones, then repairing the batteries of the screwdriver is inevitable. The quickest way, of course, is to replace it with a new one, but when using a soldering iron, try to do everything very quickly so that the jars do not heat up. If you hold its end on the circuit for a long time, you risk ruining the tool. And one more thing: in no case do not confuse the plus of the battery with the minus. The “-” value of the previous jar indicates that the next one has a “+” charge, and nothing else. Otherwise, all screwdriver battery repairs will go "down the drain."
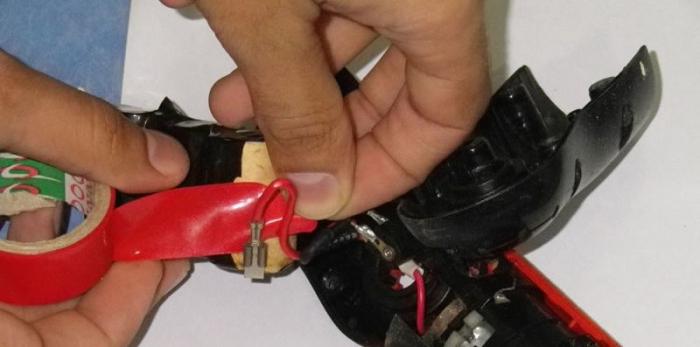
As connecting elements (if the wires are broken or damaged), use plasticine, electrical tape or the same thin copper wires. Remember that if the connection elements are cut incorrectly, the battery will become very hot, which will not be displayed in the best way at its charge level and durability.