Foam beads for creativity - convenient blanks for needlework. They serve as the basis for Christmas toys, topiary and material for children's creativity. In this article, you will learn how to cut foam balls with your own hands. You can decorate them in different ways: paper flowers, rhinestones, beads. For those who like to learn new things, we offer kimekomi techniques and a master class on creating a topiary.
How to make foam blanks yourself
It happens that there is nowhere to buy them or there is simply no means to purchase them, and the house has polystyrene from boxes with household appliances. You can cut foam balls from it yourself.
Take a thick wire and heat it up a lot. Use it to cut a cube from the material. Its corners need to be rounded with reflow over a candle. Do this until the workpiece is as round as possible. With a stationery knife, cut off all unnecessary and bring the workpiece to perfect condition with sandpaper. First use the coarse part, and then the fine-grained part.
New Year's balls from foam balls
Long winter evenings and pulls to do needlework. Make the whole family a unique Christmas balls. Foam balls will make excellent products even in children. They are not afraid to give to the hands of kids, unlike glass counterparts.
Paper flowers and pins
For work, take a figured hole punch and a large number of pins with round tips. They will replace the middle. Cut small flowers from paper. Attach them in turn to the base and secure with a pin. You can replace them with large sequins. Glue a loop to the toy and decorate it with a bow.
Those who know how to knit or crochet can tie the base. There is another option - to glue it with a finished knitted napkin. Pre-paint the foam balls in a contrasting shade. Stick on top of fragments of napkins or lace.
Kimekomi Christmas tree decor
If you like unusual decor with the use of fabric, then pay attention to the Japanese kimekomi technique. "Kime" means the edge of the tree, "Komi" - to fill. It’s easy to master, and the products are cozy and charming. In the original, the Japanese use wood, but it's easier to work with a base of lightweight material. In this case, the type of product will not be affected.
Master class "New Year's ball kimekomi"
Prepare for work:
- scissors;
- 2 cuts of bright cotton fabric;
- tweezers;
- a needle for dolls;
- socket for beads;
- centimeter tape ;
- marker.
Scheme of work
Measure the radius of the workpiece. Designate opposite sides (poles). Define the "equator" of the base. Visually divide it into 8 parts and mark them with dots. Mark the base with curly stripes as shown in the picture. Cut the grooves along the specified lines with a knife. Poke the ball through with a needle for dolls. Pass the tape inside and tie a tight knot at the end. This item can be skipped, and for fastening use a pin with tape or stick a loop to the workpiece.
We cut the material. A base with a diameter of 3 cm will require 8 strips of cotton 7 by 3 cm. Take a glue stick and apply a little on the segments. Do not overdo it with it, as excess will stain the material. Put strips on the segments, slightly shifting them, as the lines should be curves. Tuck the edges into the slots. Cut off the excess. Decorate the entire workpiece in the same way. Cotton colors alternate. In the grooves between the strips, drip a little glue. Glue them with a cord. The toy is ready.
Styrofoam snowman
Fasten the three balls together. Make clothes out of socks. Prepare several pairs: white for a fur coat and multi-colored for a hat. Still need a pompon. Eyes for dolls are also useful. For the nose, use any stick or saw off the tip of the brush. Cut off the top of the white sock. Put it on the workpiece in the middle. The elastic should be on top.
Making a toy face. Glue the eyes, draw the mouth, insert the nose, you can make the blush pastel chalk. We put on a hat on the head, sew on the tip of the pompom.
DIY topiary
It is not difficult to make a topiary with your own hands, but what a scope for imagination!
Materials for work:
- foam ball;
- organza or chiffon;
- decorative bucket;
- dried flowers;
- shells;
- alabaster;
- Toothpicks
- sisal;
- stapler;
- scissors.
We cut strips 5 cm wide from the fabric. We cut them into squares or rectangles by eye. It is not necessary to ensure that they are perfectly even. We put two elements on top of each other. Fold in half, and then again in half. The corner must be fastened with a stapler. So we process all the squares. Take the toothpicks and glue them to pieces of fabric. We make a hole in the foam blank and pour silicone glue from the thermo gun there. We insert the previously prepared trunk of the future tree.
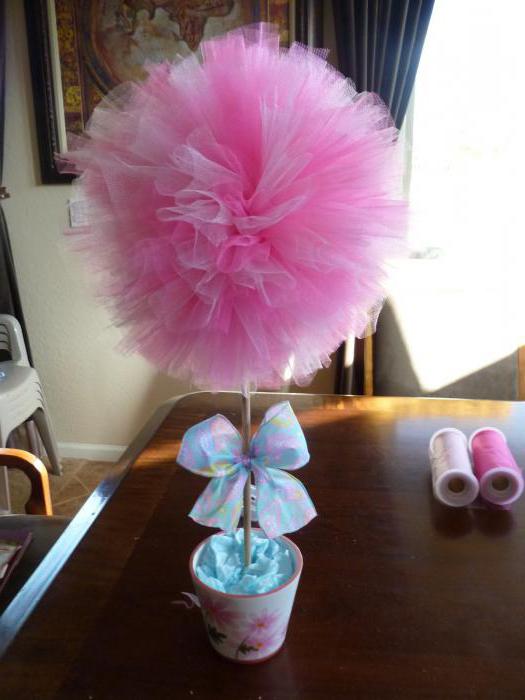
Now we will attach the blanks from organza to the foam ball. We drip into the place where the toothpick will be, a little glue and stick the element. We do the same with the rest of the workpieces. They must be fixed tightly so that there are no gaps. Next, prepare a solution of alabaster according to the instructions on the package. In the bottom of the bucket we glue a hole. Pour the solution there and insert the tree trunk. When the alabaster hardens, cover it with sisal. Decorate the tree with dried flowers, shells, beads.
Foam balls for creativity come in handy in every home where the owners want to create coziness. They can be made jewelry in a single copy, because what you personally fantasize, no one can repeat.