Do you like decoupage? Then this article is for you. From it you will learn a lot of interesting information about volume decoupage. Various options for performing work in this technique will also be considered.
Decoupage
The most amazing thing is that it is possible to engage in decoupage for both adults and children. Moreover, work is good even for beginners. By attaching paper to the surface with glue , you can get very original crafts. Therefore, if you want to make an exclusive gift, make some sort of decoupage thing. Want to keep your kids on a bad day? Let them do some work in the above technique.
Volumetric decoupage is a relatively inexpensive hobby. It takes only a few tools to start creating works of art. The idea of volumetric decoupage is that the picture looks like a three-dimensional image. This is done by overlaying the design from the background to the foreground.
The basics
Volumetric decoupage is also known as a parole or 3D decoupage. Thanks to this method, you can create not just a three-dimensional image, but also a design masterpiece. When painting, 6-7 identical images are usually used.
The necessary ornament is cut out of them, glued to the base, and the image is given volume, that is, a 3D effect. Papertol is an interesting and simple technique for creating volumetric decoupage with your favorite pictures and prints.
Decoupage wall
How to make bulk decoupage with putty? In the master class presented below, this will be described in detail. But first, select the materials that are required for decoupage walls:
- Primer. Choose the usual one that is used for ceilings. It must be applied in a couple of layers.
- Putty.
- Super glue.
- Lacquer.
- PVA glue for paper.
- Napkins or paper.
We make beautiful wall
First you need to prepare the walls. Primer. Wait a couple of hours until completely dry. If there are bumps or roughness, they should be cleaned with sandpaper.
Attach a napkin with the selected ornament and fix with a glue on top. If the main task is to create a relief, then apply an ornament. To do this, the picture must be transferred to tracing paper, after it is already applied to the base, which will be processed. It is necessary to circle the pattern. If this is not possible, use a stencil. It is undesirable to use silicone glue in the work, since it contains acetic acid in its composition. This can be recognized by the pungent odor. This type of glue is quickly absorbed into any paper and is not suitable for this type of decoupage.
Putty will enable you to easily complete a pattern or picture. And the simplest and easiest method is stencil application.
When choosing a stencil that attaches independently, the sequence of actions is as follows:
- A stencil is attached to the background used.
- Putty is applied. We fill it with the voids of the stencil.
- After applying the putty, you need to wait for about 30 minutes and disconnect the stencil. It is important to work carefully.
- If a reusable stencil is used, then after applying to the base immediately putty should be applied. For better fastening fix with adhesive tape. If putty gets under the stencil, you need to leave everything until it dries.
- Remove excess with toothpicks. When the material dries, it must be cleaned with sandpaper to smooth out irregularities. Repeat this application procedure. The main thing is to do everything so that the material is exactly on the pattern, in order to give volume. After drying, the surface is again cleaned.
Difficult option
How to make volumetric decoupage with your own hands? This method requires more time to complete the work.
- Print the desired pattern and transfer it with carbon paper onto the base. If you draw well, create an ornament yourself.
- Putty putty in a container, add a small amount of water and PVA glue. The consistency should be thick.
- Putty putty on the drawn ornament.
- After the application of the first coat is completed, leave at least 24 hours to dry completely.
- The next day, you need to check the image, if necessary, putty.
- If the pattern is not very good, you can remove it with a damp cloth and do it again. When the work with the ornament is completed, the image is varnished (preferably acrylic, the drying time is up to 12 hours).
Volumetric decoupage. Workshop on creating a picture
Materials:
- printed images, at least 10 copies.
- acrylic paint;
- Super glue.
Work Stages:
- You need to print the desired image. It is better to use thick paper. For this type of work, 10 identical images are needed.
- Stick the first onto cardboard. This will be the basis.
- From the remaining 9, you need to cut the desired image. Each of them is covered with several layers of varnish. The first must be made thin so that the paper does not tear, and each subsequent one is thicker.
- We take the substrate, put it on the drawing and draw a contour.
- Then we cut out the part a little less than along the contour, and glue it on the paper part.
- The next step is to fix everything on a foundation. So we get the first layer.
- Next, stick the following layers, combine their contours with the previous one.
- At the final stage, we tint everything that has not tinted. We clean from glue. We are preparing work for varnishing.
- We cover with several layers of varnish.
Flower pot
Now we will consider a master class on volumetric decoupage of a flower pot. Following the instructions, you can do a good job like this.
Materials and tools:
- varnish;
- PVA glue;
- napkins with flowers;
- scissors;
- brush;
- sandpaper
- primer.
The order of the work:
- Prime the surface of the pot. Wait for it to dry.
- All irregularities on the surface must be cleaned with sandpaper.
- Stick the cut ornament (flowers) onto the prepared surface.
- The next step is to give the image volume. Apply a primer within the contour of the picture. The edges need to be smoothed.
- Then we duplicate the drawing on the primer from above, attach it with PVA.
- Finished work is varnished.
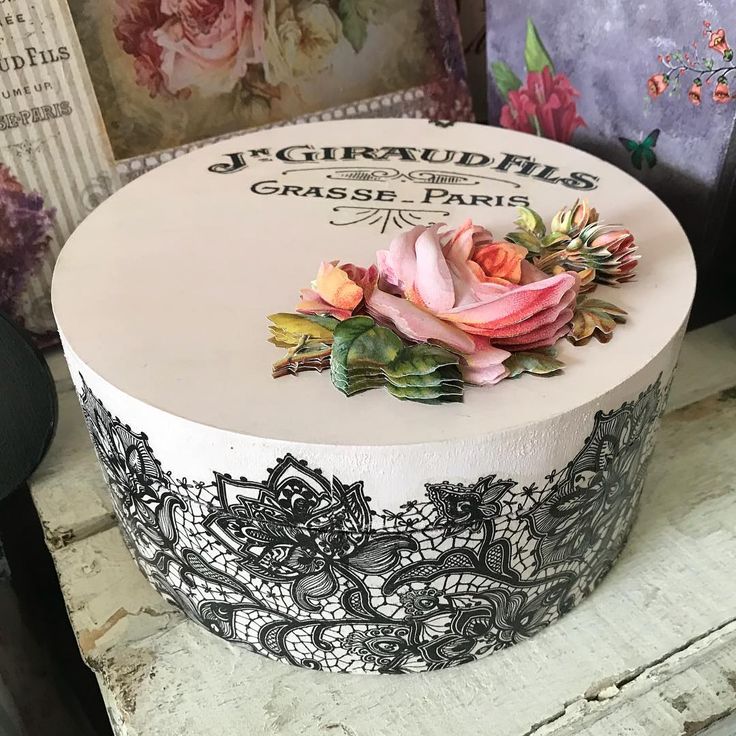
Volumetric decoupage putty. Decorate the box
Materials:
- casket;
- Printed image
- stencil;
- putty;
- PVA glue;
- acrylic varnish;
- Scotch;
- paint;
- brush;
- plate;
- hair dryer.
We make a box
- Prepare a printout with the selected image. It is necessary to “thin” it by removing the lower layers, leaving only the upper one with a picture.
- It is better to tear out the image rather than cut it out so that there is no even border. This will help make a smoother transition. We tear off and glue to the box cover.
- We cover the image with varnish.
- Next, a stencil is required. It is necessary to take putty, put it in a container. We breed PVA, add a little varnish. We apply a stencil to the end of the box. On the edge can be attached using tape. Putty putty on top
- We duplicate the actions on the other sides of the box, drying with a hairdryer.
- With a toothpick we clean off the excess putty.
- All should be varnished and dried with a hair dryer to strengthen the putty.
- The next step is to paint on the picture. Before painting, it is necessary to clean the edges to align the transition as much as possible.
- Now you need to choose the right shade, with which we begin to make a more natural color and a smoother transition in the picture.
- Painting over those places where the picture is connected to the casket.
- Using a sponge, paint the surface.
- We cover the finished painted work with varnish, we clean the transition between the image and the box well, aligning everything into one drawing.
Decoupage vases
Now we will consider a master class of volumetric decoupage with putty. In this case, a vase will be made out.
To create an exclusive vase, you need:
- the vase itself;
- putty;
- a napkin with the image of sunflowers;
- paint;
- glue;
- varnish;
- dry flowers, seeds;
- solvent.
Operating procedure:
- Pre-primed vase.
- The napkin needs to be unrolled, flipped face down and covered with a film.
- Take a little putty, give time to dry.
- Put putty on top of the image, align.
- Put the film with putty on the vase.
- A sunflower figure will remain on it.
- After the putty has dried, glue a napkin on it. Also, on the other side of the vase, make a second figure of a sunflower.
- After the glue has dried, it is necessary to take the putty and apply it on the surface of the vase.
- Until the mass has dried, press dry flowers and seeds into it.
- After the putty dries, paint the surface.
- Particular attention must be paid to staining dry flowers, seeds.
- To give the effect of "antique" to some areas, it is necessary to apply varnish. Remove excess with solvent.
- Leave to dry for a day and cover the entire vase with varnish in order to fix the image. That's all, the volumetric decoupage of the vase is finished, the work is ready.