For switching various types of loads, starters, circuit breakers, switches are used. These are electrical products that have certain parameters, characteristics, features. For self-installation, you need to make sure that this type of device used meets the consumption parameters. Otherwise, overheating of the switching equipment and, as a result, a fire is possible.
The purpose of the switch
The consignment note electric switch is designed to connect devices consuming electric current to a source of electricity. Usually this is a simple switching equipment, which, when turned on, closes or opens mechanical contacts, supplying or removing voltage from the device.
The waybill switch has a different installation method. It is installed outside the surface.
Varieties of circuit breakers
The industry produces many varieties of switches:
- external or overhead;
- internal or embedded.
By the type of switching they are:
- keyboards;
- sensory;
- rope
- wireless and others.
According to the principle of work:
- terminal switch;
- consignment note switch through passage .
Installation methods
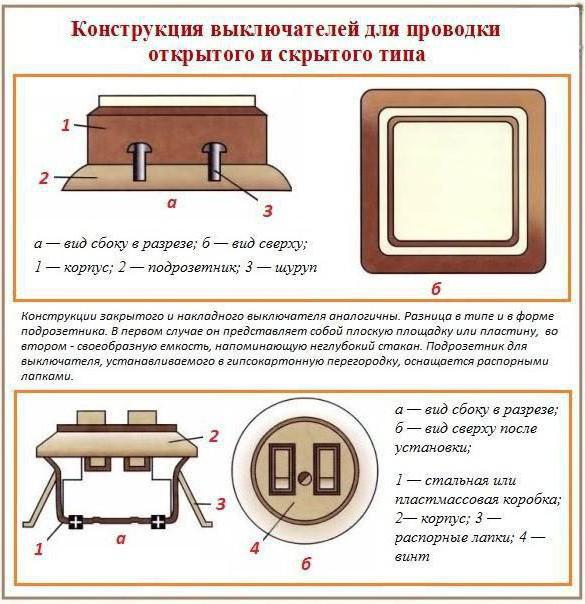
Depending on the installation method, the switches are internal and external.
Internal require preparation of the installation site. It is necessary to drill a hole in the wall or use another method to prepare a hole. Immune a dielectric box into it, into which an internal switch will subsequently be installed.
For external such training is not needed. This installation method involves mounting the on-off switch directly to the surface.
To complete the work you need the tools:
- lineman's knife;
- flat screwdriver;
- cross screwdriver;
- pliers;
- nippers;
- voltage indicator ;
- electric drill.
Installation of circuit breakers
Overhead sockets and switches are installed on the same principle.
Installation of the invoice switch must begin with a calculation of the conditions of consumption. The following parameters are taken into account: operating voltage, power consumption of the system, which must be serviced. The power consumption current is calculated. If all parameters of the circuit breaker are larger than the consumption parameters, you can perform overhead mounting.
The switches are placed on a dielectric gasket mounted on the wall surface. In the case of the use of this device on fire hazardous surfaces (wooden, combustible plastic), this gasket serves as a thermal insulation, which prevents the fire from overheating in the event of an overload. Its second purpose is to provide reliable fastening of the circuit breaker to the mounting surface.
If holes for mounting are prepared on the dielectric gasket, this will facilitate installation. If they are not there, then you need to drill holes of a suitable diameter and fix the invoice switch to the gasket. To do this, disassemble the switch and fix it on the wall using screws or screws.
An example of how to install a single-button invoice switch is considered. If necessary, you can also install two-, three-key switches in the same way . To do this, the neutral conductor is laid directly to the source of consumption. The phase wire is connected to the common bus of the switch. Each output contact is connected to the consumption conductors (2-3 contacts).
Mounting Features
Installation of overhead switches has its own characteristics for different types of fastening wires.
If fastening under a screw, then it is necessary to remove insulation by 1-1.5 cm and fasten the conductor to a regular place with screws. This process can be seen in the figure below. One end of the switch is on the incoming conductor, the other end is on the chandelier, lamp or other consumer of electricity.
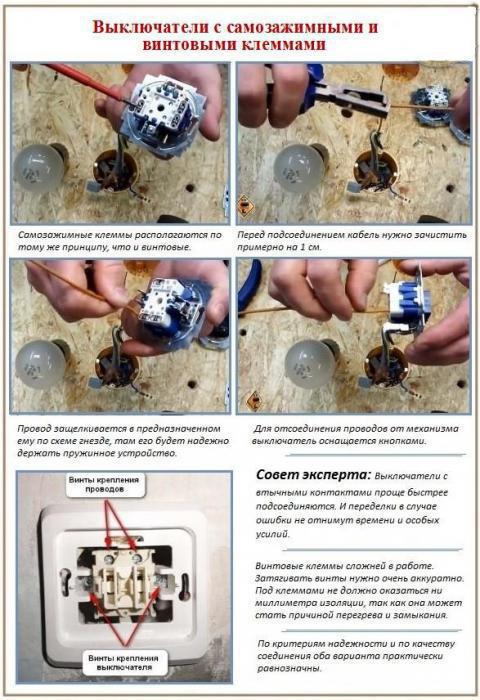
There are models of switching devices that do not have screw connections for securing wires. On the rear panel there are only holes for inserting conductors. The order of the work is as follows: strip the conductor 1 cm and insert it into the hole until it stops. The self-locking contact should fix the connection automatically and when you try to remove the conductor, it holds it pretty tight. Great effort should not be made to check the strength of the joint in order to avoid breakage of the circuit breaker. The fastening system is worked out by the manufacturer and at low current loads is quite reliable. A huge advantage of such a connection is the lack of a special tool for the connection and ease of work.
Important! For proper installation, it is required to determine the neutral conductor and the phase conductor with the help of the device. Zero is connected directly to the lighting device, and phase is connected via the consignment note switch. Thus, we get: when the switch is off, there is no voltage consumption on the device, and when it is turned on, the phase is applied.
Installation Safety
It is not recommended to carry out installation of lighting fixtures without removing the voltage, because there is a danger of electric shock. Therefore, installation must be carried out by a specialist with an appropriate approval group for work in electrical installations.
If the work is carried out on their own, then you need to remember the following safety measures:
- disconnect the supply voltage;
- check with a device or indicator that there is no phase at the ends of the conductors;
- perform work by connecting all the links according to a pre-compiled diagram taking into account phase and neutral wires;
- it is necessary to supply voltage through an automatic machine with the corresponding tripping current;
- check the operation of the mounted circuit (in case of improper installation, the circuit breaker will trip);
- if the circuit breaker has tripped, check the correctness of all the connections, make an adjustment and check the operation of the circuit again.