Interior decoration is a very exciting, but also time-consuming process. A room thought out to the smallest detail not only looks beautiful, but is also filled with the warmth and love of the hostess. However, one often encounters the fact that it is textile elements that are rather difficult to find so that they fit both in color and material, and also correspond to a whole list of desired parameters. This is especially true for bedrooms, as they are the most common fabric elements: curtains, bedspreads, pillows, bedding and much more. On the one hand, one might think that bedding does not play a special role in the interior, because the bed is covered with a blanket anyway. But this is completely wrong. After all, the room should remain harmonious at any time of the day.
Self-tailoring of textile decor elements greatly simplifies the process of creating a single design. Despite the rather large amount of work, to sew bedding is quite easy. However, novice craftsmen often do not know how to sew a duvet cover. It is this element of linen - the most difficult to manufacture.
Stages
Making a duvet cover can be divided into several stages:
- Select or create a model.
- Calculation of tissue consumption.
- Selection and preparation of material.
- Cut it.
- Sewing.
If you familiarize yourself with these steps in advance, sewing a duvet cover with your own hands will pass without problems and bring a lot of pleasure.
Select or create a model
At this stage, it is necessary to determine what the product should be in the end. Will it be simple, with classic tailoring, or have some decorative elements? Where will the hole be located, how will it be processed?
There are two types of arrangement of the cut-out of the duvet cover: in the center or side.
Center neckline
There are several types of such cuts, the most common of them:
- Square.
- Diamond shaped.
- Rectangular.
- Lightning.
A duvet cover with a cutout in the center is usually made for children's and teenage bedding. Such a hole should be 1/3 of the width of the duvet cover. This arrangement has both advantages and disadvantages. Thanks to this arrangement of the hole, it is very easy to fill the blanket into the duvet cover, however, for the children sleeping restlessly, such a duvet cover will be inconvenient, since it is possible to get confused in it, or the blanket may slip out. In addition, due to the large area of the hole, the blanket quickly gets dirty. Of the options presented, it is better to choose the fourth, with lightning. It is better to position it in the center of the upper side of the duvet cover, parallel to the long side. And to facilitate sewing, it is better to cut out the upper part from two canvases, between which the lock will be sewn.
Side cutout
A duvet cover with a hole on the side is much easier to sew than with a central one. The hole can be made in several variations:
- Open from the bottom. The easiest option, which is common on inexpensive bedding. In order to make it, it is enough to sew the bottom edge on only two sides near the corners, leaving the center not stitched.
- Closed from below. This option is a little more complicated. Depending on whether the hole closes with a zipper or buttons, it is necessary to make different indents from the edge. To make it easier to sew in the zipper, tailoring the duvet cover should start from the very side where it will be located. Make markings, stitch the edges, then first notice one half of the lock, flash it, and then repeat with the other side of the duvet cover, after closing the zipper. After that, you can flash the remaining sides of the product. Button hole is easier to make. It is enough to leave 5-6 centimeters per hem on the seam from the bottom. Hem both canvases from the underside with a double hem so that the distance between the edge and the stitch is 2 centimeters, then you need to make markings for buttons and loops. Process the latter on a sewing machine or manually, and then proceed with sewing the duvet cover itself. The bottom line should be 3 mm higher than the hem line. In this case, both the buttons and the loops will be inside the duvet cover.
- Valve. The original way of designing holes is used very rarely, however, the bed is quite original. Sewing it is simple, and thanks to the different lengths of the upper and lower fabric, it allows you to make a duvet cover two-tone, without unnecessary seams. The valve can be positioned both below and above the product. The top canvas should correspond to the size of the blanket, and the bottom should be 20-40 cm longer. On a larger fabric on the short side, it is necessary to process the edge and pierce the loops, and then sew the three sides, leaving the side with the loops not stitched. Unscrew the product, bend the valve, mark the location of the buttons according to the broken loops. Sew on buttons. If you make the upper part, for example, with an active floral print, and the lower one is solid, then you will end up with a combination fabric.
- Hole on the side. It can be either closed or open type, its implementation corresponds to the implementation of the first and second versions of the cut-outs of the duvet cover discussed above.
Decor
A duvet cover does not have to be boring, consisting of two simple canvases. His models can be diversified in many ways.
For example, before sewing, you can sew lace or lace on the upper fabric, backing 40 cm from the edge. This option is suitable for products from plain fabric, or with a small pattern.
You can also sew quilling. However, it will not hold well in shape and turn around, showing a short edge. Therefore, it must be done either with the same edges, laying them in different directions (the line will be located on the sides), or to make the upper fabric in two parts, and sew the quilling between them. For the ruffle to look beautiful, its length should be 2.5 -3 times longer than the length on which it must be sewn. Sewn-on ruffles can be made both parallel to the edge and diagonal, or even lay out patterns on the entire surface of the duvet cover. However, this design option should be chosen if the blanket is removed from the berth for a day. Otherwise, it will be necessary to have ruffles to the sheets so that the bedspread does not tuberize.
The duvet cover sewn from scraps will look originally. There are a few rules to follow. Colors should be combined, all segments should be cut along the shared (to avoid deformation of the product), and the lower canvas should be solid, otherwise it would be uncomfortable to sleep under such a blanket.
In addition, a classic shuttlecock around the perimeter will decorate the duvet cover as well as other options. Such decor is placed between the upper and lower canvas, so the edge of the shuttlecock is inside the duvet cover.
Sizes and consumption of fabric
In order to make the duvet cover perfect, you need to pay special attention to its size. There are standards for the size of duvet covers, depending on the size of the duvet.
| Blanket | Duvet Cover Size | Amount of fabric |
| Width 150 | Width 220 |
Baby | 112 * 147 | 230 cm in the transverse arrangement on the fabric, 300 cm in the longitudinal. |
1 bedroom | 145 * 210 | 430 cm | 300 cm |
1,5 sleeping | 160 * 210 | 500 cm (seam across 70 cm from the edge) | 330 cm |
2 bedroom | 175 * 210 | 540 cm (seam across 70 cm from the edge) | 360 cm |
Euro | 200 * 220 | 900 cm (seam along the center) | 450 cm |
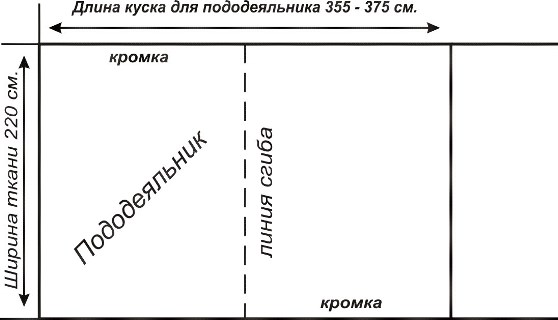
To determine how much fabric is needed for a duvet cover, it is necessary to take into account not only allowances for seams, but also make a margin for shrinkage of the fabric (as a rule, it is better to leave 10% of the length on it), as well as take into account the features of the cutout processing and possible decor. The table shows the approximate flow rate taking into account only allowances for the seams. However, before sewing a duvet cover, it is worth measuring the blanket that will be used, because there may be discrepancies in the established standards and its real parameters.
Material selection and preparation
The next step is to purchase the material. Preference is best given to natural fabrics such as calico, linen, satin. Such tissues are not only hypoallergenic, but also pleasant to the touch, and in addition, it is easier to work with them. Sewing duvet covers from synthetic materials, such as satin, is much more difficult, since it is quite slippery.
It is better to choose a color according to the design of the bedroom, however, do not use fabrics of bright contrasting colors in one product, if there is no confidence in the color fastness. Combined duvet covers look very nice, the upper fabric of which is decorated with a print, and the lower one is plain or with a small pattern.
In addition, the fabric must be prepared before stitching the duvet cover. It is better to wash it, since in this case not only the degree of shrinkage will be visible, but also the resistance of the paint. A simpler option is to dampen the fabric, and then iron it. In this case, the fabric will partially shrink and the paint will not be washed off. It should be remembered that when calculating the fabric, it is necessary to take into account the shrinkage coefficient 0.1. This means that with every meter 10 cm long, deformation will go away after washing. Even if the fabric is tightly woven, it is better to purchase with a margin than to later try to squeeze the blanket into a narrow duvet cover for him.
Cut
After the material is selected and prepared, you can start cutting. There are only a few features:
- If the product will be made in patchwork technique, then the pattern of the duvet cover must be prepared in advance.
- Fractional threads on the upper and lower canvas, as well as all the details of one side should match.
- If the fabric is not properly prepared, then it is worth laying in the size of the duvet cover at least 5 cm per shrink in the pattern along with the allowances for the seams.
- To get a square cut in the center, fold the upper canvas four times, and cut off a square with sides equal to 1/6 of the width of the duvet cover from the corner formed by the center, without taking into account the seam allowances.
- To get a diamond-shaped cut, cut the corner formed by the center of the fabric from a canvas folded 4 times, after measuring 1/6 of the width of the duvet cover. For a round hole, the steps are similar, but instead of a straight cut, it is necessary to make a cut along an arc.
Sewing
When sewing bedding, the main attention should be paid to the processing of the cutout of the duvet cover. The cutout in the center is best treated with an oblique trim. It’s easy to work with, but such an edge looks neat. On top of it you can decorate the neckline with lace, lace or ruffles.
If you plan to make a hole of a closed type, for example, with buttons or a zipper, then sewing must begin from the other side. where will the cutout be located.
The edges of the sheets for the duvet cover must be treated with an overlock to avoid deformation of the fabric during operation. If this is not possible, then sew a duvet cover twice. First, you need to fold the fabric with the front side out, stitch along the perimeter, backing 0.8-1 cm from the edge, then turn the product to the wrong side and, backing 1-1.5 cm, stitch again. Thus, the tissue sections will be between the two seams and during the washing process are not deformed.
The decor must be sewn to the upper fabric before stitching the duvet cover around the perimeter. This will greatly facilitate further work, and the product will look more neat. In addition, when grinding the lower and upper canvas, it is necessary to ensure that creases are not formed, and decor elements, such as ruffles, do not fall into the main seam.
Sewing bed linen allows you not only to create a unique design for the bedroom, but also to develop sewing skills: straight lines, sewing zippers, punching loops, sewing the edges with an oblique edging, sewing on braid, ruffles and much more, which will make it possible to easily use the acquired skills in sewing in the future clothes and other textiles.