Today , decoupage technology is at the height of fashion. Interest in this type of art is justified: anyone who wants it can create real masterpieces. By
moreover, today, unlike the Middle Ages, when this type of needlework was just born, many tools and materials are available that facilitate and accelerate the work.
But what is it - decoupage? In simple terms, this is the decoration of various objects by gluing paper. Used as a variety of colored textured paper, as well as postcards, napkins with a beautiful pattern. In addition to gluing, it becomes coloring, gilding, varnishing, aging, inlay. The result is unique, stunning imagination.
Most often, using this technique
decorate furniture and utensils. But
decoupage of bottles with napkins is especially popular, as this allows you to create not only beautiful, but also practical things. A bottle decorated with your own hands can be presented as a gift for any celebration, or you can fill it with homemade wine on a festive table. She will certainly attract attention and will admire her one look.
Like any art, decoupage of a bottle with napkins has different levels of difficulty. There are decor techniques that are available even to children, and there are those that only an experienced master can handle. We suggest you familiarize yourself with the simplest example and try your hand at decorating such an ordinary object as a bottle.
What do you need?
In order to decoupage bottles with napkins, you need to prepare all the necessary materials in advance. First of all, this is the bottle itself. More often they choose dishes of an unusual shape from under vodka, wine, and elite drinks. As a gift option, the decor of a bottle of champagne is very popular. Of course, in this case a full bottle is drawn up. In all the rest, it may well be empty. The second item is napkins. For gluing choose two-layer dense napkins with a beautiful pattern. It can be geometric, floral or thematic, for a specific holiday (New Year, Easter, March 8). Paper napkins are on sale today in the widest assortment, which gives needlewomen truly unlimited possibilities. Depending on the artistic design, you may need ribbons, beads, rhinestones, shells, small stones, confetti.
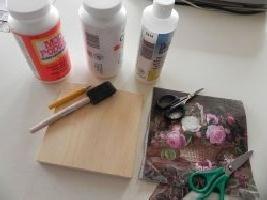
In addition, you will need glue (special or transparent PVA), a simple soft pencil, scissors, a special foam brush, acrylic paints, contours and varnish. Decoupage materials and tools are best purchased at stores specializing in the sale of handicrafts. Experienced wizards will help you make your choice.
Getting to work
Naturally, decoupage of a bottle with napkins requires an absolutely clean surface. Therefore, the container is thoroughly washed, all stickers and labels are removed from it. The washed surface is degreased with acetone, alcohol or glass washing liquid.
Second stage: priming. The easiest way to do it is with white acrylic paint. Perhaps your artistic idea suggests an open “window” on the bottle, where there will be no decor. Naturally, this area should not be covered with soil.
The third stage: preparation of napkins. If the selected cloth is not dense enough, it should be lightly sprayed with hairspray and allowed to dry. Then the layers are carefully separated, and the intended area with the pattern is pulled out by hand. Oddly enough, such an uneven edge is smoothed out better and becomes invisible in the finished product.
Stage Four: Bonding. Coat the bottle with glue and carefully apply a tissue. Begin on one side, avoiding the appearance of possible wrinkles. The edges are especially carefully smoothed. If you use special glue for decoupage, it can be applied over a napkin. In this case, it is easier to avoid defects. Leave the work to dry.
Stage Five: details and color. If an additional drawing framing a napkin is conceived, we first apply it with a simple pencil, and then cover it with paint or an acrylic contour. If there is none, we cover our product with paint of the desired color, smoothing all the contours in the place of gluing. In accordance with the plan, we apply
gilding, silver, and glue inlaid elements.
Sixth stage: varnishing. After the paint has dried (give it a day), the bottle is covered with a layer of clear acrylic varnish.
You might want to artificially age your creation by portraying it as “dust of the ages” by special means. But, by and large, the decoupage of the bottle with napkins is complete. As you can see, it is not necessary to be an artist to create beauty with your own hands. Enough desire, patience and work, from which you get great pleasure.