There are times when there is a need to decorate simple cardboard boxes somehow . Therefore, we suggest that you familiarize yourself with several workshops showing how to glue paper over the box beautifully.
What is it for?
Boxes can be used for the following purposes:
- as organizers (for example, sort documents and so on);
- to put in them things that are not used every day (for example, Christmas toys);
- as a gift package (give gifts in them for which factory packaging is not provided).
Most often, solid packaging is used for shoes that have already been worn and disposed of, household appliances, and so on. By and large, for any packaging you can find application. But to make everything look neat and orderly, the box should be decorated.
The simplest and most cost-effective way of decoration consists in gluing the box with paper. And there are a lot of options and methods.
What paper is suitable for pasting a box?
To transform a cardboard box, you can take absolutely any paper. For this purpose, everything is suitable:
- colored paper;
- gift;
- paper for decoupage and crafting;
- self-adhesive paper;
- Wallpaper (vinyl, paper, non-woven, textile and so on);
- napkins and much more.
What tools and materials are still needed?
In addition to paper and the cardboard box itself, the following tools and materials are needed:
- scissors and / or clerical knife ;
- ruler;
- pencil.
Depending on the type of paper with which you will ennoble the boxes, you will need to stock up:
- double adhesive tape;
- PVA glue;
- glue gun;
- wallpaper glue (sometimes depending on their type);
- glue brush.
The easiest way
A master class showing how to glue a box of paper over can be seen in the presented photo.
- Expand the paper roll and place your box on it.
- Measure how much material you need so that it completely covers the bottom of the box, its walls and bends slightly inward (Figure 1). This can be done using the ruler. To do this, measure the height and width of the box and measure on the sheet a length equal to these parameters plus another width and plus six to ten centimeters per bend.
- Cut the desired piece of paper (Figure 2).
- Place the box in the center of the cut out piece of paper and cut out the excess parts in the corners (Figure 3).
- Cut four small pieces of paper and stick them on the corners of the box (Figure 4).
- Now glue the walls and glue the paper (Figure 5).
- Coat the inside of the box and wrap the paper (Figure 6).
- Glue the cover in the same way.
- Let the box dry.
All is ready! Now you can use the box at your discretion.
Tip: do not use too much glue, otherwise the paper may warp and the whole look will deteriorate.
The second way to decorate paper
Here is another instruction on how to glue the box with paper:
- Attach the bottom of the box to the selected paper and circle it (Figure 1).
- Cut the bottom part so that there is a margin of two to three centimeters on each side (Figure 2).
- Glue the part to the bottom of the box and wrap the peeling edges (illustrations 3 and 4).
- Attach one side to the paper and outline it. Cut the part with a margin of several centimeters on all sides. Glue the paper on one side (illustrations 5 and 6).
- Gently bend the edges of the paper (bottom, sides, and inward). If necessary, make small cuts (Figure 7).
- Similarly, glue all sides of the box (illustrations 8 and 9).
- Inside you can paint the boxes with a suitable paint. It is better to use acrylic (Figure 10).
- Let the glue and paint dry completely.
The decorated box is ready!
Decoupage technique for the decor of cardboard packaging
Some people are in a hurry to throw away not only shoes, boots and other shoes that they demolished, but also a box from under it. But if you glue the shoe box under the paper, then it will be transformed and become an indispensable thing. It can be used as a box or a place to store various little things that tend to get lost.
The master class will show how to glue a box of paper using decoupage technique :
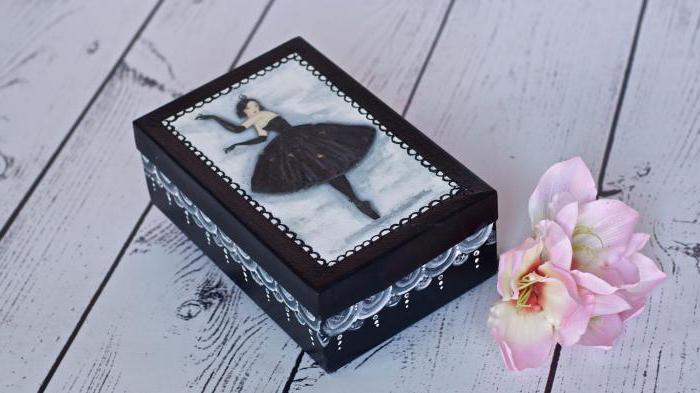
- Take a clean shoe box and clean it of tape and other stickers.
- Take two shades of paint (preferably acrylic) and cover it with the walls and the lid of your box. Paint the sides black and the top white.
- Make the frame on the lid of the same color as the side box. To do this, step back from the top edge a few centimeters and stick a square of masking tape. Fill indentation with black. Then remove the tape. As a result, you have a frame for a white square in the middle with smooth edges.
- Pick the right picture. It can be depicted on a napkin, plain paper, wallpaper and so on.
- Cut the picture and dip it in water.
- Then pull the picture out of the water, put it on a piece of oilcloth (A4 file is perfect for this purpose) face down, and pat it several times with a cotton or paper towel to remove excess moisture.
- Cover the picture with PVA glue or decoupage.
- Also glue the cover where the picture will be glued.
- Transfer the oilcloth with the image onto the cover. To do this, simply turn the picture over and spread it with your fingers.
- Carefully remove the oilcloth.
- When the picture dries, the entire lid should be covered with acrylic varnish.
- So that the borders of the picture do not stand out too much and catch your eye, apply white paint to the edges of the image and gently blend it with a large brush or sponge (you can take a piece of foam rubber).
- To make the picture look harmonious, you can additionally paint some strokes with acrylic paint (for example, shadows and highlights, background).
- When you finish working with the background and image, varnish completely the entire surface of the box lid.
- Decorate the walls as desired.
When everything is dry, you can use the box.
Mulberry fiber sheets: how to glue a box of paper over it?
Master class on pasting a box with mulberry leaves:
- Mulberry paper has a number of features that should be considered when working with it. The most important - the material is very thin. Therefore, if you are decorating not with a plain surface, but with different images, then you need to paint all of it with paint.
- When the paint dries, cover the surface with PVA or decoupage adhesive.
- Tear the mulberry paper into pieces of different sizes and paste over the box.
- If you want, additionally decorate the surface using decoupage technique with napkins or other pictures. This must be done after the layer of mulberry paper is completely dry.
- In conclusion, you need to cover the box with a layer of varnish.
This box looks old and fits perfectly into any interior.
Is it possible to decorate a box of a different shape?
How to glue a round box of paper:
- Place a box on a piece of paper and draw a bottom line.
- Cut two of these circles.
- Then cut a rectangular strip. Its height should be equal to the height of the sides of the box plus four extra centimeters.
- Coat a rectangular piece of paper and box walls with glue.
- Step by step, glue the rectangle to the side so that from below and above it goes beyond the edges.
- Cut along the entire perimeter at the protruding edges of the paper and wrap them on the box.
- Glue cut circles to the bottom and lid of the round box.
The decor is complete.
Tips and tricks on pasting boxes with paper
- How to glue a box with colored paper if there is no other? Such sheets can decorate cardboard packaging in two ways: as usual or using decoupage technique.
- To wallpaper the box, use a special wallpaper glue. So you will be sure that the paper does not move away from the walls over time.
- How to glue a box with gift paper or corrugated? Such sheets are very thin, and tearing them, as in the case of mulberry, is not recommended. This decor does not look too beautiful and neat. In this case, it is better to take a thin double-sided tape and stick it around the entire perimeter of the box. Then the protective layer on which the paper is applied is removed from it. So gradually the whole box is pasted over.
- How to glue the box with paper so that it does not peel? To do this, select the appropriate glue and gently stick the sheets to the surface. Then the craft must be well dried.