The ceiling plinth performs a decorative role, therefore, when repairing it, gluing should be given special attention. On flat areas, this is quite simple, but novice masters wonder how to glue the skirting boards on the ceiling in the corners.
What you need to know about gluing skirting boards
In order to harmoniously combine the ceiling and walls, it is best to use the baseboard. With it, you can hide the wiring, so most often the fillets are hollow. If we are talking about wide baguettes, then you can hide the backlight in them, the rays from which will lay a soft light on the ceiling. The modern skirting board is made of gypsum, stone or wood, as well as polystyrene and polyurethane. For decoration, white moldings are used, but color models are not uncommon today. Regardless of what material is the basis, baguettes have a standard length, which is limited to two meters, so in the process of carrying them to be docked. It is customary to fix skirting boards before gluing wallpapers and painting the ceiling. But the biggest difficulty can be the fitting of the ceiling plinth in the corners.
Alternative solution
Some, not understanding how to glue the plinth on the ceiling in the corners, get ready-made corners, which remains to be glued to the corners and docked with the rest of the elements. However, this method has certain disadvantages, which are expressed in the higher cost of these expendable components. There is one more problem. It lies in the fact that not all apartments have perfectly even angles. Therefore, sticking fillets from individual segments is more convenient, since you can independently set the desired angle.
How to cut
Before gluing the plinth on the ceiling in the corners, it is necessary to prepare not only baguettes, but also the surface, the latter must be cleaned of dust and other contaminants, and also be as dry and smooth as possible. The desired state can be achieved at the stage of putty and primer. Even if the corners are far from perfect, sticking skirting boards can fix the situation for the better.
The first strip is set from the angle that is closest to the entrance. It will be possible to cut the rail with the help of a miter box, this is a special device that looks like an inverted letter P. The sides of this tool have slots at the right angles. A plinth must be installed between the sidewalls, and a hacksaw in the desired slot. After you can start sawing. If you are thinking about how to glue the skirting boards on the ceiling in the corners, then in addition to the hacksaw, you should prepare a set of simple tools, namely:
- goniometer;
- stationery knife;
- pencil;
- hacksaw for metal;
- a ruler.
Professional trimming with a smooth edge and without burrs can be done with an electric jigsaw, reciprocating or miter saw. But such tools are not always available in the arsenal of the master. If a hand tool is available, then the baseboard must be cut as carefully as possible, since the teeth can crumble or delaminate the material.
For reference
Before you cut the ceiling baseboard, you can make the miter yourself, as it is a very primitive tool. Why use two boards that are knocked together at the right angle and have a cutout in the right place. If you can make such a device, then you can cut the material even by weight, pressing the element to the boards. If foam plastic products are used in the work, then they must be cut with a construction knife, the blade of which is previously sharpened.
Sticking the baseboard in the corner
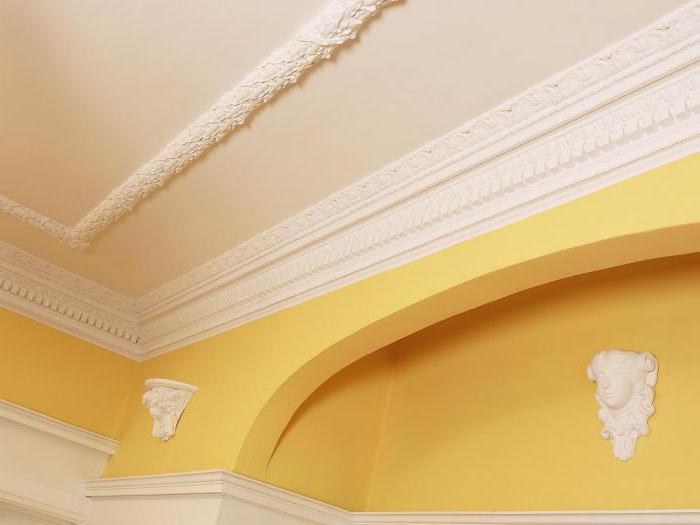
Information on how to cut the ceiling skirting was presented above, however, to achieve a positive result, it is important to know also the technology of gluing elements. The baseboard can be joined in the inner and outer corners, the size of the first is 90 °, but the outer corners are less common. Most often, their angle is 270 °. Trimming molding for internal and external corners is necessary according to the same technology, joining two trims - left and right. Using a miter box for cutting fillets, it is necessary to remember that the side of the baguette, pressed when cutting corners to the side wall of the tool, when glued will be located on the wall with the same side that is pressed to the bottom of the tool. If it is an internal corner, then the lower side will protrude above the upper. First you need to measure the angles between the walls, if they are 90 °, then you need to trim the elements at an angle of 45 °. If the angle is different, then the desired value must be divided into two.
Installation of fillets begins from the corners, after which you can work on straight sections. If you decide to use stucco molding, then putty is used to fix it. Before mounting, the attachment points are wetted with a primer, this eliminates the quick drying of the putty and facilitates installation. If you are joining skirting boards in the corners of the ceiling, you must first distribute the putty with a spatula, trying to create a thin layer. After the plinth is applied in its place and pressed to the surfaces. It is necessary to get rid of excess mixture, and fill the remaining gaps with putty. The rest of the composition is removed with a rag soaked in water. As soon as the putty dries, you can close the cracks again.
Strengthening the baseboard with glue
It is necessary to apply the adhesive composition to the seamy surfaces of the plinth, for this you can use a brush. It is permissible not to glue the joints of the products, and after the fillets are pressed against the wall and ceiling, they must be held for 1 minute. If plastic skirting boards are installed for the ceiling, it is important at the final stage to wipe with a sealant the spaces formed between the wall and the skirting. This applies to places between the ceiling and the baseboard. It is necessary to carry out such work around the entire perimeter of the room using a rubber spatula.
Varieties of glue for ceiling skirting
Polyurethane skirting for the ceiling can be hardened to surfaces using polymer mixtures. Such adhesive compositions are developed for each variety of products. The most popular among consumers today are the brands "Titan", "Eco-naset" and "Moment". They have a good astringent ability, harden in a short time and are able to hold the glued material immediately after strengthening to the surface. However, if you decide to install a polyurethane skirting for the ceiling using one of these compositions, then you should understand their characteristics.
For example, “Titan” and “Eco-naset” adhesives have increased adhesive abilities and are completely transparent. However, until the mixture has set, the element must be maintained in order to avoid shifts. But the “Moment” grasps immediately, however, it is necessary to work with it as carefully as possible to prevent the composition from getting onto the front surface of the baseboard. This adhesive can only be used in tandem with a mounting gun. As practice shows, the latter option has a higher cost and expense in comparison with the mentioned alternative options.
The adhesive for polymer-based skirting boards is used with the obligatory use of a solvent, which allows the mixture to be in a liquid state. But work with such adhesives is necessary only in well-ventilated areas.
Using Liquid Nails
Liquid nails are universal, as they can glue almost any material. They can be neopropylene or acrylic. The first variety has a pungent odor and is made on the basis of an organic solvent. It is unsafe for human health, but only until it dries. Neopropylene liquid nails have an advantage over the acrylic variety, which is expressed in the ability to work in rooms with high humidity and at low temperatures. Acrylic adhesive for ceiling skirtings in the form of liquid nails is harmless to human health, but has a faint odor. It is worth remembering that these mixtures are afraid of the effects of low temperatures, and when freezing, the acrylic base is destroyed.
Conclusion
If during the repair you decide to use a ceiling plinth, the inner corner using these elements can be decorated. You can use a miter box for cutting the material, and if you have enough experience in carrying out these works, then cutting the products can be done "by eye".