Let's find out what you can make a snowflake from, and also give a few workshops on how to create it. The proposed crafts will be able to decorate windows and walls, a festive table, a Christmas tree and many other interior items.
What can you make a snowflake out of?
The answer to this question is quite simple - from everything. After all, in fact, there are many materials from which you can make a snowflake. Therefore, the list is quite extensive:
- paper;
- beads and beads;
- cloth napkins;
- the cloth;
- thin branches of bushes and trees;
- wooden sticks;
- woolen threads and so on.
As you can see, there are quite a few options from which you can make a snowflake. The main thing is to show your imagination.
Plain paper snowflakes
When we talk about cutting out New Year’s snowflakes, the first thing I remember is a bunch of sheets of paper folded into a triangle. This is the most popular way to make crafts, known even to a small child.
So, to make such snowflakes, you will need paper, pencil and small scissors.
Step-by-step instructions on how to cut a snowflake:
- Take a simple sheet of paper and make it square (Figure 1). There are two ways to do this. First: use a ruler to measure four identical sides and draw a square, then cut it out. Second: wrap the upper left corner to the right side and smooth the fold, cut off the excess paper.
- Fold the sheet into a triangle (Figure 2).
- Make another triangle (Figure 3).
- Wrap the right side to the middle of the triangle, then fold the left side (Figure 4).
- Cut off the extra “ponytails” (Figure 5).
- Draw a diagram with a pencil and cut out a snowflake (Figure 6).
Beautiful Christmas snowflakes - stencils
In this way, as described above, you can make a huge number of completely different snowflakes. All variety is the use of patterns.
If you have already become a master and can cut beautiful New Year's snowflakes - you do not need stencils. After all, you can independently draw any pattern and cut it out. The main difficulty is that in the end a beautiful snowflake comes out. And this does not always work.
If you don’t really want to bother yourself and invent patterns, then you can use ready-made stencils. It is enough to simply redraw them on the workpiece and cut along the contour.
In the illustration above you can see examples of such stencils. In fact, there are a huge number of them and only you can decide which snowflakes you want. Indeed, depending on the pattern, you may get an openwork craft, more square, with a pattern of figures and so on.
Most often, the more curls and thin lines in the stencil, the more airy the finished product will turn out.
What paper is suitable for creating snowflakes?
To make paper snowflakes, almost any paper will do. The main thing is that the sheet can be easily bent, and then it is easy to cut out a pattern from it. Therefore, it is better to use the following options:
- office paper (another name - for printer);
- album sheets;
- colored paper;
- for origami;
- for decoupage with patterns;
- kitchen napkins.
You can also make snowflakes out of cardboard, just in a different way. After all, this type of paper is difficult to fold several times. And to cut thin patterns out of it just will not work. Therefore, if you want to make a cardboard snowflake, then you need to do this in the following way: draw on the whole sheet all the contours of the craft, and then cut it.
3D snowflakes
Volumetric snowflakes (3D) look very beautiful in the quality of interior decor. They are made from several sheets of paper.
Master class on how to make paper 3D snowflakes:
- Take a sheet of paper and make it square (Figure 1).
- Fold the leaf in half to make a triangle.
- Make triangular cuts with scissors at least three times, as in Figure 2. The number of cuts depends on the size of the paper.
- Open the sheet and connect the ends of the first carved square with PVA glue (Figure 3).
- Turn the snowflake over and glue the ends of the second square in the same way (Figure 4).
- Turn the part over several times until all the squares are wrapped (Figure 5).
- Make five more parts of the same size in the same way.
- When all the parts are ready, they need to be glued together. Take two parts and glue them to honey at two points: at one end and in the middle (Figure 6). Combine all six parts in this way. Spread the loose ends.
All is ready! You have a volumetric snowflake.
The second method of manufacturing snowflakes 3D
To make such voluminous snowflakes, you do not need a lot of paper. For one craft, you only need to cut twelve strips of the same width and length.
The procedure for creating a volumetric snowflake:
- Cut the required number of strips (Figure 1).
- Take two strips and glue them together to make a cross (Figure 2).
- Place two more on the sides of one of the strips, only now above or below the perpendicular part (depending on where the first one is) (Figure 3).
- Do the same, but the other way. As a result, you should be able to do as in Figure 4.
- Now take the two ends of the side strips and glue them together (Figure 5).
- Repeat with the other three sides (Figure 6).
- Make another exactly the same detail (Figure 7).
- Slightly bend all the loops inward at each part (Figure 8).
- Connect the two parts together, putting the resulting loops on the remaining stripes (Figure 9).
- Stick them together with glue.
The original volumetric snowflake is ready!
Tip: so that all elements stick together faster and better, and do not fall apart during work, connect the necessary points with staples.
Fabric Napkin Snowflake
To make wonderful snowflakes from napkins, you do not need any additional materials, except for a finished piece of fabric. All you need is a sleight of hand and the master class below.
Instructions on how to make snowflakes from napkins for decorating the New Year's table:
- Take a clean and ironed linen napkin (Figure 1).
- Wrap all corners to the center (Figure 2).
- Wrap the new four corners to the center again (Figure 3).
- Hold the center of the napkin and flip it over to the other side (Figure 4).
- Fold the four corners to the middle (Figure 5).
- Holding the middle so that it does not open, turn the inner parts forward at all corners (Figure 6).
- Now lift the corners left behind (Figure 7).
The snowflake napkin is ready!
Tip: so that the craft does not fall apart, you can clamp the middle using special clamps.
Wicker snowflake
Original crystal fluffs are obtained from beads. Then they can be used as Christmas toys. Snowflakes in this case are hung on a Christmas tree by a string or fishing line.
Instructions on how to make a pendant on a New Year tree:
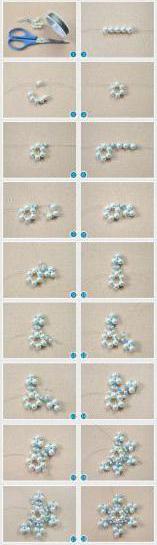
- Take three types of beads: 8 mm, 4 mm and 2 mm. You also need a fishing line about 70 cm long (Figure 1).
- Take the fishing line and string on it 5 beads 8 mm in size (Figure 2).
- Put on the sixth bead and pass the other end of the fishing line through it to make a loop (Figure 3).
- Tighten the eyelet (Figure 4).
- From one end of the fishing line, put on the beads in the following order: 4 mm, 2 mm, 4 mm, 2 mm (Figure 5). It will be prettier if you use beads of two different colors.
- Next, string the beads in the following order: 8 mm, 2 mm, 8 mm, 2 mm, 8 mm, 2 mm (Figure 6).
- Now pass the used end of the fishing line through the second 2 mm bead (Figure 7).
- Tighten another eyelet (Figure 8).
- String the bead on the working end of the fishing line in the following order: 4 mm, 2 mm, 4 mm (Figure 9).
- Pass the line through the bead from point 3 (Figure 10).
- Pass the right end of the fishing line through another large bead and string such beads on it: 4 mm, 2 mm, 4 mm, 2 mm (Figure 11).
- String this bead: 2 mm, 8 mm, 2 mm, 8 mm, 2 mm, 8 mm, 2 mm. Pass the fishing line through the second 2 mm bead and put on the 4 mm and 2 mm beads (Figure 12).
- Pass the line through the beads shown in Figure 13.
- Tighten the tabs (Figure 14).
- Remove the line through the adjacent large bead (Figure 15).
- Similarly, weave another three sides of the snowflake (Figure 16).
- Continue weaving snowflake tops on the other side of the fishing line (Figure 17).
- Pass the two edges of the fishing line through several different beads and tie small knots (Figure 18).
The snowflake is ready! It remains only to tie a ribbon, thread or piece of fishing line so that the crafts can be hung on a fishing line.
We use ice cream sticks
Absolutely wonderful decor can be made from ordinary wooden sticks of ice cream (for example, popsicle). You must either collect them or buy (they are sold in large sets of 50 pieces or more).
First, collect a snowflake of any shape. When you like everything, carefully glue the wooden sticks together with a glue gun . Then paint the design in any color with acrylic paint. She lies very well and dries quickly.
When your snowflake is ready, make a hook from the wire and hang it on the wall or door. This is a very simple and at the same time stylish New Year’s room decor .
Tip: to make the craftsmanship neat, sticks should be placed on top of each other only on one side.
Natural materials come to the rescue
Snowflakes made from the simplest cones that you can collect while walking through the forest look very beautiful.
To make such an original craft, you will need nine pieces of small bumps. Connect the material together using a glue gun. To do this, drip glue on the back of the cones and tightly connect them together. That is, the "butt" should be in the middle, and the lush parts form a snowflake. To make the craft look more elegant, cover it with white paint, and sprinkle silver sparkles on top.