Easter Bunny is a relatively new holiday symbol for our country. However, very cute cute little animals have already managed to win the love of many. Try and you make beautiful souvenirs with your own hands.
Ways to create and interesting ideas
Easter bunny can be made as follows:
- Stitched.
- Crocheted.
- Baked.
- Blinded from any plastic mass (salt dough, polymer clay, etc.).
- Folded from paper using a simple or modular origami technique.
- It is made in the form of an application.
- Made using quilling technique.
- Gossip from beads.
In fact, there are many more options. The most accessible, understandable and popular are the first and second.
Knitwear
Very cute are Easter bunnies crocheted. Ideas can be used different. Choose from these options:
- A small openwork stylized souvenir.
- Egg stand.
- Simplified shape with a convenient basket for several eggs.
- Big bunny with pockets for each egg.
- The figure of a cute animal, consisting of two halves (upper and lower), which allows you to hide the egg inside.
- Souvenir detailed toy of any size.
As you can see, Easter bunnies crochet very differently. Choose your favorite method and create cute creatures with your own hands.
What you need for sewing
Of course, knitted products are very beautiful, but it takes a lot of time to create them. If you are not very friendly with a hook or just need to make gifts quickly, sew souvenirs from scraps available at home. Such an Easter bunny will turn out to be no less beautiful. To work, prepare the following:
- Fabric in different shades.
- Paper for the pattern.
- Pencil and eraser.
- Scissors.
- Pins
- Threads with a needle.
- Sewing machine.
- Filler.
- Decor (embroidery floss, eyes, nose, antennae, bows, satin ribbons, beads, flowers).
In fact, you will not need either complex materials or laborious stages of work. Using a simple pattern, it is easy to get a lot of products in a short time.
We sew a souvenir
DIY Easter bunny made of fabric can be made in the following options:
- Flat or surround.
- Simplified or detailed.
- In the form of an egg with ears or as a gift wrap that is put on an egg.
- In the form of a full soft toy.
Even the girl will cope with the simplest ideas, so the process of creating gifts can be turned into family creativity. A very light and beautiful Easter bunny is made of fleece or felt with your own hands. These materials do not require edge treatment, and the product is easy to sew even on the right side. Small details of the decor, for example, a muzzle is enough to glue on the base.
Any fabric is used for sewing: both plain and colorful. The shapes of souvenirs are diverse: from simplified stylized in the form of a triangle, an oval to realistic, fully detailed.
Easter Bunny: pattern
To stitch any product, even the simplest, you will definitely need a paper part template. There are two ways to act:
- Print the finished outline image on the printer at a suitable scale.
- Draw the details yourself on a piece of paper.
The second method is suitable for those who know how to work with a pencil and like to develop new ideas. In the first case, you just select a picture and have a printer at hand. You will not succeed in an exclusive thing if you take a ready-made sample, but it will save a lot of time: printed, cut it out. You can create an unusual image through the details of the decoration (tie a bow, sew a hat, clothes, etc.)
Sample patterns
According to the templates below, you will get a very simple and at the same time beautiful Easter bunny. The pattern on all samples except the last consists of one element. It is enough to print it on a printer and can be used. Two identical parts are cut out of fabric. The flap can be easily folded with the front sides inward, pin the paper blank with pins, circle, not forgetting the seam allowances, and cut.
Easter souvenir is made in the form of a bunny figurine or just his head. The form can be either realistic or simplified, as in the following template. You will need to stitch the two parts around the perimeter when they are folded with their faces inward and turned out. The eversion hole in this case is best left between the ears. So it will be more convenient to fill the souvenir with holofiber or synthetic winterizer.
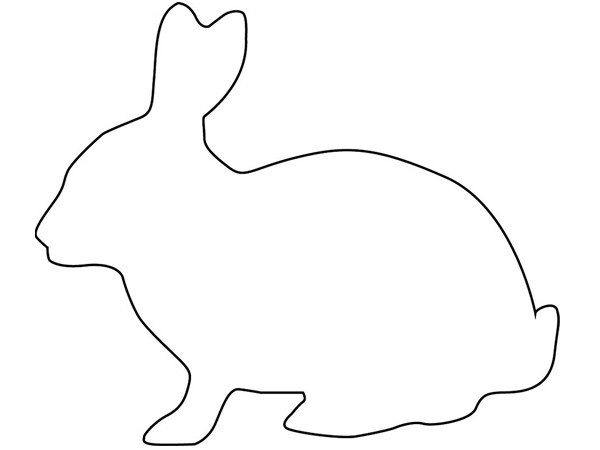
The following two patterns are bunny figures in profile. The first option is simplified. If you cut the details from the fleece, you can sew them, generally, on the front side, glue the circles of the eye, nose, and pink center of the ears.
The next workpiece has a realistic contour shape. If you sew on it from ordinary fabric from the wrong side, leaving a hole for turning out, you can leave the unstitched part near the ears, and even next to the paws. So it will be more convenient to fill the form with stuffing material. Before turning, do not forget to make incisions on the seam allowances in places of complex rounding of the form. This is necessary so that the fabric does not pull and unnecessary folds in shape are formed.
Easter eggs bunnies look original . The base form can be sewn as a separate blank or immediately with the rest of the pieces. Use the option from the following illustration or modify it. You will need two of these details. The contour extends all the way to the place indicated by the arrow. Through this hole, the hare is filled, and the ears and upper legs are first and foremost, after which the stitching is already performed on the front side in the places shown by the dotted line. Try to fill the body of the hare denser, so that it looks like the shape of an egg. You can fill the legs at the same time with the body or also sew the stitch, as is the case with the upper legs.
A variant of the pattern for sewing another three-dimensional figure from several elements is presented in the next section, since the sequence of work is described on its example.
Master class "Easter Bunny"
A souvenir in the form of an egg with a head, ears and paws is also made according to this template. The sequence of execution will be as follows:
1. Cut out all the details from the appropriate fabric. If you use a tight felt, it is enough to make all the elements except the body in a single copy, although if you also make it single, you will get a flat bunny, which can be used as an application or to create a magnet. To get a three-dimensional shape, legs, ears, make of two identical parts.
2. Fold all the paired elements with their faces inward and sew along the perimeter, stepping back from the edge to the distance that you provided for the seam allowance. Do not forget to leave an open hole for turning out. It is better to make them at the junction with the base, and on the body itself - at the bottom.
3. Make accurate cuts on the allowances. Caution, do not damage the stitch.
4. Turn out the details and fill with prepared material.
5. Sew holes and connect all parts using a needle and thread.
6. Coat the details of the muzzle, ears and paws with a layer of PVA glue.
7. Paint the face, the middle of the ears and the feet with acrylic paints.
Your souvenir is ready. You can, of course, sew or draw clothes for him again. By the way, the muzzle and other decorative details do not need to be done with paints. Embroider them, glue or stitch them. Get creative.
As you can see, the easter bunny is done quite simply. All options, from the lightest to the most complex, look cute and beautiful.