Each of us has a thing that already seems to have outlived itself, but for some reason it is dear to our heart. And you can’t get rid of it in any way. But keeping it in a conspicuous place is awkward. And sometimes you just want to bring something new and beautiful to your life, but there is no money for designer jewelry.
But in the first and in the second case there is a way out, and, strangely enough, it is the same, and this is decoupage.
Core tools
The main tools that are necessary for this lesson are beautiful napkins, glue, varnish, brushes and scissors. As you can see, no specific or ultra-expensive materials will be needed. Despite the availability and simplicity of the method, the result can exceed all your wildest expectations.
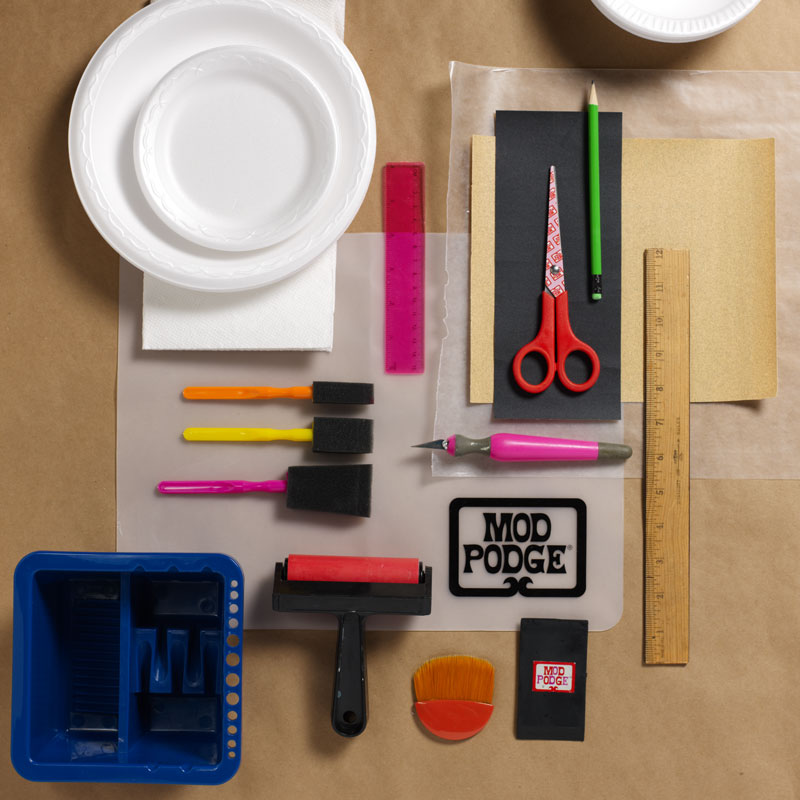
- The first is flat brushes. Their width should be from 0.8 to 2.5 cm, the best choice is a thin artificial pile, since it is easiest for them to apply varnish or glue.
- The second - small sharp scissors, if desired, you can take them with several different shapes of blades.
- The third is acrylic varnish. Water-based varnish is ideal. This is not a prerequisite. You can use any varnish for decoupage a bottle of champagne, but this one is more convenient. It does not darken with time and has no smell. The varnish does not have to be transparent. If you use a composition with any effect, for example, decorated with sparkles or having the effect of aging, then your work will become even more individual. You can take a special varnish for decoupage, but it will cost more than a regular construction, which is also suitable for this purpose.
- The fourth one is stationery. This is an eraser, a pencil and scissors.
- The fifth point is glue. There is also a choice for you. You can use PVA glue, which is sold at budget prices, or specialized for decoupage, but it will cost a lot more.
- See below for material selection.
Where to apply and why
In general, the decoupage technique is the transfer of a pattern to a specific material and fixing it from above with a layer of varnish. As you can see, everything is simple to the point of banality.
You can apply this technique on almost any surface, the main condition is that the latter is smooth and not porous. Want to decorate an old table? You are welcome! Dreaming of refreshing earthenware or porcelain dishes? Why not! Do you have a favorite plastic toy and want to transform it? Forward! Is a glass vase fed up with its boring transparency? So let exotic flowers bloom on it!
In this article we will talk more about the decoupage technique in general and how to make bottle decoupage for the New Year with our own hands.
What else is needed
Perhaps it’s worth explaining in more detail what tools you still need.
- When applying acrylic paint to the base, you will need a sponge. Unfortunately, after it, the surface becomes rough, which means that it should be smoothed out with a brush. In this case, it does not matter whether it is a flat brush or a round one, the main thing is that its size is convenient for use on the surface with which you are working.
- Thin art brushes are also useful - in order to accurately draw contours and emphasize the necessary details.
- It will be convenient to apply varnish with rollers, but not with those used for walls, but with a smaller size.
- If desired, you can use the palette, but this is not necessary. It can easily be replaced with a regular disposable plate.
- Acrylic paints. They are needed in order to tint or finish the picture, making your picture more complete.
- Sandpaper. Depending on the material on which the drawing will be, the grain should be selected either medium - 250-400, or smaller - 600-800. Which paper to use also depends on the processing step. Medium is used for primary processing, and small for final grinding.
- Priming. It is used for wooden surfaces in order to reduce their absorption.
- The following item is also required for wooden surfaces. This is a specialized putty. It is necessary only if the surface used has any defects and irregularities.
- The last paragraph is the material with which the main drawing will be applied.
Decoupage material: three-layer napkins
The main advantage is the low price of the material - from 15 rubles. Usually only the top layer of napkins is used, on which, in fact, is the pattern. But for beginners, this is not the easiest option. Since the napkin layer is very thin, it often wrinkles, bubbles, or even breaks.
Therefore, for this type of decoration is better to take after a certain amount of practice.
Rice paper
The second way of drawing a drawing is more suitable for beginners, since it is much easier. In this case, use special decoupage rice paper with the pattern you have chosen.
The advantage of this method is the ease of use of this figure. In specialized stores, such jewelry sells in different formats and colors. Rice paper does not deform when exposed to water and stretches well.
The downside is only the price of this material, which starts at 60 rubles.
Decoupage cards
There are also special cards for decoupage on plain paper. Such cards are only suitable for perfectly flat surfaces. The paper does not stretch or adjust to the surface, as was the case with rice paper.
This paper can be with a variety of patterns and have a different format. In addition, it differs in density. The minimum cost of such cards starts at 30 rubles apiece.
Photo paper
Another way to apply a picture is to use photo paper. The main advantage of this method is that the image can be one hundred percent unique.
I need a printer, a transparent file. You need to look at the drawings, some need to be flipped in front of the computer in a mirror image. Otherwise, it does not look right. Example: butterflies, snowmen and snowflakes do not care, but Westminster Bridge is to the left of Big Ben, and nothing else.
When decoupage with photo paper, its density should be between 110 and 180 g / sq. m. The image must be dried from 6 to 12 hours so that there are no unpleasant surprises. After which it costs at least three layers to cover it with acrylic varnish, but preferably in 4 or 5 layers, for sure. The next step is to soak the paper in well warm water for about 20 minutes.
Then remove the varnish layer with a pattern, because this is exactly what is necessary for decoupage. Doing this is extremely accurate. Further actions are similar to what they do with napkins. On the decorated surface, prepared in advance, walk with glue, after drying, fix with varnish.
In fact, there are many interesting methods of decoupage, including the creation of volumetric jewelry, but all of them will be understandable and accessible only to those who have been engaged in decoupage for a long time. The easiest way is to start mastering the decoupage technique by sticking large fragments.
Patterns
After you have chosen what exactly you are going to apply the drawing to, it is worth considering which particular pattern you want to see on your product. If you still decide to use napkins, then you will have to fill your hand for a while so that it rests on the product evenly and without bubbles, it will also be necessary to ensure that the napkin does not tear. When you can do this, you can start and learn more complex techniques.
For decorating Christmas bottles, such patterns as various snowflakes, snow-covered houses, beautiful candles, cute animals, bright rowan clusters, beautiful Christmas trees, with or without toys, spruce branches with a bow, gifts, snowmen, Grandfather can be an excellent option. Frost with the Snow Maiden and all that is enough for your imagination.
As an example, we describe the decoupage process of bottles with napkins.
Step one
We describe step-by-step decoupage of bottles. In the photos posted in the review, you can see how beautiful the resulting product is. But first you’ll have to work hard with the foundation on which the drawing will be located. First of all, it is worth washing the bottle to get rid of the label, then level the surface to the maximum. It is necessary to cover with specialized soil and paint with white paint.
For the decoupage of champagne bottles for the New Year, it is better to use napkins with winter and bright patterns that create a festive atmosphere. It is necessary to apply white paint in order to make the picture more vivid.
A napkin in three or more layers needs to be divided - separate the layer with the picture from the rest.
On a dark or colored surface, the pattern will not stand out so much as on white. Paint should be applied to any surface, whether it is wood, ceramic or plastic. Sometimes it is necessary to apply several layers of paint so that it is better fixed. Do-it-yourself decoupage of bottles is also necessary.
Second step
Another point to think about is the material with which you will glue the picture. You have a choice: PVA glue or pencil glue, varnish, special glue, egg white. Gluing is as convenient as glueing, the only difference is that after the varnish, fixing the flaws is no longer possible, because it makes the drawing and the product as a whole. That is why those who only learn to work with decoupage usually use glue in order to be able to correct defects.
PVA glue is usually diluted with water one to one. But with this method, when working with napkins, problems arise due to the fragility of the material.
Glue stick can be a great way out, but it also has its drawbacks. It is best to use such glue for smooth and slippery surfaces, on which there is a higher chance of carefully smoothing out all the folds and bubbles.
For the decoupage of a New Year's bottle of champagne, this would be the best option. Egg white is also a specific material and requires its skills when working with it.
For the first decoupage work, you should choose a small item, it is also worth looking for the shape of the product as simple as possible in order to get used to working in this technique.
To glue a napkin, glue can be applied both to the object itself and to the napkin. It depends on how you prefer. The most important thing is not to forget that even the slightest folds should not remain, only then your picture will be beautiful and pleasant to the eye.
After drawing the picture, it must be allowed to dry. If you do not want to wait, then you can speed up the process using a regular hair dryer.
If the surface to be decorated is fairly even, you can do it even easier, without having to mess with the bubbles and leveling the napkins. It is necessary to walk over the surface on which the drawing is applied properly with glue and allow it to dry, after which, put the necessary pattern on the place where the glue is located, cover it all with baking paper on top and, starting from the edge, go with the iron over the required area.
The adhesive will soak the cloth under the influence of temperature. For the decoupage of bottles for the New Year is the easiest and fastest option. After that, you need to go over the glue again and let it dry.
Step three
After preliminary preparations, a pattern can be applied. And here you can go in several ways. It depends on the size and shape of the product you are working with. On a flat surface you can apply the entire pattern at once.
But it happens that the surface is curved, for example, the drawing should be on a vase. In this case, divide the picture into fragments. This can be done by tearing the napkin.
Which way to choose depends on the picture. If it has clearly defined borders, and it has a large format, then it is better to cut it, but if the picture is small and will be glued close to each other, then you should tear it, it is easier to combine the edges.
Fourth step
It is necessary to process the edges of the pattern on the product. And here you can even trim the failed sidewalls and tint the pattern, or simply wrap the edges of the napkin on the back of the product.
For decoupage of bottles, only the first option is suitable. If, after the drawing has completely dried up, you notice a crease in the drawing, then there is nothing to worry about, you can simply gently sand the unsuccessful area, you just need to make sure that the rest of the drawing does not touch. Step Five After all of the above, it is worth covering the bottle with acrylic varnish, this is the best material. Lacquer should be walked at least 2 or 3 times, each time waiting for complete drying, in order to fix the picture as best as possible.
Then you can decorate as desired.
It clearly demonstrates what masterpieces turn out if decoupage of bottles is done, the photo below.
You may find inspiration for your own products. Create with pleasure!