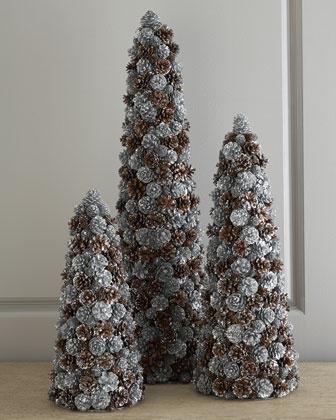
From the simplest materials, creative and original crafts can be obtained. Do you like to work with a variety of natural material? Then try to build a tree of cones with your own hands. This craft will appeal to both households and guests of your family.
Cone spruce
Such a spruce can be made quickly and easily. A preschool child will also cope with the task (with the help of an adult, of course). At the beginning of work, take a sheet of thick cardboard and build a cone from it with glue.
This will be the basis, the trunk of the future Christmas tree. Then take the bumps and gently stick them to the trunk over the entire surface of the cardboard. If the cones have rods, then you can pierce holes for them in the cone and fasten them from the inside. You can additionally decorate the Christmas tree with ribbons or sparkles as desired. You can leave the color natural or paint the cones from the tank with green paint. The craft is ready.
A tree of happiness from cones: preparation for work
All people love to decorate their home for the New Year holidays. With the help of cones, this is very simple. Try to make a merry Christmas tree. To get started, prepare a pot for him. You can build it from any material at hand, for example, a mayonnaise bucket, a milk carton, a bottle, and so on. First, glue the bottom of the container you selected with elegant gold paper. After that, take a straw napkin and glue it over the box on the sides. We decorate the pot - glue a strip of burlap on it, a braid and a beautiful bow on top. A cone tree will look great in this pot.
How to make a tree of happiness?
When the pot is ready, proceed to the main part of the work - the construction of the tree of happiness itself. Take the foam ball and make a hole in it to insert the barrel. Pre-paint the ball with brown acrylic paint if you do not want to close all the gaps closely.
Then glue the cones on the foam ball around the perimeter. Insert and glue the trunk for the tree of happiness. Place the craft in the pot and fill with gypsum to half. Be sure to properly prepare the gypsum solution, clearly follow the instructions. When the gypsum sets, fill the pot to the end. So the craft is likely to dry out. Do not forget to decorate the foot with cones and grass, and also spray snow on the tree. By the same principle (but changing the decor), you can make an autumn tree of cones.
Tree with baby hands
A primary mascot for successful study can be done with your own hands by a younger schoolboy. All the same cones will help him in this. Very often they are asked to bring autumn crafts to school. A tree of cones will be just the way. A tree trunk can be made of several reed branches, fastened with wire at the top and bottom. A child can put a tree of cones in an already prepared ceramic pot with a suitable pattern.
The trunk should be placed in the middle of the pot, and empty space as densely as possible clogged with a newspaper. The foot of the tree can be decorated by gluing coffee beans to it. Next, you need to paint the prepared large cones with gold paint. Now you need to take the ball-blank, cover it with plasticine and plant it on the barrel. Cones will easily be attached to plasticine. If necessary, you can connect glue. The tree of cones can be decorated with other natural materials (seeds, berries). At the end of the work you need to take a wide silk ribbon and tie it with a tree and a pot.
Autumn crafts: a tree of cones
You can make a very beautiful topiary of pine cones with your own hands. It is very simple. To get started, take some vase or pot. The stem of the topiary will be a suitable wand (it can even be a simple pencil). Crown of a tree - a ball for tennis. Make a hole in the ball that is suitable in size to insert the stick. Place the barrel in the crown.
Start decorating the trunk - wrap it with double-sided tape. Attach sisal or coconut fiber to the tape. Firmly fix the barrel in a vase with plasticine. Next,
pine cones are attached to the ball using a thermal gun or glue “Moment”
. They should stick tightly to the crown, without gaps. As you can see, a tree made of cones with your own hands is easy. It remains to cover the formed gaps with natural material, for example, with dry branches of thuja. Sprinkle the tree with sparkles. The topiary is ready.
Branchy tree
In order to make a tree branch with cones, you need a good wire. Each cone must be wrapped with it, passing the long end into the loop. Take a thick black wire as a basis and create a branch out of it. Wind a thinner wire on it (at the end of which there are cones). In the end, you can simply wrap the colored wire with black tape. Combine the resulting branches into a solid tree of cones. If you took an excessively soft wire, and it bends under the weight of natural material, then put toothpicks under the insulating tape.
Then you need to thicken the trunk from below. To do this, feel free to take a plastic bag and twist tight. Wind the resulting tourniquet with electrical tape to the bottom of the tree trunk. Then make a pot. Decorate an ordinary mayonnaise bucket according to your desire. Then, right in this bucket, part the gypsum mixture and quickly lower the tip of the tree there. When the gypsum hardens, cover the wood with a layer of paint from a spray can. Better do it outdoors.
A huge number of interesting crafts on any subject can be made from ordinary cones.