People have always tried to decorate their home, whether it be a cave, a dugout, a merchant's house or a modern apartment. Rugs, carpets, curtains, curtains and other textile things perform not only a practical function - protection from wind, cold and light, but also decorative. After all, it is with the help of such things that comfort is created in the house.
Just like curtains, rugs and carpets, bedspreads play a big role. In the bedroom, the bed is the main piece of furniture, respectively, attracts all the attention to itself. And the general impression of the room depends on what the bed is made of. With just one bedspread, you can create an atmosphere of royal chambers, a hunting lodge, a warm village hut or a spaceship. It all depends on the owner of the home.
But often when creating an image of a room, they are faced with the fact that there is no way to buy a bedspread in the store: either there is no suitable model or color, but it happens that the size does not fit. What then to do? Sew the cover with your own hands. How? It all depends on which product is needed for this room.
Types of bedspreads
Depending on the number of layers of the product are divided into:
- Single layer. As a rule, sewing bedspreads on a bed with your own hands is quite simple. To do this, you need to choose a dense fabric: tapestry, jacquard, fleece or any other, cut off the required length. If the width of the fabric is less than necessary for the bedspread, then you can sew it from 2 sections of fabric, making a seam in the middle. The edge can simply be hemmed with a double hem, processed with a slanting inlay or in any other way. You can also decorate with ruffles, satin ribbon, etc. In addition, you can make single-layer knitted, woven plaids or from pompons.
- Layered. In such bedspreads there are 2, 3 or more layers. They can be lightweight or insulated with synthetic winterizer or other filler, flat or voluminous, from a single piece of cloth or from shreds.
The bedspread on the bed with your own hands can be made absolutely from any materials. It:
- one piece of fabric
- shreds
- threads
- tapes
- fur,
- unnecessary clothes and much more.
There are several general rules for creating your own bedspreads on your bed:
- Before starting work, it is necessary to wash any fabric, without wringing it, hang it, and then iron the still wet material. Most fabrics shrink during the washing process from 1 to 15%. Therefore, in order for the bedspread to please its appearance for a long time, it is necessary to do this.
Important! Cutting out the details is done after the fabric is hooked, so you need to buy it with a margin not only for allowances for seams, but also for shrinkage.
- If you make a bedspread with your own hands from an old thread - knit, crochet or make pompons, then you also need to prepare the yarn. To do this, it is necessary to wet it and wrap it tight, for example, on the back of a chair, and dry it. Thus, the yarn will straighten, during operation the thread will lay down smoothly, without unnecessary twists, due to which the cover will have a more presentable appearance.
- When working with any materials, it is also necessary to remember that both the fabric and the threads can shed quite strongly, which is why the first wash or just a spilled glass of water can lead to sad consequences. Therefore, before starting work, it is necessary to check the material for ink resistance and, if necessary, replace the material or color.
- If you need to sew a blanket on your own bed with your own hands, it is better to take a natural fabric. It can be calico, satin, poplin or flannel. They do not cause an allergic reaction, are pleasant to the touch, and such a cover is quite easy to care for.
- Bedspreads made of delicate fabrics, such as satin and silk, are very beautiful, but it is better to lay them out on bed in the bedroom, where they will rarely sit down, as the fabrics are delicate and puffs are easily placed on them. If the sleeping place is in the room where companies or the whole family often gather (relevant for one-room apartments), then it is better to make a choice in favor of denser, and therefore longer-lasting fabrics.
You can make absolutely any blanket on the bed with your own hands. There are more than enough workshops on this topic, so there will be no particular difficulties in making the dream bedspread.
Counterpane
Make it easy enough. To sew a quilted bedspread on the bed with your own hands, you will need 2 fabric cuts equal to the size of the bed + descents on the sides and legs, if necessary + allowances for the seams. If you add a synthetic winterizer between two layers of fabric, then the cover will be softer and it is better to keep its shape, however, it will slightly puff up on the slopes. You will also need a thread to the color of the fabric. If the fabrics of the upper and lower parts of different colors, then 2 types of threads will be needed.
Sewing:
- Wash, iron, spread the fabric on a flat surface.
- Measure on the canvas the dimensions of the future bedspread + allowances for seams 1.5-2 cm.
- The edges of the fabric must be processed. This can be done using an overlock, a zigzag stitch on a sewing machine or double hem. For the latter method, both cuts must be folded with the wrong side inward, stitched along the perimeter, 0.5-1 cm indent from the edge. The main thing is not to forget to leave a hole for turning out. Unscrew the resulting workpiece, and, stepping another 1-1.5 cm from the edge, also flash along the perimeter. Thus, a section of tissue will remain between the two seams.
- Fold the fabric face to face, sew along the perimeter, backing 1-1.5 cm from the edge, leaving a hole. Turn out.
- If the cover is with a synthetic winterizer, you can insert it inside in two ways: either in step 4. the third layer of insulation is placed on the top layer and all 3 layers are sewn together (this method is convenient in future work, since the synthetic winterizer will be immediately fixed on four sides, however, when turning out in the seam area, a seal is obtained, since there will be 4 layers of fabric and 2 layers of insulation), insert the synthetic winterizer into the workpiece after turning it as a blanket into the duvet cover (this way you can avoid unnecessary sealing in the seam area, however, with further Stitching pad can move out, forming lumps and voids.
- Sew a hole. Mark with chalk, soap or a vanishing marker the lines along which the cover will be stitched. It can be squares, rhombuses of various sizes, patterns, circles, hearts and much more. The choice of the type of future stitches depends on the imagination and skills of the needlewoman. Before embroidering the intended lines, they must be marked manually so that the fabric layers do not move during the stitches. Sew on the marking on a sewing machine, remove excess threads, decorate if necessary.
The master can sew a bedspread on a bed with his own hands from a whole canvas or from large rags. Against the background of small shreds, the stitch, which is the main decoration of such a bedspread, is lost.
Fur bedspread
Fur is not only a very warm and windproof material, but also a symbol of wealth.
You can sew a luxurious bedspread on the bed in the bedroom with your own hands from natural fur. This can be whole animal skins or trimmings, which can often be bought by weight from fur factories, old fur coats, collars, edges and more. It is quite difficult to work with such material, however, a bedspread in the style of a royal hunting lodge is worth the effort.
Highlights of working with fur:
- The skins should be soft enough, but strong. To check how high quality the material is, it is necessary to connect 2 parts with several stitches and pull in different directions. If the skins are of high-quality manufacture, then the base will not be torn. If they are not strong enough, then they can be fixed with adhesive cloth.
- Fur must be sewn either on a special furrier's machine, or manually, by a furrier's seam.To do this, 2 parts are folded with fur inward, connect the edges and sew one stitch into the same hole over the edge, the second over the edge into the neighboring hole. Thus, through each puncture, the thread passes twice.
- If the seam is hard, then it can be gently tapped with a hammer through a towel.
- When stitching pieces of skins, it is necessary to select the direction of the pile as much as possible, then the seams will practically not be visible.
- Wash such a blanket is better in dry cleaning.
Patchwork
Patchwork-style products have a special charm. Consisting of many small pieces of canvas fascinate with their drawings and at the same time create a warm rustic atmosphere. Using the patchwork technique, you can also make your own bedspread on the bed. There are a lot of workshops on the patchwork technique, so even a beginner will cope with the creation of a unique bedspread.
We, in turn, will present the basic rules for creating such a product:
- The fabric may be different in color, pattern and texture, but it should be the same density.
- Cutting and stitching the details is necessary only by the share. It is easy to identify. The fabric along the shared, main thread, practically does not stretch. Therefore, if you combine the lobar with the transverse, then the product will be deformed.
- It is necessary to stitch together well-ironed patches on the modules, then assemble the modules into ribbons, which are then connected to the finished product.
- For the convenience of cutting, it is necessary to make templates of parts on thick cardboard.
- Each patch should have seam allowances on all sides.
- The distance from the edge must be done the same, so that the modules are the same, and the pattern was corner to corner.
There are a lot of types of patchwork patterns; they can be found in magazines, invented by yourself, or use ones like in the photo below.
Bonbon Bedspread
These bedspreads are distinguished by their special volume and airiness. They look great on both children's and adult beds. Bonbon technique is a kind of patchwork. Sewing the bedspread with your own hands, as in the photo below, is not very simple, but certainly interesting.
To create such a bedspread, you will need fabric - the base, the fabric on the upper vesicles, about 2-4 times more than the main fabric, threads and filler: synthetic winterizer or holofiber.
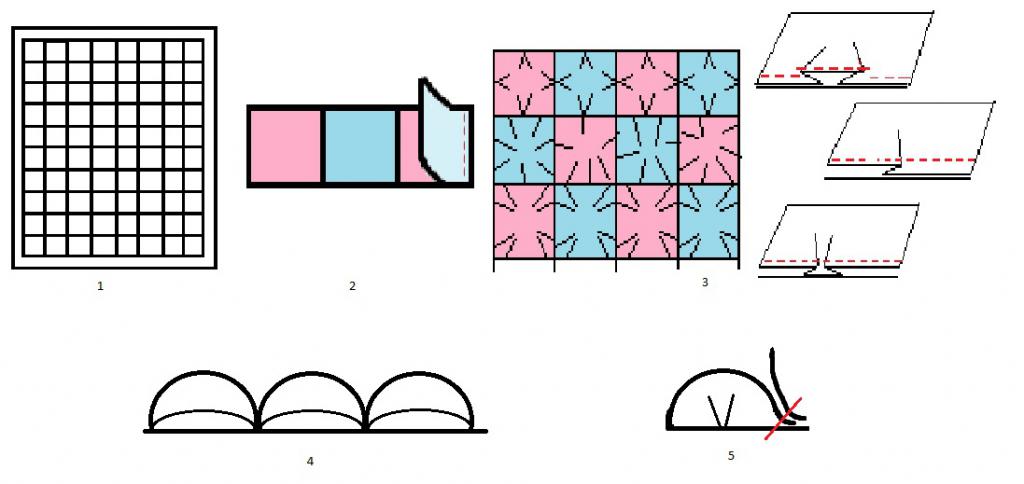
- Before cutting, you need to determine the amount of fabric. To do this, you need square fabric cuts 13 * 13 cm and 20 * 20. On a smaller square, mark 10 * 10 in the center. Now, along the marking line, sew on the three sides of the larger square, forming folds. They can be arbitrary, go from the center or from the edges (No. 3 in the figure). Fill the resulting pocket with a padding polyester. It turned out 1 bubble. At this stage, the upper square can either be increased or decreased, depending on the desire. When the optimal volume of the bubble is selected, you can proceed with the calculation. The area of the future bedspread is divided by 100 (the area of the square is 10 * 10). The resulting number is the number of bubbles on the bedspread. Already starting from this, calculate the size of the fabric.
- Prepare material, iron, cut. If more than one fabric color will be used, then prepare a color scheme on a piece of paper. Cut the base fabric, adding 1.5-3 cm along the edges for their processing, and draw into 10x10 squares (1).
- Sew the squares of the upper fabric into strips (2). Iron the seams in different directions so that there are no extra layers of fabric.
- Now you need to sew the tape to the base. To do this, lay the base with the wrong side up. Put the tape face down on it so that the upper marking line is 1-1.5 cm higher from the lower edge of the tape. Using safety pins to form the folds of each square. It is necessary to ensure that the seam of the connection of the squares coincides with the transverse marking.
Important! Since this strip will be turned over, it is necessary to carefully monitor the folds. If folds were selected from the center, then on the wrong side they should be, on the contrary, from the corners.
Sew a strip of squares to the base, lower the tape with the wrong side to the wrong side of the base. Her edge turned out to be hidden. If any other treatment of the edge of the bedspread is not implied, then it can also be hidden inside. To do this, at the first stage, the front side of the strip of squares is combined with the front base, stitched, twisted, ironed to avoid edge displacement.
Next, you need to flash the sides of each square. To do this, the extreme edges are tucked inward, folds are formed with English pins, stitched on a typewriter.
Important! It is necessary to carefully connect the seam between the squares with the marking line and flash it. Try to ensure that the line does not run into a single square.
In the resulting pockets (4) put the insulation, with pins to form folds and attach to the base. Do not bend the edge inward.
The next row is sewn, like the previous one, only this time the first seam should coincide with the last one on the finished row (5).
The last row is sewn in the reverse order - first the lower edge, then the side parts. We fill the cover with a synthetic winterizer, then, bending the edge and forming folds, we make a connecting seam. It will sink between the bubbles and will not be visible.
At the end of the work, you need to remove the excess thread, if necessary, to process the edge. To do this, you can use a slanting trim, a double lapel, ruffles or make a third layer of fabric to hide the seams on the bottom of the bedspread.
A do-it-yourself bedspread can be a great gift for any occasion.
Ruffle bedspread
Such bedspreads are suitable for the room of a little princess. Ruffles can only be sewn along the edge in several layers, leaving the central part of the bedspread smooth, or take small ones, from 5 to 15 cm, and sew over the entire surface. They can be sewn parallel to the edges or diagonally. Presented on the photo above, a self-sewn bedspread on the bed is filled with ruffles all over the square. But you can decorate and only part of the product.
In order to sew a bedspread using ruffles with your own hands, you need 1 or 2 cuts of fabric for the base (depending on whether it will be single or multi-layered), as well as fabric for ruffles. You can calculate the same way as in the manufacture of bonbon blankets, that is, by an experimental method. To do this, you need to determine where the ruffles will be, whether they will be two-sided (the seam will be in the center of the strip) or one-sided (the seam from the edge), how long and how lush. It is better to make a ruffle arrangement on paper. It is not necessary to take the full width for the sample; calculations are usually performed on a small segment. After the consumption of fabric is determined, you can start sewing.
- On the base fabric, mark the location of the ruffle.
- Overlay the ribbons on both sides, to obtain the required length, you can sew several strips, at a distance of 1 cm from the edge or sew in the center of the strip with the widest stitches. On one side, tie the threads, on the other hand, begin to gently pull, forming waves. The length of each ruffle should correspond to its position on the diagram. Distribute folds evenly.
- Sew the blank to the base by applying the seamy side of the tape to the front of the base.
- To process edges of the basis or to connect with the second layer of fabric.
- Decorate with decor.
Knitted bedspread
Another type of very beautiful and cozy bedroom decor item is a knitted bedspread. With your own hands, you can do it with the help of knitting needles or a hook. They can be solid (a single fabric looks very beautiful with knitting needles, but knitting such a cover by hand is very inconvenient) or modular (it looks like a patchwork technique; knitting is quite convenient, both on knitting needles and crocheting). A knitted bedspread will fill the room with warmth and love.
Cover of unnecessary things
A do-it-yourself blanket on the bed in such an original style will give a second life to unnecessary things. Usually they use old knitted T-shirts and dresses, cutting them into ribbons, from which they then weave the fabric.
For the manufacture of the above photo, bedspreads on the bed with their own hands used whole children's clothing.
Bedspread with applique
The bedspread with applique has a special charm. It can be children's, plant or any other. To make a beautiful bedspread with your own hands on the bed, you must first sew decorative elements on the top layer, and only then combine the resulting canvas with the bottom layer of the bedspread.
Pompom bedspread
From yarn you can make not only a knitted product, but also an incredibly tender and fluffy of pompons. It is ideal for cots. A master with great experience can make such a bedspread on the bed with his own hands in just a few hours. Beginners will need 2-3 days.
For the manufacture of bedspreads you will need
- wooden frame of the size of the future product,
- nails
- yarn,
- scissors.
It is necessary to drive nails into a frame of wood. The distance between them should be 4-4.5 cm above the frame should remain 5 cm of nail (1).
- Tie a thread to the extreme nail. Then, as shown in the diagram, first make horizontal rows (2), and then vertical (3). For the base of the plaid, you need to do 15-20 repetitions (30-40 threads at the intersection), and another 30-35 repetitions for pompons (60-70 at the intersection). It is better for beginners to take warp threads and pompons of different colors, this will make it possible to significantly simplify the work in the future. The result was a fairly voluminous grid (4).
- Each intersection must be tightly bandaged crosswise so that the hairs of future pompons do not spill out (5). It is very important not to miss a single intersection. It is better to take the threads of the base color so that they are not noticeable on the finished product, and the knots are made on the top layer of the bedspread.
- Now you need to cut in half the threads for pompons around each intersection (6). Already at this moment, the bedspread takes on an almost finished look (7).
- After all the pompons are cut, it is necessary to remove the finished product from the frame. To do this, carefully cut in half all the threads in half between the cloves and immediately fasten. This can be done with a double knot or thread, forming a brush.
There are a lot of types of bedspreads, they can be of different shapes, structures, colors, but they are united by one. We knit them, weave or sew them, the bedspread in any case will bring comfort and warmth to the room, because it was made with love.