You have nowhere to plant flowers? Perhaps you want to give your friends a beautiful element of decor? Then you will be interested to learn how to make vases with your own hands. For the manufacture of decorative products, you can use improvised material. Look for ideas and workshops below.
Glass painting
With your own hands, you can make a vase from a glass. This idea is suitable for those who have nowhere to put small bouquets. Sometimes fans bring girls non-standard floral arrangements that cannot be put in a regular vase. For this case, you can independently make a beautiful decorative item. Take any glass cup and degrease it. Now draw a sketch on a piece of paper. It is advisable to depict a floral and floral motif or abstraction. Such forms will be conveniently transferred to glass. If you move away from the sketch a little, it will not be very noticeable. Use a pencil for glass to transfer the linear pattern. Now circle it with special contours. Fill the space between the convex lines with special stained glass paints on the glass. Acrylic is also allowed to be used, but it will be worse to stay on a smooth surface, especially when you consider that the vase will often come into contact with water. After the product is ready, cover it with varnish and dry well.
Vase from the branches
As a basis for such a product, you need to take something plastic or glass. For this purpose, a glass glass or any jar or bottle with a cut-off neck is suitable. Do-it-yourself vase will be made from small twigs. You need to collect the necessary material and dry it well. After that, you can begin to work. Secateurs cut branches into equal parts. Now take a hot gun and glue the branches to the base layer by layer. You need to arrange the wooden elements in a chaotic manner so that large gaps are formed between the parts. Glue the second row on the first, reducing the gaps between the elements. At this stage, the work needs to be completed. Try to keep within two layers, otherwise the vase will turn out to be too bulky. If you wish, you can paint the resulting product or coat the branches with varnish for wood.
Spoon vase
Such a decorative product is made in just an hour. Do-it-yourself step-by-step vase master class is attached above. How is the manufacturing process going? Take disposable spoons and cut off their handle. Now paint the blanks from the spray can. It is advisable to use the color of metallic, that is, gold or metallic. While the workpieces are drying, you need to find a suitable base. It can be a glass jar or any plastic container. When the blanks are dry, you can begin to make a plastic vase with your own hands. Starting from below, row by row, glue the upper parts of the spoons. When one row is completed, go above. Now the blanks are attached in a checkerboard pattern, relative to the first row. Under this scheme, you need to continue working until you close the base.
There are various options for creating this vase. You can not paint all the spoons, but only half of them. Then your vase will be white and gold. Or you can give each blank its own color. Such a decorative product will become a bright accent in any interior.
Mini vase
Want to quickly create something beautiful? How to make a vase with your own hands in 10 minutes? Take a blown bulb and unscrew the base from it. Now cut off the upper part from the metal tip. Glue the base into place. Take the wire and thread it through the holes that will need to be pre-made in the metal top of the bulb. Twist the two ends of the wire together and hide them in one of the holes. The vase is ready. In it you can put flowers on short legs or small floral arrangements. Such vases in the interior look beautiful when they are hung on the walls or window. You can create a whole garland in this way, which will not only decorate the room, but also fill it with the fragrant aroma of flowers.
Bottle vase
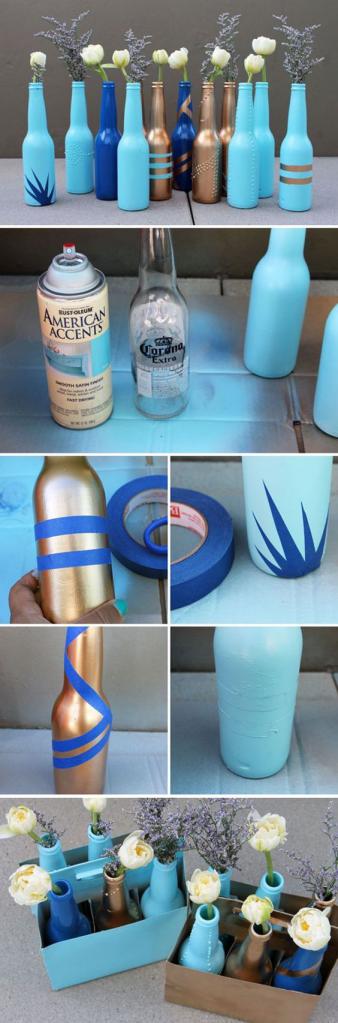
Want to decorate your interior with something unusual? Then create a vase from a bottle with your own hands. Decorative crafts can be used for their intended purpose, but it will fit no more than one flower. So if you want to place a whole bunch in a bottle, take a wide-necked container. When the container is selected, you can proceed to its decor. Remove all labels from the bottle and degrease the glass. Now take a spray can of paint or acrylic and a brush. Cover the glass with a thin layer. After the bottle dries, you will need electrical tape. With it, you need to create stripes, stars, circles on the bottle. Show your imagination. You can create a pattern with adhesive tape, but keep in mind that it will be much worse to restrain the second layer of paint than duct tape. When the work on creating a protective layer is completed, you can start painting. As the top layer, it is best to use metallic colors. Such vases will look good in any interior. When the product is completely dry, remove the electrical tape and cover the bottle with a layer of varnish.
Thread vase
To create such a product, a ball of thread and a balloon are required. To some, the technique may seem familiar. Similarly, needlewomen often create shades. To make a vase, pick up threads of the color that will complement your interior well. Take a bottle of PVA glue and pierce it with a needle. Pull the thread of your choice through the openings and wind it in a chaotic manner on a large balloon. You can use a gym equipment if you need a very large vase. Now set the resulting "tangle" to dry. After a day, you will need to pierce the ball or gently blow it out. The resulting vase can be left in this form, or can be decorated with beads, rhinestones or threads of a different color.
Papier mache vase
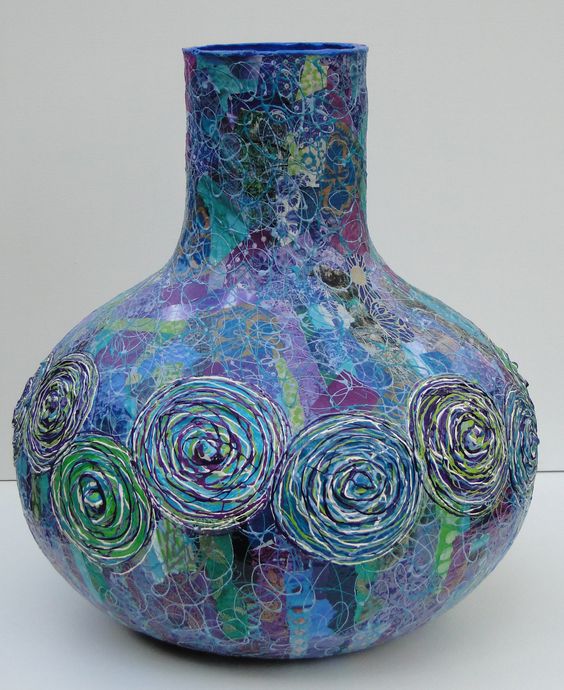
An interesting outdoor vase with your own hands can be made of paper. Papier-mâché technique is great for making large decorative items. As a basis, you can use your existing vase, or you can create a mold from improvised materials. For example, stack a plastic jar, an inflated balloon and a small container of sour cream on top of each other. When the form is ready, you can proceed to gluing it. To do this, you will need to pre-cut, but rather tear the newspaper into small pieces. Fill the paper with water and add some flour there. Stir the pulp and let it stand for at least two to three hours. Put paper paste on the form you need in layers. If you use a ready-made vase as a base, grease it with a fat hand cream. When the first layer of paper is applied, fix it with glue and leave to dry for a day. Then apply a second layer of paper and dry again. If you made the layers thin, then you can apply the newspaper pulp again. When the product dries, cut it in half and remove the mold. Glue the two halves of the paper vase with glue. It remains to apply a primer on the paper, and then paint the product. If necessary, you can make a bas-relief on a vase from the remnants of paper pulp.
Cardboard vase
An unusual version of a decorative product is shown in the photo. Do-it-yourself vase is made of cardboard. Such a decorative product will definitely not go unnoticed. How to create a vase? You need to take a cardboard box and cut it into thin strips. The cardboard should be air-laid in the middle. The resulting strips must be divided into identical parts. Using a hot gun or using PVA glue, we make the basis. Four cardboard blanks are glued together with a square. The second layer is glued to the base. We do it with a slight offset, that is, relative to the first row. Then we glue the third layer and again we shift it. We continue to repeat this operation until the product height is acceptable. The finished product can be painted from a spray can, decorated with various accessories.
Floor vase
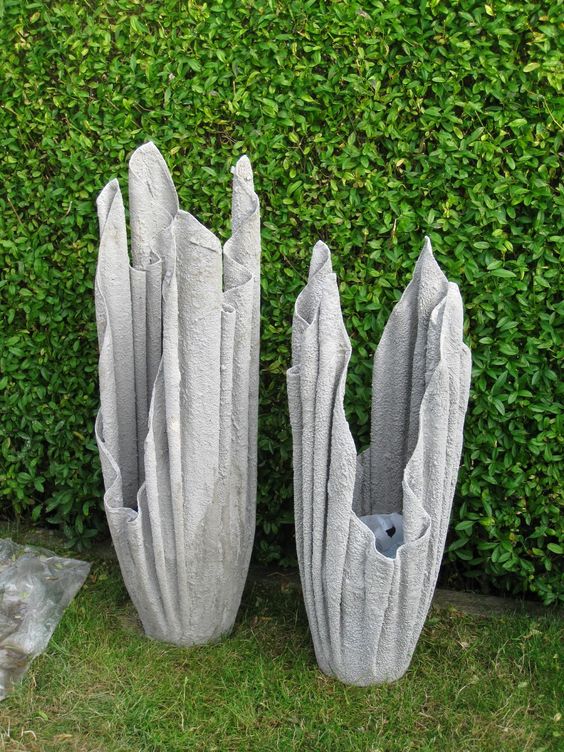
If a person has a fantasy, he always has energy and a desire to make a vase with his own hands at home. To do this, you need a large piece of fabric and a bowl of cement. Find unnecessary material and determine the size of your product. Find a suitable shape, for example, a bucket or a narrow pipe. Dilute the concrete with water and dip the fabric there. Saturate the material well with a gray substance. Now take out the fabric and squeeze it a little. You are not faced with the task of completely removing cement from the material. You just need to remove the excess solution. Then you should hang the material on a pre-prepared form. After a day, you can remove the resulting vase. If you made a product for the home, and not for the garden, then you need to process it a little with sandpaper. A primer can help you align your shape. If necessary and desired, you can paint the product in any color. For this purpose, use not only acrylic or spray paint, but also ordinary paint for construction work. Do-it-yourself vase is ready. In this way, you can create new and unique products every time.