Origami came to us from Japan. This is a way to fold paper nicely to make different objects. Engage your children and friends in this fun activity. We offer you to learn how to make an origami fox.
Muzzle assembly diagram
Little children will be very interested to learn how origami fox is made. So that the lesson does not turn into flour, start with simple schemes.
Instructions on how to make a fox face:
- Take a two-color square sheet of paper: it should be white on one side and orange on the other. If not, connect the two sheets together.
- Fold the sheet diagonally with the white side inward (Figure 1).
- Fold the top together (Figure 2).
- Bend both sides of the figure and turn it over (illustrations 3 and 4).
- Draw the elements of the face with a marker or pen.
The muzzle is ready!
We collect the whole origami fox
To get such an origami fox, you need to use not a square sheet of paper, but a regular rectangular one.
The assembly diagram is as follows:
- Fold the left corner of the sheet diagonally (Figure 1).
- Expand the sheet and bend the right side (Figure 2).
- Fold the leaf in half in length (Figure 3).
- Wrap the paper as shown in illustration 4.
- Fold in half on the bottom of the part (Figure 5).
- Wrap the top corner (Figure 6).
- Fold the bottom along the fold line (Figure 7).
- Turn the part over (Figure 8).
- Spread the edges of the lower part of the figure (Figure 9).
- Spread the top and “tail” in different directions (Figure 10).
- Fold as shown in Figure 11.
- Gently spread the figure along the formed fold lines (Figure 12).
Origami fox is ready! If desired, you can draw a muzzle with a marker or pen.
The second version of the origami fox
If you take a square leaf, you can get another model of the chanterelle :
- Fold the sheet diagonally (Figure 1).
- Expand it and fold it again diagonally, only to the other side (Figure 2).
- Wrap the left and right sides of the resulting triangle (Figure 3).
- Fold the resulting shape in half (Figure 4).
- Wrap the right side of the upper triangle, as in picture 5.
- Spread the figure along the fold lines and turn the part over (Figure 6).
- Bend the ponytail on the left and draw a muzzle (illustrations 7 and 8).
Origami fox from paper is ready!
Putting a fox on four legs
Master class on how to make an origami fox (assembly diagram is attached):
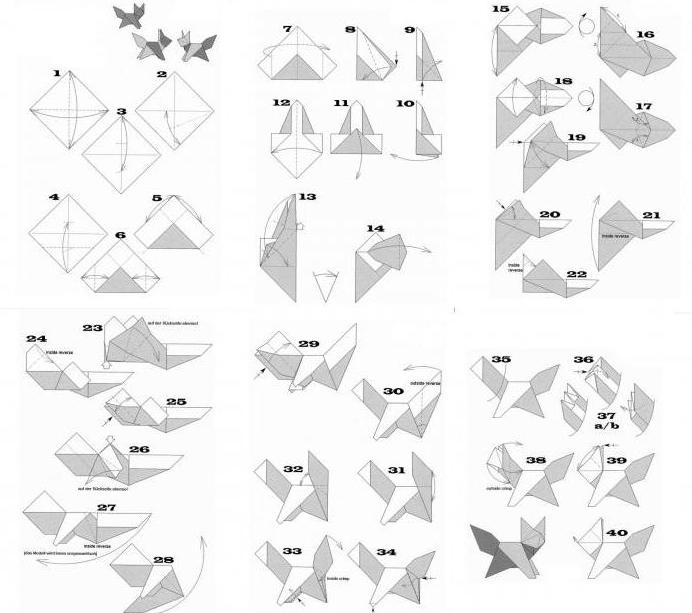
- Take a square leaf and draw fold lines on it, as shown in pictures 1, 2 and 3.
- Fold the bottom corner to the marked point (picture 4).
- Make bends as in pictures 5 and 6.
- Fold the shape in half (Figure 7).
- Unscrew the edges of the figure (picture 8).
- Roll up the part again (Figure 9).
- Flatten the sheet, but not to the end (pictures 10-12).
- Gently fold the figure along the marked fold lines (Figure 13).
- The upper part must be bent (picture 14).
- Turn the figure over (picture 15).
- Make some fold lines, as in picture 16.
- Unscrew the marked parts (Figure 17).
- Turn the part over and fold it in half (Figure 18).
- Make the fold lines by bending the “wings” of the figure (Figure 19).
- Fold the part as shown in pictures 20, 21 and 22.
- Spread the figure slightly so that it can be folded, as in pictures 23 and 24.
- Make a few folds on the left side of the part (picture 25).
- Straighten the left side of the figure (pictures 26 and 27).
- Scroll the part (picture 28).
- Now your fox figure has begun to take shape.
- Divide the left part in half and bend it (Figure 29).
- Bend the right side to the left (picture 30).
- Align the right side with the points marked in the pictures 31 and 32.
- Fold and tuck the inside of the future paw (picture 33).
- Fold the right part over the folds and bend the bottom corner of the “paw” (picture 34).
- Make the left part of the part, as shown in pictures 35, 36, 37 and 28. It should be folded so that a three-dimensional figure is obtained.
- Shape the head of the fox (Figure 39).
- Give volume to the whole body (picture 40).
Volumetric origami fox is ready!