In winter, often in schools and kindergartens give the task of making a snowman. It can be a simple ink painting, applique made of paper or other material. Students are given a more difficult task: to make a snowman with their own hands from improvised material. You can use threads and paper, and plastic dishes, sponges, covers and other material.
Here, certain skills are already needed - the ability to use scissors and a stapler, to make three-dimensional figures from threads with the help of a needle or balloons. In the article, we consider a large number of options for making a snowman with your own hands by different techniques. Detailed instructions will help you do this job yourself. The submitted works are arranged as they become more complicated. First, options for crafts for preschool children are given, then snowmen, which schoolchildren can make, at the end the most complex crafts for adults will be placed. We will also tell you how to sew a snowman costume with your own hands for a child in a kindergarten on a New Year's party.
Sponge snowman
For such a craft, you need three soft cotton sponges in white, several sheets of felt: black for a hat, orange for a carrot nose, raspberry for a scarf. If the broom is designed for a snowman, then you still need to take the green or brown colors. In this work, you will need scissors and PVA glue, a blue cardboard sheet and a glue brush.
detailed instructions
Work begins with gluing sponges. The back side is well smeared with PVA glue and placed in the center of the sheet in one vertical line, one above the other. Then, small details of the picture are cut from sheets of felt. You can give the child stencils from cardboard, then the preschooler will be able to circle them along the contour and correctly cut out the elements. A rectangular cylinder hat is cut from black felt. From orange color you need to create a carrot shape. This is a sharp thin triangle. The scarf has two ends and a flat neckband.
If a snowman, made with his own hands, is depicted with a broom, then a thin stick is cut out of a black felt sheet - this is the broomstick shaft. Then from a brown sheet - a triangle with notched stripes at the base. Twigs on a broomstick can also be made green, as if they were cut from a Christmas tree. So the work will turn out brighter and more interesting.
Craft from disposable plastic plates
Such a snowman, made with his own hands, turns out to be voluminous. Children love to work with non-standard types of materials. Will be needed for work:
- two plastic plates of different diameters;
- colored paper in red, orange, black and blue;
- fluffy yarn;
- PVA glue;
- glue brush;
- gouache helmets;
- paint brush;
- a glass of water;
- a sheet of cardboard of any dark color.
Explanations for work
First, work with plastic plates. Since their middle has a void, they are smeared with glue only along the rim. A large plate is placed below, a smaller diameter above it.
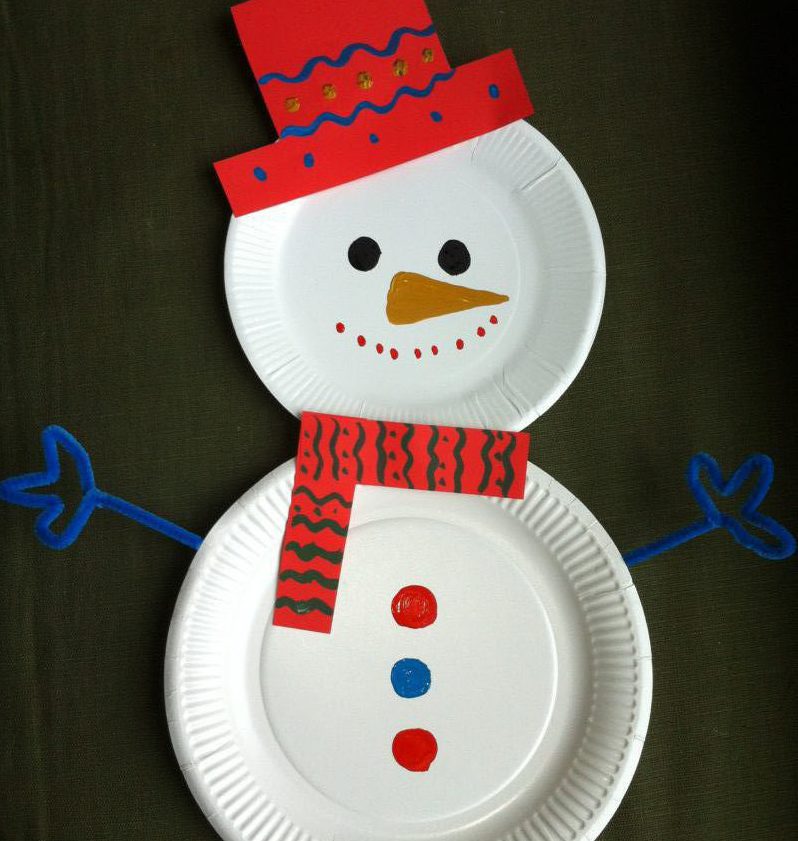
Then work on the snowman with his own hands continues with paper. If the children still do not know how to draw an even circle, you can offer them a template. Circle it with a simple pencil on the back of colored paper, cut out circles of the same size with even edges. The buttons are glued to the snowman on the lower plate in the center, alternating colors. From the cut out black circles the eyes are made to the character. Next, you need to cut a sharp triangle for a carrot nose. All children can do this on their own. When the small details of the head are ready, cut out the hat and scarf from red colored paper. It is better to draw a pattern on clothes before gluing, because on a convex surface it is inconvenient to draw, you get a curved image. When the paint has dried, you can turn the parts over and apply PVA glue on the back. These elements need to be glued carefully, as they are placed on a convex surface.
It remains to make a snowman out of fluffy terry or velvet threads. To do this, draw the contours of the fingers with a pencil and an even line of the hands. Then, PVA glue is smeared along the line and the thread is carefully laid out on top. It is better to make the mouth points from plasticine by rolling up small balls and gently crushing them with your hand.
We make Christmas toys
On a sheet of cardboard, such small snowmen do it yourself on New Year’s Day from materials such as:
- caps from glass bottles, turned upside down (can also be made from caps from plastic bottles, only white);
- a small piece of satin ribbon for scarf and eyelet;
- PVA glue;
- plasticine;
- glue brush;
- button bright color.
Still need a thread with a needle.
Step by Step Description
First, pieces of tape are cut off and bent by a loop. Glue it, smearing only the lower part. The front side of the covers is coated with glue and attached to the cardboard in a vertical line. The top cover is applied over the eyelet so that its ends are not visible.
Then, small parts are made from small pieces of plasticine. It is necessary to try so that the eyes and the holes of the buttons are the same size, then the handmade snowman crafts will look neat.
Lastly, a scarf is attached. It can be made from a piece of satin ribbons, or you can use knitting threads. If the child is of school age, then it is quite capable of independently sewing a button on the tape, and from the threads you can weave a pigtail, then the scarf will be thicker.
Snowman sock
If you do not know how to make a snowman with your own hands, then we can advise the following version of the craft. Here you need sewing skills. A white sock is taken as the basis of the snowman. The bottom with the heel is cut off immediately. From it we will subsequently sew a hat. The work is carried out with a flat part of the sock. The bottom is sewn up with threads.
As a filler, you can use cotton wool or synthetic winterizer. First, the entire even part of the sock is packed tightly, then the top of the fabric is tied to a knot. To do this, you can simply wrap the end several times with a strong thread or a thin rope and tie a knot, tightening the fabric of the sock. He will not be visible under the cap.
Then the sock is pulled by the same rope, not just in the middle, but closer to the top. The head should be smaller. The synthetic winterizer is leveled at the same time hands. The knot on the rope is hidden under a thin flap of colored fabric - a scarf.
Eyes and nose can be made of black beads in black and orange. Then two bright buttons of different sizes are sewn onto the snowman’s stomach.
From the previously cut part of the sock, the area where the fingers were placed is cut out. It resembles a hat in shape, so that special efforts and sewing are not required, only the edges when putting on a snowman's head need to be rolled inside, then the threads will not be visible.
If you want a do-it-yourself snowman (photo above) to stand firmly on the surface and not fall sideways, you need to weight the bottom of a large ball. To do this, you can pour a little salt or sand before filling the sock with a synthetic winterizer. The hat can be decorated with a ribbon bow.
Paper snowman
With your own hands, you can make a volumetric snowman by folding in half a large number of circles. The circles are cut according to the pattern and have three different sizes. For the head - the smallest, for the middle part - more, for the lower ball - the largest circle. Hands can be made of thin twigs, and the rest of the details of felt in different colors. Much work remains to be done in folding circles in half. Finger folds are ironed clearly. Then the circles are glued in size to the back side in semicircles. The more circles used for crafts, the more beautiful it turns out.
When the balls are made, they are glued together. On a medium ball, branch arms are attached. To keep them well, you can use glue with a stronger fixation, for example, transparent glue "Crystal".
A strip of felt is tied around the "neck" of the snowman. You need to act carefully so that the balls do not stick together. Then we work on creating a hat. It can be made of thick black paper, or it can be sewn of felt. To do this, a template is drawn - a large circle from which a smaller circle is cut. This will be the rim and bottom of the hat. Then think over the height of the headgear, then a rectangle is cut out of the fabric, whose width is the height of the hat, and the length is the size of the perimeter of the inner circle of the rim. Then all the parts are sewn together and attached to the snowman's head for glue. There will be enough PVA glue.
Craft from pompons
For such a handmade snowman (see the step-by-step description below), you need to have white and blue yarn threads, small knitting needles, half beads for the eyes, nose and buttons on the stomach. First you need to make two pompons of different sizes from white threads.
To make it, you need to make two identical cardboard rings for a large pompom and two smaller rings for a head. A needle with a thread is inserted into the inner hole and wrapped around the template until there is room for the needle. Then, scissors cut the threads along the edge of the ringlets and bind between the cardboard with a dense thread. Then the rings are incised and removed. Between themselves pompons are sewn. The scarf is knitted with a simple rubber band 1 x 1. The cap on the head can be made of plastic thimble.
Snowman made of thread
If you have not yet chosen how to make a snowman with your own hands, then we can offer an option from threads. The craft is done very simply. Three balloons are inflated to the desired size. Then PVA glue is poured into the bowl and white threads are put there. Then they are wound around the ball in a chaotic manner and hung out to dry.
Then the ball breaks with a needle and is pulled out carefully through the hole from above. Then the balls stick together, the eyes and nose of felt are attached.
Snowman made of plastic cups
With your own hands you can make a huge snowman and put him in the hallway of the school, in a group of kindergarten, in the office and even at home instead of a Christmas tree. Making such a craft will take a lot of time, but the product is very effective. You can insert a Christmas garland into the inner empty part, then the whole snowman will glow beautifully. You need to make a snowman out of cups with your own hands using paper clips and a stapler.
How to make a craft?
Depending on the size of the crafts, the number of white plastic glasses is selected. The open part they are located outside and fastened together, forming a circle. To make the next circle, another glass is additionally taken so that the layer is larger than the previous one. This is done to increase the volume of the ball. When you need to reduce it, then, on the contrary, one cup is taken. Until the original number remains.
Then similar work is done on the second ball. All layers are bonded together, forming two balls. The upper one needs to be made smaller, because this is the head of a snowman. Balls are obtained not round, but in the form of curved bagels. This is done so that they can be placed stably on the floor and on top of each other.
A cylinder hat is put on the head, the manufacture of which is described earlier in the article (we will not repeat it), or a cap with a pompom on top.
A scarf is put on the snowman’s neck , with his own hands from the assembled plastic cups . A carrot-shaped nose is easy. You need to take orange corrugated paper and roll it with a cone of several layers. Then it is simply inserted into the glass, like the circles of buttons.
Snowman costume
To make a snowman costume for a boy with your own hands, you need: white fabric, white leggings or trousers, a brown turtleneck. For small details, you can take sheets of felt in black and orange. For a hat, it is recommended to use a cap pattern, making a nose and eyes from felt and synthetic winterizer.
The outfit itself is a cape with cutouts for the sleeves. At chest level, they pick it up with an elastic band. Also make out the bottom of the suit. The cape is cut out in the shape of a trapezoid, expanding downwards, so that the second ball turns out to be more voluminous. The entire outfit can be starched or a layer of padding polyester for volume.
The article presents interesting crafts in the form of a snowman. Engage with children for your own pleasure. It’s easy to create beautiful pictures and voluminous figures, the main thing is to want! Good luck