A doll made by mom’s hands - what could be the best gift for a little girl? And even if you have never previously sewed such toys yourself, this does not mean that you will not succeed. Desire and diligence are the main components of the success of this business. And the information presented in this article will become an assistant in your work. It offers workshops on making such a toy as a textile doll. Having studied them, you will understand that it is not at all difficult to make such a gift for your daughter with your own hands. From the most accessible materials, we learn to create cute dolls.
Soft baby doll. Preparatory stage for the manufacture of toys
The version of the doll presented in the master class is very simple to manufacture. We prepare the following materials for work:
- light-colored cotton fabric (for the body);
- any colored fabric (for clothing);
- yarn for knitting;
- synthetic winterizer or other filler (cotton wool, holofiber, small trimmings of thread or fabric);
- sewing supplies ;
- tape
- scissors;
- a piece of chalk;
- pattern.
The stage of manufacturing parts of soft baby doll
Where should you start making crafts such as textile dolls? Patterns - it is with them that we begin the creative process. An example of a simple template for sewing soft dolls is presented to your attention in the photo. But you can use any other pattern, redrawn from somewhere or created by you yourself. Initially, the pattern is done on paper. Then cut it and transfer it to the fabric. Fasten the patterns to the textiles with pins, draw a pencil or chalk around it. Cut out the patterns by stepping back from the lines about 1 centimeter to the side. The textile doll according to this description is sewn from so many details:
- head - 2 pcs.;
- body - 2 pcs.;
- pens - 4 pcs.
Sewing a soft baby doll with your own hands
You can connect the details of the craft on a sewing machine with a regular stitch or manually with small stitches. You need to lay them along the lines outlined in pencil or chalk when transferring the pattern. First, design two halves of the head of the pupa. Leave a small hole at the top of the workpiece (where hair is supposed). Next, connect the parts of the body. Leave a hole in this blank on one side, where the arm will be attached. Through these holes, the textile doll will be filled with padding polyester. Sew the handles completely, and then make holes in the upper part of these parts.
We sew baby dolls from fabric: collecting parts
We continue to create textile dolls with our own hands. The next stage in the work is filling the doll with soft material. Cram the sintepon (or other filler of your choice) into small pieces through the holes left in the parts. Make sure that it fills the entire interior of the pupa evenly. If the arms and legs of the baby doll are narrow, then you can stick out the filler with a pencil or scissors. To keep the toy in good shape, do not spare the padding polyester, lay it tightly. Particularly tightly fill the neck area, otherwise the doll's head will hang from side to side. Next, sew all the holes. Attach the handles to the body.
Making head details
Homemade textile dolls (photo of which is confirmed), as a rule, have painted facial features. On the fabric they can be decorated with acrylic paints for decorative work or with special waterproof markers. You can also embroider a little face with thread floss, to simulate the eyes use buttons or beads. When this part of the head is formed, start making hair. Cut the yarn into pieces of about 10 centimeters. This will make a wig with medium length hair. If you want to make a doll with a scythe, then the lengths of thread should be larger. Fold the yarn in a bun, in the middle, tie it with the same thread. On the head of the baby doll, mark the top center point. In this place and attach the wig by sewing it on or gluing it with fabric glue. You can perform several of these bundles, placing them on the occipital area of the head of the baby doll, then the hair will get thicker. Next, sew the head to the body.
Textile doll: master class. Sewing Stage
How to dress up a soft baby doll? If this is a female toy, then the easiest way is to sew a dress for her. To do this, take a rectangular flap of fabric and fold it four times. Cut the corner resulting from this action. Expand the workpiece. Here is a rectangle with a hole in the center. The doll’s head should go through this hole, if not, cut it again. Now overcast this neckline. On the sides, make connecting seams on both sides of the product, leaving openings for the hands. Chop the bottom edge. From the tape, complete the belt. The dress is ready. Put it on the toy, tie it around with a belt. Textile doll (girl) is ready.
If the baby doll is male, then according to the principle of manufacturing the dress, sew him a shirt, taking a rectangular flap of shorter length. From another such cut of fabric, make pants for him. Fold the flap in half and sew the connecting seam. Next, cut the workpiece in the middle, forming legs. Sew these parts together. Tuck the top edge of the product. Sew it so that you can stretch the elastic inside. Overcast the bottom edge of the pants. Put clothes on baby doll.
Here are described the most elementary ways of sewing outfits for soft dolls. They can be decorated with embroidery, beads, braid, beads and other decorative elements. Also, clothes can be knitted or crocheted.
Handmade fabric doll - quick, easy, affordable
This toy model can be performed with children. The work is simple and very interesting. You will need an empty plastic bottle (0.5 l), socks, a filler, sewing accessories, an elastic band for hair, two beads.
Insert an empty bottle into the sock. Pull the fabric so that the heel is above the neck of the container. Drag the sock with a rubber band, securing it to the neck. Next, put the filler in it (just in the heel), forming the head. Fill it tight so that the workpiece holds its shape. You can use a small ball to make a head. Re-attach the toe to the top of the heel. You got a torso and a head. Cut and sew the toe cuffs on one side. Twist the part and put it on the toy, forming a hat. Sew the bead eyes, embroider the mouth and nose. The textile doll-primitive is ready.
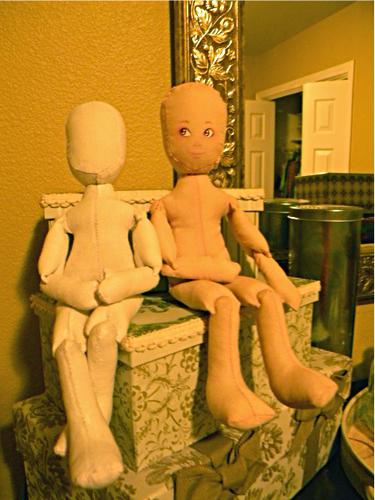
Hinge dolls are wonderful toys!
A real piece of jewelry can be called such a craft as a textile articulated doll. To complete it will require a lot of time, patience, diligence and certain skills in the implementation of seams and fastenings. But the advantage of just such models of dolls is that their heads, body, and arms and legs are bent. Such a chrysalis can be planted, set, bent forward or backward. Hinged parts are fastened in several ways. The simplest of them is the button method of connecting the elements, the so-called "constriction". A doll decorated in this way, you can see in the photo. More complex is the method of attaching blanks using beads or soft balls. But its advantage over the button connection of elements is that the parts can not only bend, but also rotate around its axis.
In addition to the fact that in the hinged dolls there is a special fastening of parts, a frame is inserted inside them. It is made of wire. It is twisted, giving the form of the necessary elements: arms, legs, or just the whole skeleton. A framework is inserted into the stitched textile blanks, a filler is stuffed around it. And after that they perform the articulation of the parts. The work is quite troublesome, but the result is worth it. Experienced craftsmen have already learned how to create such textile "joints" that are very believable, that is, their body parts are close to the natural forms of man.
Whatever toy you sew, it will be called a “textile author's doll” because you created it with your own hands. And no matter what master class you use, the craft will still turn out exclusive, unique and only yours. Create with pleasure!