DIY crafts made from various materials are a simple and inexpensive way to realize yourself creatively and usefully spend time. This is important for mothers who want to establish or improve their relationship with children. Indeed, joint creativity is very close, and beloved daughters and sons develop creative thinking, fine motor skills and the habit of working, and this is so important in education. You can learn to knit together, sculpt from clay or plasticine, sew and embroider, do scrapbooking, quilling, carve figurines from wood and much more. One of the simplest products that can be made during a joint work with her daughter is hairpins made of rep ribbons or satin, which she can wear herself or give to friends.
Training
First you need to collect all the materials. It is also better to choose them together with your child in the store of sewing accessories or materials for creativity. To do this, take your favorite rapeseed ribbon and satin, beautiful buttons and beads, ready-made flowers. By color and pattern, it is better to choose those that can be combined together. In addition, we need a base: small metal hair clips, preferably empty. But for the future you can take empty headbands and elastic bands.
You also need to stock up for the future with glue, threads of suitable colors, put scissors and a ruler, a needle bar and a garbage box on a table covered with oilcloth for creativity. It should be remembered that from the youngest years a child needs to be accustomed to cleanliness and accuracy. To do this, give him an example and the fact that in the process of creativity all the garbage is immediately thrown into the cooked box, and not scattered on the table. The result of the work will be much more accurate if the work surface is not cluttered with foreign objects. Now we are ready for joint creativity, and how to make hair clips from ribbons, we will learn further. Let's get started!
Option one: for the triumph
This simple solution is suitable for women of all ages: from the smallest to the most mature. So, our do-it-yourself hair clip from a ribbon will be made with a large flower, bought in a store for creativity. To begin with, we will make the basis that we will use in other products. To do this, we take a simple small crocodile hairpin and a rep ribbon that is suitable for the width, open the “teeth” with one hand and begin to glue the ribbon first from the inside, and then from the two outer ones, as indicated in the picture. The glue should not be spared, but you don’t need to fill the entire space with it, otherwise the material will be impregnated and become too stiff, and you will get tired. We erase excesses with an unnecessary rag or a piece of newspaper. Leave to dry.
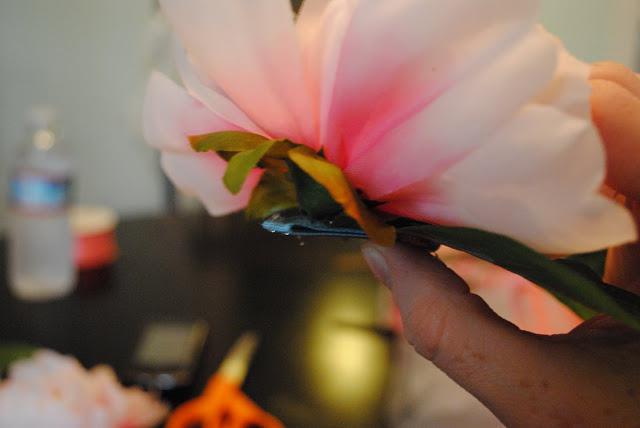
During this time, you need to pick up an artificial leaf and a flower to each other. They should match in size and look natural. Now we just have to stick them to the previously made base, and our simple, but elegant hairpin made of tape with our own hands is made!
Option number 2: small decorations for babies
As in the previous example, we need to make the basics with rep ribbons. It’s better to make several pieces of different colors at once so that you can pick them up to your princess’s outfits. A kanzashi hairpin made of satin ribbons will look very beautiful, while you can make a flower both small and large.
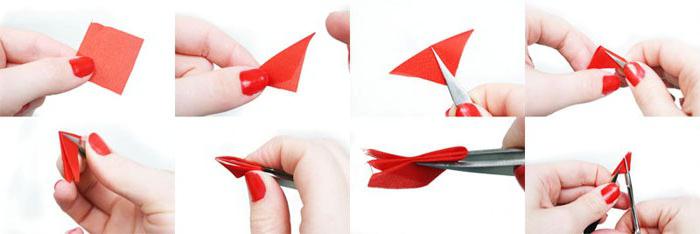
It will consist of two levels of 5 and 4 petals, and we will decorate the center with a shiny bead. So, to make a flower, we take 9 identical squares from a ribbon, we add them first diagonally, and then in half. It is better to work with tweezers, because the details are quite small. So, first we trim the corner, then the base, and singe. From the side of the corner, it is better to hem with a thin needle for strength. Now we first string 5 petals on a thread and sew them into the first level of the flower, and then 4 for the second. Our own hairpin made of ribbon with our own hands using the kanzashi technique is almost done, we just have to sew both levels to each other, decorate the center with a bead and glue the finished flower to the base. Done!
Option 3: the idea with a twist
In the previous paragraph, we made
flowers from satin ribbons using the
kanzashi technique. The hair clips of them, no doubt, are very cute, but you can make them even more interesting. For this we need wide and thin green and wide pink rep ribbons. Using the technique described earlier or simpler, we make a flower from the latter. It will consist of six simple petals with sharp edges fastened in the center. To decorate the seams, you can make a snowflake out of white beads or pick up a beautiful bead, there is already everything your imagination will do. So, the first part is ready.
Stage Two
Now we add a figure of eight from a wide green ribbon, carefully scorch the edges with a lit match and stitch it in the center, you should tighten it very slightly to make the bow larger than the flower, but not by much. In general, in the manufacture of any decorations from ribbons or fabric, you need to learn how to combine colors, patterns and sizes of blanks. To do this, you can use special schemes and tables, look for ideas in stores. So, further from a thin green rep ribbon, cut 3 short pieces, 8-10 cm long. Using scissors or a metal ruler, we make curls on them, preferably the same. This will be the highlight of our future hair clips.
Stage Three
So, we sew these curls on the bottom of the green bow, and on top we fix with the glue (since we can no longer hide the seams with the decor) pink kanzashi flower. As a result, we can only stick this charm on the base, which we will also pre-wrap with a green rep ribbon, as on curls. This must be done very carefully so as not to stain the workpieces with glue, because the decoration should look like it was bought in a store, only better. That's it, here we have learned how to make a hair clip of kanzashi ribbons with a small but very cute twist.
Option number 4: bow
The best jewelry for girls' clothing or accessories is not just ruffles, lace and flowers. A bow is a mandatory attribute, in the form of which will be our next handmade hair clip made of ribbon. It is suitable for both casual and festive attire - it will depend on the combination of colors we have chosen. For our hairpin we need three types of rep ribbons: wide white and pink and thin peas of similar shades. Both bows will be made of the first and in structure will be two crossed eights. Therefore, we make 4 segments 20 cm long, mark on each center and fold the side edges to it. Now we singe the edges, stitch in the middle and tighten. So, our bows are almost ready.
Process completion
Next, we lay on top of each other two previously prepared “eights” of identical colors and again we sew the centers with a neat seam. So that subsequently our seams were not visible, we need a short segment of a thin pink ribbon, with it we decorate the center of the hairpin at the very end. So, now we add up what happened: we put white and pink bows on each other, sew or glue (the first option is preferable, since such a product will be stronger). Now we cut two strips of 5 cm from a thin ribbon into polka dots, remove small triangles on their edges and singe them with a lighter or a match so that they do not crumble. All that remains is to assemble the product. On the double bow we put the last blank with a cross, stitch it, and wrap the center with a thin pink ribbon and tie it behind. Now we glue everything onto the finished base, and our wonderful hair clip for the girl is ready!