You can plant your favorite plants in flower pots and put them on the patio, balcony and windowsill. Instead of buying original expensive flowerpots, why not make your own by using glue and paper with a beautiful pattern for decoupage? We will now tell you how to do it right.
A master class in decoupage of flower pots with craquelure napkins
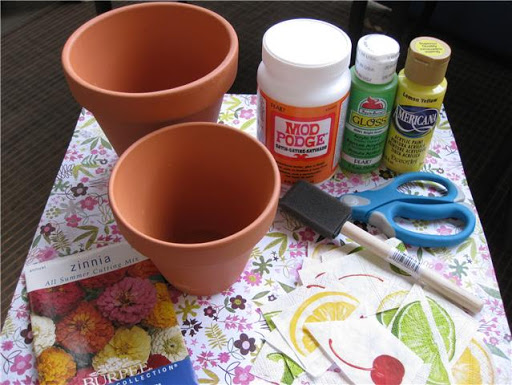
To work, you will need:
- scissors;
- acrylic paint;
- brush (sponge);
- napkins;
- alcohol or acetone;
- sandpaper;
- primer;
- cotton pad;
- brush;
- craquelure varnish;
- varnish.
Work stages
- Prepare the surface of the pot. First you need to wash it with detergents.
- Dry the container.
- Degrease the pot (you can use alcohol, acetone for this). Put the selected liquid on a cotton pad and treat the surface of the pot.
- Brush the primer.
- Let the pot dry.
- Then with a brush it is necessary to cover the surface of the flowerpot with acrylic paint.
- Let it dry.
- Now you can proceed with the decoupage.
- Prepare napkins. Remove the lower layers of white paper. Cut if using only a pattern.
- Use glue.
- Attach to a flower pot.
- Smooth so that air bubbles come out from under the napkin.
- Once you have finished gluing the entire surface, take a sponge brush and coat the entire pot with glue. One layer is good, but a couple is better. Wait 15-20 minutes between drying of the layers.
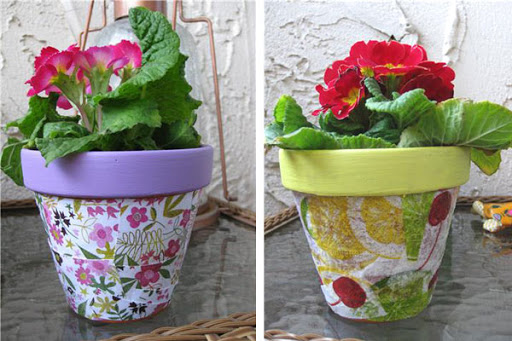
- Once the flower pot is dry, you can paint the rim of the flower pot with paint that you like. Although you can leave it as it is.
- After decoupage of the flower pot is completed and it dries, it is necessary to apply varnish. After a couple of hours, cover the pot with craquelure varnish.
- To dry it.
- Wipe the cracks with sandpaper.
- To varnish to fix and give strength to the picture on the flowerpot.
- The original flower pot is ready.
Decoupage napkins
How to make decoupage flower pots with napkins? The workshop presented below will help you. Everything is done quite simply.
For work you will need:
- a pot (preferably clay);
- brush;
- glue;
- paint (preferably acrylic);
- napkins;
- varnish;
- scissors;
- sandpaper;
- sponge.
Step by step creation
- Prepare the pot. Brush it in hot water. Do not touch until completely dry.
- The pot needs to be cleaned with sandpaper.
- Using a sponge, prime the surface of the pot with a primer.
- After drying, apply a coat of paint to the pot.
- Cut a napkin (or pattern / picture) of the required size, after removing unnecessary layers.
- Apply glue on the pot to the place where a napkin or drawing will preferably be. Gently attach to the pot.
- Align the pattern by removing air bubbles. Apply another coat of glue.
- Apply a layer of varnish on top of the pattern / picture.
Fabric decoupage
How to make decoupage of flower pots with a cloth? We will talk about this later.
For work you will need:
- fabric (it is better to choose a dense material);
- scissors;
- acrylic paint;
- brush (sponge);
- napkins;
- varnish;
- sandpaper.
Making a beautiful pot: step by step instructions
Now we will tell you how to make decoupage of flower pots (photos of finished works are presented above for clarity):
- Take the pot. You can use any size. If you plan to put the plant in a pot, then it should have a drainage hole below. It would be nice to find a saucer suitable for him. It will be necessary to work with him, so that it matches the decor of the flowerpot.
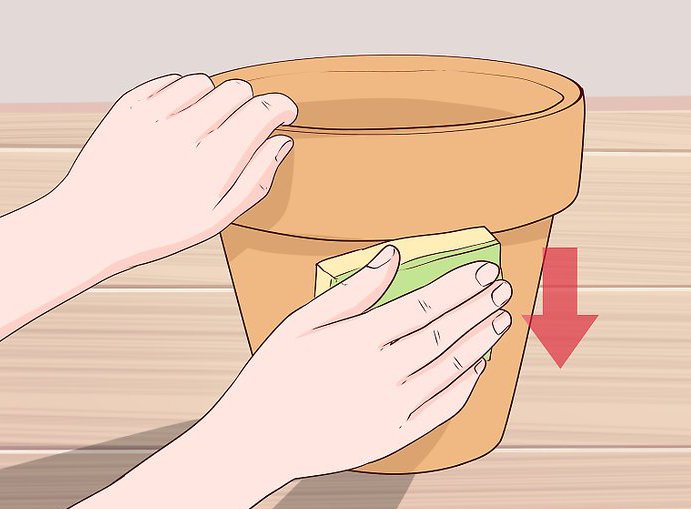
- Wipe the pot with a damp sponge. Even if you bought a brand new flowerpot, it can still be covered with dust. This can prevent paint and glue from sticking. Wipe the entire pot inside and out with a damp sponge and then dry. If it has any rough edges, sand them with sandpaper. Be sure to wipe the pot again when done.
- Using a brush, coat the outside of the pot with two to three layers of primer. Everyone should dry before applying the next. How much is required for each coat to dry depends on the type of primer used.
- After that, paint the outside of the pot with 2-3 layers of acrylic paint. Allow each to dry before applying the next. Acrylic dries quickly. Therefore, you will need to wait 15 to 20 minutes between the next staining. When you finish painting the flowerpot, it needs to dry completely.
- You can use any shade of paint in the work, but so that it matches the background of the fabric. Then the completed work will look your best.
- Choose a fabric (it is better to use cotton). Choose material with shapes that are easy to cut. For example, with birds or flowers.
- You can use any design you want, but something themed that will look beautiful on a flower pot.
- How much fabric you need depends on how big the flowerpot is and how you plan to cover it (pattern, pattern, or completely). You can cover the entire pot with a cloth. Or you can add only a few drawings.
- Before using fabric for decoupage, it must be washed and ironed in order to prevent sticking of creased material. Then the finished pot will look amazing.
- Cut out individual shapes or patterns from the fabric. For example, if there are birds on the material, cut them out.
- Apply glue to the pot. You can use a brush or brush.
- Glue the fabric (picture).
- Press on the glued fabric. Use your fingers or a clean brush to smooth the material. Start in the middle and move outward to the edges.
- Apply some glue to the image. Starting at the center of the picture. The brush will help smooth the edges and fix them.
- Continue bonding images. You can stick one picture on a flowerpot or several. You can even overlap images with each other for a collage effect. If you decide to combine the images, the main thing is that the first layer is dry.
Decoupage with pansies
Decoupage pot with a floral pattern of pansies will add bright spring colors to the home decor. How to do it right and what do you need? More on this later in the article.
For work it is necessary:
- plastic flower pot;
- brush;
- white water-based primer;
- glue;
- water-based varnish;
- pink acrylic paint;
- hair dryer;
- photos of pansy flowers;
- scissors;
- several sheets of old newspapers to protect the working area;
- old cloth.
Instruction manual
- Before making a decoupage of a flower pot with your own hands, wash the container in warm soapy water and thoroughly wipe it with an old cloth.
- Apply a thin layer of white primer over the outside of the pot with a slightly damp brush. Dry it completely with a hairdryer. In this case, be careful! Do not use the highest temperature when blow-drying, as the pot may become too hot to handle.
- Then, using the same brush, add a thin layer of pink acrylic paint over the water based primer. Dry it completely with a hairdryer.
- Add a second coat of pink acrylic paint. After thoroughly blow dry it.
- Print photos of pink flowers of pansies, at least 20 pieces.
- Cut them out. Next, decide how the flowers will be placed on the pot.
- Use a brush to brush a significant amount of glue on the back of the first picture.
- Using a brush, apply glue to the front of the picture, pressing lightly so that it sticks to the pot.
- When working from the middle and from the inside out, remove all air bubbles and wipe off excess glue from the picture using an old cloth.
- Repeat steps 7-9 with other colors. Pansies should “bloom” around the pot.
- Use a hair dryer to completely dry all drawings.
- Using a brush, apply a thin layer of glue to the images. He will protect the drawings.
- Dry the pot completely with a hairdryer.
- Repeat steps 12-13. It is necessary to apply glue in at least 6 layers. Each subsequent must be well lubricated, in horizontal and vertical directions. It should also be remembered that after each glue application, the pot must first be thoroughly dried with a hairdryer.
- Using a brush, add a layer of water-based varnish to the painted part of the pot.
- Dry it again thoroughly with a hairdryer.
You can list the possible options for decoupage of flower pots for a very long time, it all depends on taste and imagination. Create and have fun!
Conclusion
As you can see, the decoupage technique provides great opportunities for translating your ideas. Therefore, the next time you find magazines, cards or other beautiful paper at hand, try your hand. Make decoupage of flower pots, for example. Finished products will cheer up and delight more than one day. And you can show off to guests the unique design of flower pots.