For any person, a passport is the main document confirming his identity. In order for this thing to always look neat, it needs to be put on the cover. Today you can purchase a cover for a factory-made document. But if you are a creative person, if you want your passport to look not only neat, but also original, we suggest you to “dress” it in a handmade cover. Modern craftsmen have invented and tested many ways to make such products. We will consider some of them in this article. Here you will find master classes, following which you can learn how to make a passport cover from felt, as well as in scrapbooking and decoupage techniques. We study the information.
We make a cover for the document from felt fabric. Preparation of materials
From this type of textile soft and pleasant to the touch products are obtained. In work, this fabric is very malleable. It will take no more than two hours to complete a handmade passport cover from felt. For the creative process we prepare the following materials:
- felt of different colors;
- paper;
- scissors;
- pencil;
- multi-colored threads for embroidery;
- ruler.
Instructions for making a cover
If you are interested in information on how to make a passport cover with your own hands from felt, study the following description. Measure the passport unfolded. On the table, spread a sheet of felt of the color in which you want to make the cover. On it, put marks equal to the width and length of the passport and plus 0.5 centimeters on each side for allowances for seams. Cut this blank.
Next, from the same fabric (and you can also from a fabric of a different color), perform details of the inner side parts of the cover. Its length should be equal to the length of the pattern of the main part, and the width of at least 5-6 centimeters. If done already, then the passport sheets will slip out of the case. Now we attach one inner part to the main one and connect them with a floss seam using a floss stitch . In the same way, we draw up the other side of the product. If desired, this seam can be used to make all the edges of the craft, it will look beautiful and interesting. The basis of such an object as a passport cover is done with your own hands. Getting to decorating.
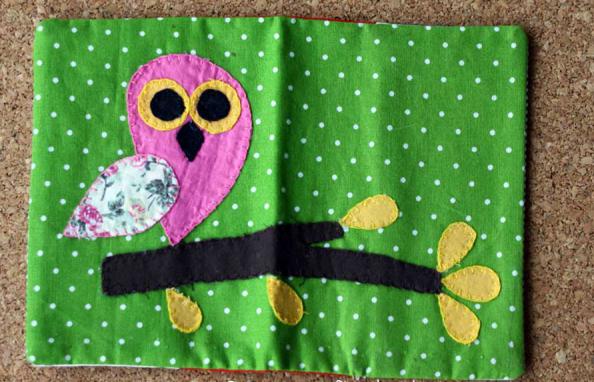
The highlight of this product will be a beautiful applique on the front side. To execute it, we depict a sketch of your desired drawing. Then we cut out the template and transfer it to felt. We carry out blanks for application. We sew them on the front side of the cover with embroidery threads. That's all, the “clothes” for your main document are made. As for applications, they can be very diverse. For inspiration you are presented in this article photos of similar products.
Making covers using scrapbooking technique. What do you need to have for this kind of creativity?
Not only original, but also very fashionable today to have handmade items made in this particular technique. Passport cover is no exception. Scrapbooking is a technique in which we will now learn how to work. We prepare for work the materials indicated in the list:
- transparent cover for a passport for factory production;
- special paper for scrapbooking of two types;
- scissors;
- PVA glue;
- pencil;
- ruler;
- decorative hole punch;
- Double-sided tape;
- artificial planar flowers;
- tape;
- printout of the word "passport".
How to make a passport cover (scrapbooking): instructions
Cut out a rectangular part from paper that matches the size of the transparent cover. Round off the edges of the workpiece. From scrapbook paper of a different color, a rectangular detail is cut out. Its dimensions should be approximately two times larger than the printed inscription "passport". The edges of this workpiece are treated with a decorative hole punch. We glue a piece of paper with the inscription on it in the center. On the front side of the main paper part we glue a decoratively decorated element with the name of the document.
In the lower right corner (or in any place you wish) we attach plane flowers. Using double-sided tape, we attach the paper cover to a transparent plastic one. Insert the document inside. Everything, the craft is ready to surprise everyone with its beauty and uniqueness.
Making passport covers in the style of decoupage. Preparation stage
Speaking of such a direction in needlework as the manufacture of covers for a passport, one cannot help but recall precisely this technology of product design. Today it is one of the most popular and fashionable. If you want to master this craft, we invite you to the next master class. But first, we will prepare everything necessary for the work, namely:
- plastic case for passport;
- decoupage napkins with the desired pattern;
- sandpaper (nulevka);
- acetone;
- white acrylic paint;
- tassels;
- acrylic lacquer.
Description of the manufacturing process of a document cover in decoupage technique
We take up the work with confidence that the cover for the passport, made with our own hands, will turn out not just beautiful, but wonderful. Getting started with creativity.
The plastic surface of the cover is lightly cleaned with sandpaper to make it rough. Next, wipe it with acetone, that is, degrease it. The next step is to apply white acrylic paint. We paint over the entire surface and leave the product to dry. Then apply another coat of paint. We try to distribute it evenly. When the passport cover, prepared with your own hands for decoupage, is completely dry, then you can start decorating it.
From a napkin we cut a blank of the same size as the cover itself. We coat the fold of the cover with acrylic varnish and 2 cm from it in each direction. Let the material dry a little. We attach a piece of the napkin to the bend exactly in the middle and iron it in different directions with the fingers. Next, we varnish another 2 cm on both sides and glue a napkin. Thus we make out the cover to the end. Smooth the paper well by driving air out from under it. It is very important to allow the varnish to dry a little after application, otherwise it will wet the napkin very much, and it may become sour and crumple into wrinkles.
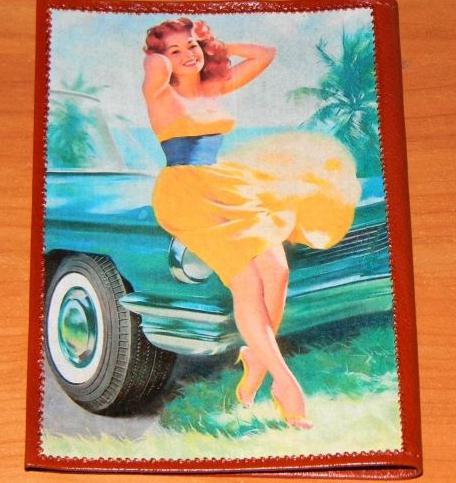
When the entire surface of the product is framed, coat it with a layer of varnish on top. Leave the cover to dry. If the edges of the napkin are beyond the cover, sand them. The end sides of the craft are tinted with acrylic paint, selected to match the napkins. Finally, cover the cover with another layer of varnish. The product is ready, the master class "Passport cover using decoupage technique" is over. Enjoy your work!