For everyone who likes to be bright, fashionable, stand out from the gray crowd, there is a great opportunity - weaving accessories from Loom bands elastic bands. Do-it-yourself bracelets for beginners can be made in many ways. The simplest are described below.
Weaving options and product design
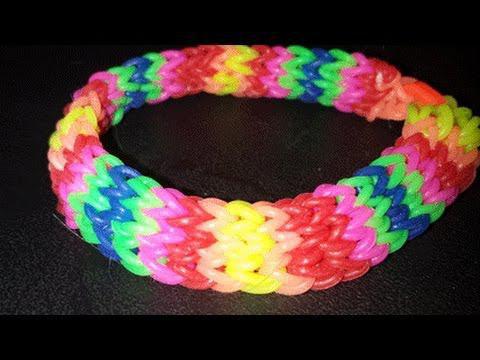
If you carefully look at the photos of these bright jewelry, you can understand that the patterns are made in different ways. The pattern can be determined both by the type of interweaving of elements, and by color combinations. Thanks to the wide range of shades of elastic bands, it is enough to master only the simplest schemes to make beautiful bracelets with your own hands. For beginners, it is quite affordable. Using combinations of colors in any order, even one pattern is easy to create a wide variety of wrist jewelry.
Materials and fixtures
For work you will need:
- Rubber bands for bracelets.
- Plastic lock for fastening the product in a ring.
- A fixture for weaving (machine, slingshot, fork), although you can work just with your fingers.
- A hook (a usual knitting is enough, but special ones are also sold) for the convenience of throwing stitches.
All of the above is easy to purchase separately, but you can buy a set for bracelets. In addition to the necessary tools, it includes elastic bands in a large number and assortment of colors. So this option is convenient. By the way, a great idea for a gift to a girlfriend.
Simple do-it-yourself bracelets for beginners on fingers
If you decide to exclusively try a new lesson and are not going to get involved in it, it is quite possible to do without buying any additional tools. Get only rubber bands for bracelets and get to work. For the first experience, take the elements of the same color. The sequence of actions will be as follows:
- On the middle and index finger put on the first gum in the form of a figure eight.
- Take the second and put on both fingers without crossing.
- Do the same with the third.
- First, pry the right side of the lower gum-eight and throw it over the top, removing it from the finger to the middle.
- Do the same with the left side of the lower gum.
- Put another element on top of the rest without crossing.
- Now repeat the previous three steps again. Do this until you get the right length.
- Connect the last loop with the first real (the figure of eight can be removed) using a plastic fastener in the form of a figure eight or a ring (which one you buy).
All is ready.
Elastic weaving: slingshot bracelets
The same sequence of steps is easy to perform using a special device. This is much more convenient, as the hands always remain free. In addition, slingshot bracelets can be made in yet another way:
- Put the first eraser on the eight horns of the slingshot.
- Put on the second without crossing.
- Take several elastic bands of the same or different colors and place on any of the horns.
- Put another elastic band (better the same color as the first two) put on the ring on both horns;
- Remove the right and left parts of the first crossed gum through the tops of the horns to the middle, as you did in the previous method on the fingers.
- Repeat to the desired length.
- Put the clasp.
The product is completed.
Fork weaving
If you take a plastic disposable cutlery and remove the middle cloves, then it is easy to use this tool like a slingshot or fingers. On four cloves, you can get other patterns, while the bracelet will be wider and more spectacular. Work as follows:
- Take the gum and fold it in half in the form of two rings, cross them with a figure of eight and put on the two middle prongs of the fork.
- Do the same for the leftmost and second, as well as the rightmost and third, if you number them from left to right. You will get a fork braided with rings, and on the middle two cloves the rings will be in two rows.
- Fold the next gum in half, but do not cross, and immediately put on the middle teeth of the fork.
- Carefully pick up the lower loops from the middle ones and throw them through the tops back by the cloves.
- Take a couple more elastic bands and, folding them in half, as in the previous steps, put on two teeth on the left and two on the right.
- Throw the lower loops on each clove sequentially through the vertices back beyond the plane of the fork.
- Repeat steps 3 through 6 to the desired length of the bracelet.
- Remove the loops from the extreme teeth to the nearest middle ones.
- Follow steps 3 and 4.
- From the remaining two loops, transfer one to the other. Remove from the fork and insert the lock. It is more convenient to use a hook to thread a plastic element into the loops. Pass the other end into the first loop of the bracelet.
You have a wide product with a neat pattern. This option can be performed both from the same color, and sequentially alternating different shades. It is worth noting that for the convenience of removing loops, it is better to use a toothpick. It is much easier than just fingers to pry off small rings.
Weaving on the machine
Accessories for bracelets are now represented by a wide range of accessories and parts. If you look at a large set for this type of creativity, you will see that, in addition to slingshots and hooks, plastic machines enter there. Usually they look like coasters with removable columns.
For each product, you can put a certain number of sticks in one or more rows. To work on the machine, any of the above weaving methods is suitable. For those that were offered for fingers and slingshots, you need to use two columns on the machine, and for the latter, proposed for the fork, respectively, four.
As you can see, do-it-yourself bracelets for beginners are made very easy. The listed methods can be implemented using any tool or only on the fingers. Choose your favorite weaving method and fixture. Create fashion jewelry yourself.