Choosing a new hobby? Want to do some textile souvenirs? After reading the article, you will learn how to sew dolls with your own hands. A master class will help to make them yourself. It's about smart little men with a round head.
What is this souvenir?
Textile dolls come in many forms. From the point of view of manufacturing technology, they are made with and without a frame. The heads also perform several forms: round with a flat face, semi-volume, elongated and spherical. The latter are called pumpkin heads. Their characteristic feature is that the details of the head are petals that are interconnected. One of the seams usually passes through the center of the face, being a line of symmetry. Patterns of textile pumpkin head dolls can be done independently. The main thing is to understand the principle. The head is sewn in four or six parts either in the form of a sphere with a protrusion of the nose. In the second case, the parts used are already asymmetrical.
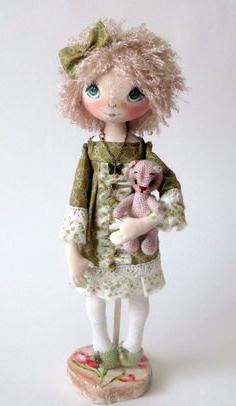
As for the doll itself, it can be made as a pendant, sitting or standing. To fix the parts of the body in an upright position, a frame and a solid base are often used. If the character is sitting, it is enough to stitch the legs in the knees with an additional seam, dividing the part into two parts. Do the same with the hands to bend them. In addition, you should not stuff these elements too tight, otherwise they will not be able to bend at all. Tightly fill the head and neck.
Manufacturing technology
To create a textile doll, you need the following materials and tools:
- white or beige fabric for the head and other parts of the body;
- material for the manufacture of dresses;
- yarn, thread or something else for hair;
- threads for embroidery or paint for drawing face elements;
- cotton wool, synthetic winterizer, holofiber for stuffing;
- paper for a pattern;
- scissors, pins, needle, pencil, sewing chalk;
- decor for clothes (beads, sequins, satin ribbons, lace).
You always need to start with the basics. If you have a ready-made template on your computer, the pattern of a pumpkin head doll is very easy. Print the sample to the desired scale, cut out the details and place it on the fabric. If you don’t have a printer, attach the glass with the transparent film glued (the file from the paper folder will do) to the monitor, circle the parts with a pen.
When the paper pattern elements are ready, do the following:
- Fold the fabric in several layers (according to the number of petals), attach the part with pins along the oblique, circle with allowance for seams. Cut along the contour. The same can be done with each element individually. Choose your preferred method.
- You can number the details.
- Sew two items.
- Add the following.
- When the "bag" is ready, it remains to turn it on the front side and fill it with padding polyester.
- Sew in the hole or sew the neck first. For strength, you can insert a rod into the head so that it does not lean to one side if the neck is not tightly packed.
- The remaining parts are carried out according to one principle: sew on the wrong side, twist, fill with stuffing material, sew to the base. Ready-made template allows you to significantly speed up the work.
Pumpkin-head doll (pattern): master class
Using schemes helps a newcomer to complete a product quickly, however, if you already have experience in the field of needlework, you may want to independently develop the appearance, proportions of the character, in a word, create an individual image.
It’s also easy to make patterns of textile pumpkin heads with your own hands. The main thing is to correctly build the details from which the ball will be sewn. The shape of the petal is easy to make as follows:
- Fold a small rectangle of paper in half vertically.
- Bend the workpiece horizontally.
- Cut the excess diagonally in the shape of an arc.
- Expand the part.
Hands, feet and a body with a neck are also easy to build by ourselves in any proportions. The pattern of the pumpkin head doll is shown in the photo below.
When all the parts are ready, begin to lay them on the fabric. Those elements that are needed in several copies are best performed at a time on a folded flap.
Pattern of pumpkin head doll with nose
If you want to make a more realistic character, use a different template. In this embodiment, the nose will be stitched immediately. It does not need to be drawn or sewn separately. To reduce the number of actions, it is better to stitch it immediately.
A four-piece pumpkin head doll pattern is shown in the figure below.
How to make your head realistic
When the basis is completed, you need to give the character a specific expression, emotion. This largely determines which image will be created. Eyes, lips, eyebrows are made in three ways:
- Embroidered.
- Apply by paint.
- Ready elements are glued.
Plastic eyes and even cilia can be bought at the needlework store. If you decide to paint with a brush, it is worth using acrylic paints (there are special ones for the fabric). To keep the color brightness, it is better to first apply PVA glue to the surface. It is better to embroider a face before cutting parts, since a large flap is conveniently fastened in a hoop.
As for hair, they are usually made from yarn. Also use floss or artificial hair. First, a hairstyle is formed, which is then fixed on the head.
It is also worth mentioning how to get a realistic doll skin color. If you have not found a fabric of a suitable shade, the desired color can easily be done independently by dropping the material into the infusion (solution) of tea or coffee. The latter will also give a pleasant aroma. It is better to stain a large flap, but the shade should be checked on a small one. Samples will help determine the strength of the infusion and the exposure time in it. After the fabric has dried, but not completely, it should be ironed slightly moist so that the shade does not fade and does not smear.
Which outfit to choose
You have a pumpkin-head doll pattern. Using it, you can easily make a ball that you turn into a realistic head. Now you should think about clothes.
It is sewn separately, but is usually made non-removable, so details can even be glued directly to the base.
For costume ideas, use the following:
- long puffy dress with lace;
- sundress;
- national clothes;
- trousers and shirt for a boy doll;
- coat for the Snow Maiden;
- image of fairies, princesses;
- theme series "Seasons"
- dolls of different professions (cook, artist).
In a word, you can create any outfits. Everything is limited by your imagination.
You have learned how to make textile dolls with your own hands. The master class is a very effective learning tool, so you can easily make your own original souvenir or interior decor using photographs and templates. Prepare the material, print out the templates, and get started.